SlideShare a Scribd company logo
1 of 77
Download to read offline
SECTION : 1C1
1.4L/1.6L DOHC ENGINE MECHANICAL
CAUTION : Disconnect the negative battery cable before removing or installing any electrical unit or when a tool
or equipment could easily come in contact with exposed electrical terminals. Disconnecting this cable will help
prevent personal injury and damage to the vehicle. The ignition must also be in LOCK unless otherwise noted.
TABLE OF CONTENTS
SPECIFICATIONS 1C1–2
. . . . . . . . . . . . . . . . . . . . . . . . .
Engine Specifications 1C1–2
. . . . . . . . . . . . . . . . . . . . .
Fastener Tightening Specifcations 1C1–5
. . . . . . . . . .
SPECIAL TOOLS 1C1–7
. . . . . . . . . . . . . . . . . . . . . . . . . .
Special Tools Table 1C1–7
. . . . . . . . . . . . . . . . . . . . . . .
COMPONENT LOCATOR 1C1–9
. . . . . . . . . . . . . . . . . . .
Cylinder Head 1C1–9
. . . . . . . . . . . . . . . . . . . . . . . . . . . .
Cylinder Block 1C1–10
. . . . . . . . . . . . . . . . . . . . . . . . . . .
Intake & Exhaust Manifold 1C1–12
. . . . . . . . . . . . . . . .
Timing Belt 1C1–13
. . . . . . . . . . . . . . . . . . . . . . . . . . . . .
Engine Mounting 1C1–14
. . . . . . . . . . . . . . . . . . . . . . . .
MAINTENANCE AND REPAIR 1C1–15
. . . . . . . . . . . . .
ON–VEHICLE SERVICE 1C1–15
. . . . . . . . . . . . . . . . . . .
Engine Cover 1C1–15
. . . . . . . . . . . . . . . . . . . . . . . . . . .
Camshaft Cover 1C1–15
. . . . . . . . . . . . . . . . . . . . . . . . .
Intake Manifold 1C1–16
. . . . . . . . . . . . . . . . . . . . . . . . . .
Exhaust Manifold 1C1–20
. . . . . . . . . . . . . . . . . . . . . . . .
Cylinder Head and Gasket 1C1–21
. . . . . . . . . . . . . . . .
Camshaft 1C1–29
. . . . . . . . . . . . . . . . . . . . . . . . . . . . . . .
Timing Belt Check and Adjust 1C1–30
. . . . . . . . . . . . .
Timing Belt 1C1–34
. . . . . . . . . . . . . . . . . . . . . . . . . . . . .
Oil Pan 1C1–38
. . . . . . . . . . . . . . . . . . . . . . . . . . . . . . . . .
Oil Pump 1C1–40
. . . . . . . . . . . . . . . . . . . . . . . . . . . . . . .
Engine Mount 1C1–43
. . . . . . . . . . . . . . . . . . . . . . . . . . .
Camshaft Gears 1C1–45
. . . . . . . . . . . . . . . . . . . . . . . . .
Rear Timing Belt Cover 1C1–46
. . . . . . . . . . . . . . . . . . .
Engine 1C1–48
. . . . . . . . . . . . . . . . . . . . . . . . . . . . . . . . .
Pistons and Rods 1C1–53
. . . . . . . . . . . . . . . . . . . . . . . .
UNIT REPAIR 1C1–58
. . . . . . . . . . . . . . . . . . . . . . . . . . . .
Cylinder Head and Valve Train Components 1C1–58
.
Crankshaft 1C1–65
. . . . . . . . . . . . . . . . . . . . . . . . . . . . . .
Crankshaft Bearing and Connecting Rod
Beadings – Gauging Plastics 1C1–74
. . . . . . . . . . . .
GENERAL DESCRIPTION AND SYSTEM
OPERATION 1C1–77
. . . . . . . . . . . . . . . . . . . . . . . . . . . .
Cylinder Head and Gasket 1C1–77
. . . . . . . . . . . . . . . .
Crankshaft 1C1–77
. . . . . . . . . . . . . . . . . . . . . . . . . . . . . .
Timing Belt 1C1–77
. . . . . . . . . . . . . . . . . . . . . . . . . . . . .
Oil Pump 1C1–77
. . . . . . . . . . . . . . . . . . . . . . . . . . . . . . .
Oil Pan 1C1–77
. . . . . . . . . . . . . . . . . . . . . . . . . . . . . . . . .
Exhaust Manifold 1C1–77
. . . . . . . . . . . . . . . . . . . . . . . .
Intake Manifold 1C1–77
. . . . . . . . . . . . . . . . . . . . . . . . . .
Camshaft 1C1–77
. . . . . . . . . . . . . . . . . . . . . . . . . . . . . . .
1C1 – 2I1.4L/1.6L DOHC ENGINE MECHANICAL
DAEWOO V–121 BL4
SPECIFICATIONS
ENGINE SPECIFICATIONS
Application Description (Manual and Automatic)
1.4L DOHC 1.6L DOHC
General Data:
Engine Type F14D F16D
Displacement 1399 cm3 1598 cm3 (97.51 in3)
Bore Stroke 77.9 x 73.4 mm (3.01 in. x 2.89 in.) 79.0 x 81.5 mm (3.1 in. X 3.21 in.)
Compression Ratio 9.5 ± 0.2:1 9.5 ± 0.2:1
Firing Oder 1–3–4–2 1–3–4–2
Cylinder Bore:
Diameter 77.9 mm (3.07 in.) 79 mm (3.1 in.)
Out of Round (Maximum) 0.0065 mm (0.00025 in.) 0.0065 mm (0.00025 in.)
Taper (Maximum) 0.07 x 30° 0.0065 mm (0.00025 in.)
Pistion:
Diameter 77.87 mm (3.07 in.) 78.970 mm (3.1090 in.)
Clearance to Bore 0.030 mm (0.0012 in.) 0.030 mm (0.0012 in.)
Piston Rings:
Ring, End Gap:
Top Compression
2nd Compression
0.15–0.30 mm
(0.0059–0.0118 in.)
0.3–0.5 mm (0.0118–0.0197 in.)
0.2–0.3 mm (0.008–0.012 in.)
0.5–0.6 mm (0.02–0.024 in.)
Groove Clearance:
Top Compression
2nd Compression
0.05–0.09 mm
(0.00197–0.00354 in.)
0.06–0.1 mm
(0.00236–0.00393 in.)
0.016 mm (0.0006 in.)
0.066 mm (0.0026 in.)
Piston Pin:
Diameter 18.00 mm (0.708 in.) 18.00 mm (0.708 in.)
Pin Off–Set 0.5 ± 0.1 mm
(0.0197 ± 0.00787 in.)
0.7–0.9 mm (0.028–0.036 in.)
Camshaft:
Lift Intake 7.2 mm (0.283 in.) 8.5 mm (0.335 in.)
Lift Exhaust 7.2 mm (0.283 in.) 8.5 mm (0.335 in.)
End Play 0.1–0.25 mm (0.00394–0.00787 in.) 0.10–0.25 mm (0.004–0.0089 in.)
Journal OD:
No. 1
No. 2
No. 3
No. 4
No. 5
29.94 mm (1.179 in.)
26.94 mm (1.061 in.)
30 mm (1.18 in.)
27 mm (1.06 in.)
27 mm (1.06 in.)
27 mm (1.06 in.)
27 mm (1.06 in.)
1.4L/1.6L DOHC ENGINE MECHANICAL 1C1 – 3
DAEWOO V–121 BL4
Application Description (Manual and Automatic)
1.4L DOHC 1.6L DOHC
Crankshaft:
Main Journal:
Diameter (All)
Taper (Maximum)
Out of Round (Maximum)
55 mm (2.71 in.)
0.005 mm (0.0001 in.)
0.004 mm (0.0001 in.)
54.982–54.994 mm
(2.164–2.165 in.)
0.005 mm (0.0001 in.)
0.004 mm (0.0001 in.)
Main Bearing Clearance (All) 0.026–0.042 mm (0.001–0.002 in.) 0.026–0.042 mm (0.001–0.002 in.)
Crankshaft End Play 0.1 mm (0.003 in.) 0.05–0.28 mm (0.002–0.011 in.)
Connecting Rod Journal:
Diameter (All) 43 mm (1.69 in.) 42.971–42.987 mm
(1.691–1.692 in.)
Taper (Maximum) 0.005 mm (0.0001 in.) 0.005 mm (0.0001 in.)
Out of Round (Maximum) 0.004 mm (0.0001 in.) 0.004 mm (0.0001 in.)
Rod Bearing Clearance (All) 0.019–0.070 mm
(0.0007–0.0028 in.)
0.019–0.071 mm
(0.0007–0.0028 in.)
Rod Side Clearance 0.070–0.242 mm
(0.0027–0.009 in.)
0.070–0.242 mm
(0.0027–0.009 in.)
Valve System:
Valve Lash Compensators Hydraulic Hydraulic
Face Angle (All) 45°~45.25° 90°~90.5°
Seat Angle (All) 44.5°~45° 89°~90°
Seat Runout (Maximum, All) 0.05 mm (0.002 in.) 0.05 mm (0.002 in.)
Face Runout (Maximum, All) 0.03 mm (0.0012 in.) 0.03 mm (0.0012 in.)
Seat Width:
Intake
Exhaust
1.17–1.57 mm (0.046–0.062 in.)
1.4–1.8 mm (0.055–0.071 in.)
1.17–1.57 mm (0.046–0.062 in.)
1.4–1.8 mm (0.055–0.071 in.)
Valve Guide Inside Diameter (All) 6.00–6.02 mm (0.236–0.237 in.) 6.00–6.02 mm (0.236–0.237 in.)
Valve Stem Diameter (All) 6 mm (0.236 in.) 6 mm (0.236 in.)
Valve Diameter (All):
Intake
Exhaust
28.57 mm (1.125 in.)
27.24 mm (1.074 in.)
28.6 mm (1.126 in.)
27.2 mm (1.072 in.)
Valve Spring Loads:
Valve Open
Valve Closed
580 ± 29N (426 ± 21 lbs)
260 ± 13N (191 ± 9.6 lbs)
580–26N (428–19 lbs)
@23.0 mm(0.90 in.)
260”13N(192” 9 lbs) @
32.0mm(1.25 in.)
Valve Spring Free Length 41.2 mm (1.622 in.) 41.2 mm (1.622 in.)
Oil Pump:
Gap Between Oil Pump Body and Out
Rotor
0.400~0.484 mm
(0.0157~0.019 in.)
0.400~0.484 mm (0.0157~0.019 in.)
Out Rotor Side Clearance 0.045~0.100 mm
(0.0018~0.0039 in.)
0.045~0.100 mm (0.02~0.004 in.)
1C1 – 4I1.4L/1.6L DOHC ENGINE MECHANICAL
DAEWOO V–121 BL4
Application Description (Manual and Automatic)
1.4L DOHC 1.6L DOHC
Inner Rotor Side Clearance 0.035~0.085 mm (0.001~0.003 in.) 0.035~0.085 mm (0.001~0.003 in.)
Relief Valve Spring Free Length 81 mm (3.2 in.) 81 mm (3.2 in.)
Sealants and Adhesives:
Rear Main Bearing Cap GE p/n RTV 159
Camshaft Carrier to Cylinder Head HN 1581 (Loctite® 515)
Oil Pan Bolts HN 1256 (Loctite® 242)
Oil Pump Bolts HN 1256 (Loctite® 242)
Oil Pan Pickup Tube Bolts HN 1256 (Loctite® 242)
Oil Gallery Plug HN 1256 (Loctite® 242)
Coolant Jacket Caps and Plugs
(Freeze Plugs)
HN 1756 (Loctite® 176)
Exhaust Manifold Studs/Nuts Anti–seize Compound (HMC Spec HN1325)
1.4L/1.6L DOHC ENGINE MECHANICAL 1C1 – 5
DAEWOO V–121 BL4
FASTENER TIGHTENING SPECIFCATIONS
Application NSm Lb–Ft Lb–In
Air Cleaner Housing Bolts 10 – 89
Camshaft Cap Bolts 16 12 –
Camshaft Cover Nuts 10 – 89
Connecting Rod Bearing Cap Bolts 25
+ 30° + 15°
18
+ 30° + 15°
–
Coolant Temperature Sensor 20 15 –
Crankshaft Bearing Cap Bolts 50
+ 45° + 15°
37
+ 45°+ 15°
–
Crankshaft Cover Nuts 5~8 – 44~71
Crankshaft Pulley Bolt 95 NSm
+ 30° + 15°
– –
Cylinder Head Bolts (Cylinder Head Mounting Bolts) 25 + 70°
+ 70° + 50°
18 + 70°
+ 70° + 50°
–
Direct Ignition System Coil Mounting Bolts 10 – 89
Direct Ignition System Coil Mounting Bracket Bolts 10 – 89
Engine Mount Attaching Bolts 30 22 –
Engine Mount Bracket Attaching Bolts/Nuts 50 37 –
Exhaust Camshaft Gear Bolt 67.5 49 –
Exhaust Flex Pipe–to–Catalytic Converter or Connecting Pipe
Retaining Nut
35 26 –
Exhaust Flex Pipe–to–Exhaust Manifold Retaining Nuts 35 26 –
Exhaust Gas Recirculation Valve Adapter Bolts 25 18 –
Exhaust Manifold Heat Shield Bolts 15 11 –
Exhaust Manifold Retaining Nuts 25 18 –
Flexible Plate Bolts 60 44 –
Flexible Plate Inspection Cover Bolts 10 – 89
Flywheel Bolts 35
+ 30° + 15°
25
+ 30° + 15°
–
Flywheel Inspection Cover Bolts 12 – 106
Front Timing Belt Cover Bolts (Upper and Lower) 10 – 89
Fuel Rail Assembly Retaining Bolts 25 18 –
Fuel Rail Retaining Bolts 25 18 –
Generator Upper Retaining Bolt 20 15 –
Intake Camshaft Gear Bolt 67.5 49 –
Intake Manifold Retaining Bolts/Nuts 25 18 –
Intake Manifold Support Bracket Lower Bolt 25 18 –
Intake Manifold Support Bracket Upper Bolts 25 18 –
Lower Front Timing Belt Cover Bolts 10 – 89
Oil Pan Flange Bolts 75 55 –
Oil Pan Retaining Bolts 10 – 89
Oil Pan Drain Plug 35 26 –
OIl Pressure Switch 40 30 –
1C1 – 6I1.4L/1.6L DOHC ENGINE MECHANICAL
DAEWOO V–121 BL4
Application Lb–In
Lb–Ft
NSm
Oil Pump Bolts 10 – 89
Oil Pump Rear Cover Bolts 8 – 71
Oil Pump Retaining Bolts 10 – 89
Oil Suction Pipe or Support Bracket Bolts 10 – 89
Rear Timing Belt Cover Bolts 10 – 89
Safety Relief Valve Bolt 30 3022 –
Spark Plugs 25 18 –
Thermostat Housing Mounting Bolts 20 15 –
Timing Belt Automatic Tensioner Bolts 25 18 –
Timing Belt Idler Pulley Bolt 40 30 –
Transaxle Bell Housing Bolts 75 55 –
Transaxle Torque Converter Bolts 45 33 –
Upper Front Timing Belt Cover Bolts 10 – 89
Water Pump Retaining Bolts 10 – 89
1.4L/1.6L DOHC ENGINE MECHANICAL 1C1 – 7
DAEWOO V–121 BL4
SPECIAL TOOLS
SPECIAL TOOLS TABLE
J–42492
Timing Belt
Adjuster
KM–470–B
Angular Torque
Gauge
J–28467–B
Engine Assembly
Support Fixture
KM–427
Piston Pin
Service Set
KM–571–B
Gauge
KM–340–0
Cutter Set
Includes: KM–340–7
Guide Drift
KM–340–13
Cutters
KM–340–26
Cutters
KM–348
Valve Spring
Compressor
KM–653
Adapter
1C1 – 8I1.4L/1.6L DOHC ENGINE MECHANICAL
DAEWOO V–121 BL4
KM–805
Valve Guide
Reamer
KM–412
Engine Overhaul
Stand
KM–498–B
Pressure Gauge
KM–635
Crankshaft Rear Oil
Seal Installer
J–36792
Crankshaft Rear Oil
Seal Installer
KM–135
Adapter
1.4L/1.6L DOHC ENGINE MECHANICAL 1C1 – 9
DAEWOO V–121 BL4
COMPONENT LOCATOR
CYLINDER HEAD
1. Oil Filler Cap
2. Engine Cover
3. Camshaft Cover
4. Camshaft Cover Gasket
5. Camshaft Cover Bolt
6. Hydraulic Tappet Adjuster
7. Valve Key
8. Valve Spring Cap
9. Valve Spring
10. Valve Stem Seal
11. EGR Vaccum Hose
12. EGR Valve
13. EGR Valve Gasket
14. EGR Valve Adaptor
15. EGR Valve Adaptor Gasket
16. Cylinder Head
17. Front Camshaft Cap
18. Valve Guide
19. Plug
20. Freeze Plug
21. Oil Duct Cap
22. Intake Valve
23. Exhaust Valve
24. Cylinder Head Gasket
25. Engine Coolant Temperature Sensor
26. Heat Take Off Pipe
27. Camshaft
28. Camshaft Seal
29. Thermostat
1C1 – 10I1.4L/1.6L DOHC ENGINE MECHANICAL
DAEWOO V–121 BL4
CYLINDER BLOCK
1.4L/1.6L DOHC ENGINE MECHANICAL 1C1 – 11
DAEWOO V–121 BL4
1. Piston Ring Set
2. Piston
3. Piston Pin
4. Connecting Rod
5. Connecting Rod Bearing Set
6. Oil Level Gauge Stick
7. Gauge Stic Tube
8. Sleeve
9. Clutch Housing Sleeve
10. Cylinder Block
11. Plug
12. Gap
13. Bypass Valve
14. Connecting Piece
15. Oil Filter
16. Oil Pump Body Gasket
17. Water Inlet Neck
18. Knock Sensor
19. Fly Wheel (M/T)
20. Flexible Plate (A/T)
21. Shaft Seal Ring
22. Crank Shaft Upper Bearing Set
23. Crank Shaft
24. Crank Shaft Lower Bearing Set
25. Transmitter Disc
26. Crankshaft Bearing Cap
27. Oil Pan
28. Threaded Ring
29. Washer
30. Oil Pan Drain Plug
31. Oil Pump
32. Oil Pump Cover
33. Oil Pump Inner Rotor
34. Oil Pump Outer Rotor
35. Oil Pump Plug
36. Shaft Sealing
37. Pressure Relief Valve Plunger
38. Relief Valve Spring
39. Sealing
40. Relief Valve
41. Oil Pressure Switch
42. Sleeve
43. Oil Suction Pipe Bracket
44. Oil Suction Pipe
45. Sealing
1C1 – 12I1.4L/1.6L DOHC ENGINE MECHANICAL
DAEWOO V–121 BL4
INTAKE & EXHAUST MANIFOLD
1. Oxygen Sensor
2. Heat Shield
3. Exhaust Manifold
4. Exhaust Manifold Gasket
5. Intake Manifold
6. Main Throttle Idle Actuator (MTIA) Gasket
7. MTIA
8. Clamp
9. Intake Air Tube
10. Breethe Hose
11. Aircleaner Assembly
12. Aircleaner Upper Hosing
13. Aircleaner Eliment
14. Aircleaner Lower Housing
15. Resoinator
16. Air Intet Hose
1.4L/1.6L DOHC ENGINE MECHANICAL 1C1 – 13
DAEWOO V–121 BL4
TIMING BELT
1. Water Pump Sealing
2. Water Pump
3. Timing Belt Rear Cover
4. Camshaft Position Sensor
5. Auto Temsioner
6. Camshaft Gear
7. Idler pulley
8. Crankshaft Gear
9. Torque Roll Axis Support
10. Timing Belt
11. Timing Belt Front Upper Cover
12. Timing Belt Front Lower Cover
13. Crankshaft Pulley
14. Crankshaft Position Sensor
1C1 – 14I1.4L/1.6L DOHC ENGINE MECHANICAL
DAEWOO V–121 BL4
ENGINE MOUNTING
1. Rear Power Unit Damping Block
2. Rear Transaxle Mounting Bracket (A/T)
3. Rear Transaxle Mounting Bracket (M/T)
4. Transaxle Mounting Cage
5. Transaxle Mounting Bracket (M/T)
6. Transaxle Mounting Bracket (A/T)
7. Engine Undercover
8. Hydro Mounting
9. Engine Mounting Bracket
1.4L/1.6L DOHC ENGINE MECHANICAL 1C1 – 15
DAEWOO V–121 BL4
MAINTENANCE AND REPAIR
ON–VEHICLE SERVICE
ENGINE COVER
Removal Procedure
1. Remove the bolts and nuts from the engine cover.
2. Remove the engine cover.
Installation Procedure
1. Position the engine cover on the engine.
2. Install the engine cover bolts and nuts.
Tighten
Tighten the engine cover bolts and nuts to 10 NSm(89
lb–ft).
CAMSHAFT COVER
Removal Procedure
1. Disconnect the negative battery cable.
2. Remove the engine cover. Refer to ”Engine” in this
section.
3. Remove the breather hose, ventilation hose and
cam position sensor wiring connector from the cam-
shaft cover.
1C1 – 16I1.4L/1.6L DOHC ENGINE MECHANICAL
DAEWOO V–121 BL4
4. Remove the ignition wires from the spark plug.
5. Remove the camshaft cover bolts and camshaft
cover.
6. Remove the camshaft cover gasket.
Installation Procedure
1. Install the camshaft cover gasket on the camshaft
cover.
2. Position the camshaft cover on the engine block.
3. Install the camshaft cover bolts.
Tighten
Tighten the camshaft cover bolts to 10 NSm(89 lb–ft).
4. Install the ignition wires to the spark plugs and con-
nect the breather hose, ventilation hose and cam
position sensor wiring connector to the canshaft
cover.
5. Install the engine cover.
6. Connect the negative battery cable.
INTAKE MANIFOLD
Removal Procedure
1. Remove the fuel pump fuse.
2. Start the engine. After it stalls, crank the engine for
10 seconds to rid the fuel system of fuel pressure.
3. Disconnect the negative battery calbe.
4. Drain the engine coolant. Refer to Section 1D, En-
gine Cooling.
5. Remove the engine cover and throttle body. Refer
to Section 1F, Engine Control.
1.4L/1.6L DOHC ENGINE MECHANICAL 1C1 – 17
DAEWOO V–121 BL4
6. Disconnect the intake manifold pressure sensor
connector, attaching bolt and vaccum hose.
7. Disconnect the intake manifold air temperature sen-
sor(MAT) connector and remove the MAT sensor.
8. Remove the intake manifold upper bracket.
9. Remove the fule rail bolt and the fuel rail.
10. Remove the all the vaccum hoses from the intake
manifold including PCV hose and brake booster
vaccum hose.
11. Remove the exhaust gas recirculation(EGR) pipe.
1C1 – 18I1.4L/1.6L DOHC ENGINE MECHANICAL
DAEWOO V–121 BL4
12. Remove the alternator. Refer to Section 1E, Engine
Electrical.
13. Remove the intake manifold support bracket.
14. Remove the intake manifold retaining bolts/nuts in
the sequence shown.
15. Remove the intake manifold and gasket.
16. Clean the sealing surfaces of the intake manifold
and the cylinder head.
Installation Procedure
1. Install the fule rail.
Tighten
Tighten the fule rail bolts to 25 NSm (18 lb–ft).
2. Install the new intake manifold gasket and intake
manifold.
Tighten
Tighten the intake manifold bolts and nuts to 25 NSm
(18 lb–ft).
3. Install the exhaust gas recirculation(EGR) pipe.
Tighten
Tighten the exhaust gas recirculation(EGR) pipe bolts
to 10 NSm (89 lb–ft).
1.4L/1.6L DOHC ENGINE MECHANICAL 1C1 – 19
DAEWOO V–121 BL4
4. Install the intake manifold support bracket.
Tighten
Tighten the intake manifold support bracket upper
bolts to 25 NSm (18 lb–ft) and lower bolts to 45 NSm
(33 lb–ft).
5. Install the alternater.
6. Install the fuel rail.
7. Install the fuel rail bolts.
8. Install the intake manifold upper bracket.
9. Install the intake manifold upper bracket bolts.
10. Install the intake manifold air temperature sen-
sor(MAT) and connect the MAT sensor connecter.
11. Install the intake manifold pressure sensor and vac-
cum hose.
1C1 – 20I1.4L/1.6L DOHC ENGINE MECHANICAL
DAEWOO V–121 BL4
12. Install the throttle body and engine cover.
13. Refill the engine cooling system. Refer to Section
1D, Engine Cooling.
14. Install the fuel pump fuse and connect the negative
battery cable.
EXHAUST MANIFOLD
Removal Procedure
1. Disconnect the negative battery cable.
2. Disconnect the oxygen sensor connecter.
3. Remove the exhaust manifold heat shield.
4. Remove the exhaust manifold nuts from the pup
converter.
5. Remove the exhaust manifold retaining nuts in the
sequence shown and remove the exhaust manifold.
6. Remove the exhaust manifold gasket.
7. Clean the sealing surfaces of the exhaust manifold
and the cylinder head.
1.4L/1.6L DOHC ENGINE MECHANICAL 1C1 – 21
DAEWOO V–121 BL4
Installation Procedure
1. Install the exhaust manifold and gasket.
2. Install the exhaust manifold retaining nuts and tight-
en in the sequence shown.
Tighten
Tighten the exhaust manifold retaining nuts to 25 NSm
(18 lb–ft).
3. Install the exhaust manifold nuts to the catalytic
converter.
Tighten
Tighten the exhaust manifold nuts to 40 NSm (30 lb–
ft).
4. Install the heat shield.
Tighten
Tighten the the heat shield bolts to 13 NSm (10 lb–ft).
5. Connect the oxygen sensor connecter.
6. Connect the negative battery cable.
CYLINDER HEAD AND GASKET
Tools Required
J–42492 Timing Belt Adjuster
KM–470–B Angular Torque Gauge
Removal Procedure
1. Remove the fuel pump fuse.
2. Start the engine. After it stalls, crank the engine for
10 seconds to rid the fuel system of fuel pressure.
3. Disconnect the negative battery calbe.
4. Disconnect the electronic control module(ECM)
ground terminal from the intake manifold.
5. Drain the engine coolant. Refer to Section 1D, En-
gine Cooling.
1C1 – 22I1.4L/1.6L DOHC ENGINE MECHANICAL
DAEWOO V–121 BL4
6. Drain the engine oil and remove the camshaft cov-
er. Refer to this section.
7. Remove the air cleaner housing.
8. Remove the throttle cable and inlet/outlet coolant
hoses.
9. Remove the thermostat upper hose.
10. Remove the intake manifold pressure sensor, in-
take air temperature sensor and coolant tempera-
ture sensor.
11. Remove the intake manifold support bracket.
1.4L/1.6L DOHC ENGINE MECHANICAL 1C1 – 23
DAEWOO V–121 BL4
12. Remove the all the vaccum hoses from the intake
manifold including brake booster vaccum hose.
13. Remove the ignition cables from the spark plugs.
14. Remove the direct ignition coil(DIS) and the bracket
from the cylinder head.
15. Remove the serpentine accessory drive belt by ro-
tating the tensioner pulley bolt to clockwise using
DW110–080. Refer to Section 6B, Power Steering
Pump.
16. Remove the front passenger side tire. Refer to Sec-
tion 2E, Tires and Wheels.
17. Remove front wheel housing shield.
18. Remove the upper front timing belt cover bolts.
19. Remove the upper front timing belt cover.
20. Align the camshaft gear timing marks.
21. Remove the crank shaft pulley.
22. Remove the lower front timing belt cover bolts and
cover.
1C1 – 24I1.4L/1.6L DOHC ENGINE MECHANICAL
DAEWOO V–121 BL4
23. Slightly loosen the water pump retaining bolts.
24. Rotate the water pump counterclockwise using the
timing belt adjuster J–42492 to relieve the timing
belt tension.
25. Remove the timing belt.Refer to ”Timing Belt” in
this section.
26. Remove the engine mounting bracket.Refer to ”En-
gine Mount” in this section.
27. Remove the camshaft cover. Refer to ”Camshaft
Cover” in this section.
28. While holding the intake camshaft firmly in place,
remove the intake camshaft gear bolt and gear.
29. While holding the exhaust camshaft firmly in place,
remove the exhaust camshaft gear bolt and gear.
Notice : Take extreme care to prevent any scratches,
nicks or damage to the camshafts.
30. Remove the timing belt automatic tensioner.
31. Remove the timing belt idler pulley.
32. Remove the right engine mount. Refer to ”Engine
Mount” in this section.
33. Remove the rear timing belt cover.
1.4L/1.6L DOHC ENGINE MECHANICAL 1C1 – 25
DAEWOO V–121 BL4
34. Remove the intake/exhaust manifold. Refer to ”In-
take/Exhaust Manifold” in the section.
35. Remove the cylinder head bolts gradually in the
sequence shown and remove the cylinder head.
Notice : Prevent any engine oil or coolant from entering
the cylinders when removing the cylinder head.
36. Remove the cylinder head gasket.
Cleaning Procedure
1. Clean the gasket sitting surfaces of the cylinder
head and the engine block.
2. Make sure the gasket sitting surfaces of the cylin-
der head and the engine block are free of nicks and
heavy scratches.
3. Clean the cylinder head bolts.
4. Inspect the cylinder head for warpage. Refer to
”Cylinder Head and Valve Train Components” in
this section.
Installation Procedure
1. Install the new cylinder head gasket.
2. Install the intake/exhaust manifold to the cylinder
head. Refer to ”Intake/Exhaust Manifold” in the
section.
3. Install the cylinder head bolts gradually in the se-
quence shown.
Tighten
Tighten the cylinder head bolts to 25 NSm (18 lb–ft)
and retighten the cylinder head bolts 70 degrees plus
70 degrees plus 50 degrees using the angular torque
gauge KM–470–B.
4. Install the right engine mount. Refer to ”Engine
Mount” in this section.
1C1 – 26I1.4L/1.6L DOHC ENGINE MECHANICAL
DAEWOO V–121 BL4
5. Connect the throttle cable at the throttle body and
the intake manifold.
6. Install the intake manifold support bracket upper
bolts to the intake manifold.
Tighten
Tighten the intake manifold support bracket upper
bolts to the intake manifold to 25 NSm (18 lb–ft).
7. Connect the surge tank coolant hose at the throttle
body.
8. Connect the heater inlet hose to the cylinder head.
9. Install the generator upper retaining bolt.
Tighten
Tighten the generator upper retaining bolt to 20 NSm
(15 lb–ft).
10. Connect the fuel feed line at the fuel rail.
11. Connect all the disconnected vacuum hoses and
the brake booster vacuum hose at the intake man-
ifold.
12. Install the catalytic converter retaining nuts at the
exhaust manifold flange.
Tighten
Tighten the catalytic converter to exhaust manifold
flange nuts to 40 NSm (30 lb–ft).
13. Install the rear timing belt cover.
14. Install the rear timing belt cover bolts.
Tighten
Tighten the rear timing belt cover bolts to 10 NSm (89
lb–in).
1.4L/1.6L DOHC ENGINE MECHANICAL 1C1 – 27
DAEWOO V–121 BL4
15. Install the timing belt automatic tensioner.
Tighten
Tighten the timing belt automatic tensioner bolts to 25
NSm (18 lb–ft).
16. Install the timing belt idler pulley.
Tighten
Tighten the timing belt idler pulley bolt to 25 NSm(18
lb–ft).
Notice : Take extreme care to prevent any scratches,
nicks or damage to the camshafts.
17. Install the intake/exhaust camshaft gear.
Tighten
Tighten the intake/exhaust camshaft gear bolts to
67.5 NSm (49 lb–ft).
18. Apply a small amount of gasket sealant to the cor-
ners of the front camshaft caps and the top of the
rear camshaft cover–to–cylinder head seal.
19. Install the camshaft cover and the gasket. Refer to
”Camshaft Cover” in this section.
20. Connect the ignition wires to the spark plugs.
21. Install the oil filler cap.
22. Connect the engine ventilation hose to the cam-
shaft cover.
23. Align the timing marks on the camshaft gears.
24. Align the mark on the crank shaft gear with the
notch at the bottom of the rear timing belt cover.
1C1 – 28I1.4L/1.6L DOHC ENGINE MECHANICAL
DAEWOO V–121 BL4
25. Install the timing belt.
26. Rotate the water pump clockwise using the timing
belt adjuster J–42492 to apply tension to the timing
belt.
Tighten
Tighten the water pump retaining bolts to 10 NSm (89
lb–in).
27. Check and adjust the timing belt tension. Refer to
”Timing Belt Check and Adjust” in this section.
28. Install the upper and lower front timing belt covers.
Tighten
Tighten the upper and lower front timing belt covers
bolts to 10 NSm (89 lb–in).
29. Install the crank shaft pulley bolt.
Tighten
Tighten the crank shaft pulley bolt to 95 NSm (70 lb–ft)
and retighten 30 degrees plus 15 degrees.
30. Install the serpentine accessory drive belt. Refer to
Section 6B, Power Steering Pump.
31. Connect the upper radiator hose to the thermostat
housing.
32. Install the front wheel and splash shield. Refer to
Section 2E, Tires and Wheels.
33. Install the air cleaner housing.
Tighten
Tighten the air cleaner housing bolts to 10 NSm (89 lb–
in).
34. Connect the breather tube to the cam shaft cover.
35. Install the crank shaft pulley bolt.
36. Connect the MAT sensor connector.
37. Connect the intake manifold pressure sensor, in-
take air temperature sensor and coolant tempera-
ture sensor connector.
1.4L/1.6L DOHC ENGINE MECHANICAL 1C1 – 29
DAEWOO V–121 BL4
38. Connect the DIS coil connector.
39. Connect the fuel injector harness connectors.
40. Connect the oxygen sensor connector and the
ECM ground terminal at the intake manifold.
41. Install the fuel pump fuse.
42. Connect the negative battery ground cable.
43. Refill the engine cooling system. Refer to Sec-
tion1D, Engine Cooling.
CAMSHAFTS
Removal Procedure
1. Remove the camshaft cover. Refer to ”Camshaft
Cover” in this section.
2. Remove the timing belt. Refer to ”Timing Belt” in
this section.
Notice : Take extreme care to prevent any scratches,
nicks or damage to the camshafts.
3. While holding the intake camshaft firmly in place,
remove the intake camshaft gear bolt and gear.
4. While holding the exhaust camshaft firmly in place,
remove the exhaust camshaft gear bolt and gear.
5. Remove the camshaft cap bolts gradually in the
sequence shown for each camshaft cap.
1C1 – 30I1.4L/1.6L DOHC ENGINE MECHANICAL
DAEWOO V–121 BL4
6. Remove the intake/exhaust camshaft caps. Main-
tain the correct positions for installation.
7. Remove the intake/exhaust camshaft.
Installation Procedure
Notice : Take extreme care to prevent any scratches,
nicks or damage to the camshafts.
1. Lubricate the camshaft journals and the camshaft
caps with engine oil.
2. Install the intake/exhaust camshafts.
3. Install the intake/exhaust camshaft caps in their
original positions.
Tighten
Tighten the intake/exhaust camshaft caps bolts to 16
NSm (12 lb–ft).
4. Measure the intake/exhaust camshaft end play.Ref-
er to the ”Engine Specifications” in this section.
5. Install the intake/exhaust camshaft gear.
6. While holding the intake/exhaust camshafts firmly
in place, install the intake/exhaust camshaft gear
bolts.
Tighten
Tighten the intake/exhaust camshaft gear bolts to
67.5 NSm (49 lb–ft).
7. Install the timing belt. Refer to ”Timing Belt” in this
section.
8. Install the camshaft cover. Refer to ”Camshaft Cov-
er” in this section.
1.4L/1.6L DOHC ENGINE MECHANICAL 1C1 – 31
DAEWOO V–121 BL4
TIMING BELT CHECK AND ADJUST
Tools Required
J–42492 Timing Belt Adjuster
KM–470–B Angular Torque Gauge
Adjustment Procedure
1. Disconnect the negative battery cable.
2. Remove the air cleaner outlet hose from the throttle
body.
3. Remove the breather tube from the camshaft cover.
4. Remove the air cleaner housing bolts.
5. Remove the air cleaner housing.
6. Remove the right front wheel. Refer to Section 2E,
Tires and Wheels.
7. Remove the right front wheel well splash shield.
8. Remove the serpentine accessory drive belt. Refer
to Section 6B, Power Steering Pump.
9. Remove the crankshaft pulley bolt.
10. Remove the crankshaft pulley.
11. Remove the upper front timing belt cover bolts.
12. Remove the upper front timing belt cover.
13. Remove the lower front timing belt cover bolts.
14. Remove the lower front timing belt cover.
15. Install the crankshaft pulley bolt.
1C1 – 32I1.4L/1.6L DOHC ENGINE MECHANICAL
DAEWOO V–121 BL4
16. Rotate the crankshaft at least one full turn clock-
wise using the crankshaft pulley bolt.
17. Align the mark on the crankshaft gear with the
notch at the bottom of the rear timing belt cover.
18. Align the camshaft gear timing marks.
19. Slightly loosen the water pump retaining bolts.
20. Rotate the water pump clockwise using the timing
belt adjuster J–42492.
21. Rotate the water pump clockwise until the adjust
arm pointer of the timing belt automatic tensioner is
aligned with the notch in the timing belt automatic
tensioner bracket.
22. Tighten the water pump retaining bolts.
23. Rotate the crankshaft two full turns clockwise using
the crankshaft pulley.
24. Loosen the water pump retaining bolts.
1.4L/1.6L DOHC ENGINE MECHANICAL 1C1 – 33
DAEWOO V–121 BL4
25. Using the timing belt adjuster J–42492, rotate the
water pump until the adjust arm pointer of the tim-
ing belt automatic tensioner is aligned with the
pointer on the timing belt automatic tensioner
bracket.
26. Tighten the water pump retaining bolts.
Tighten
Tighten the water pump retaining bolts to 10 NSm (89
lb–in).
27. Remove the crankshaft pulley bolt.
28. Install the upper and lower front timing belt covers.
29. Install the upper and lower front timing belt cover
bolts.
Tighten
Tighten the front timing belt cover bolts to 10 NSm (89
lb–in).
30. Install the crankshaft pulley.
31. Install the crankshaft pulley bolt.
Tighten
Tighten the crankshaft pulley bolt to 95 NSm (70 lb–ft)
and retighten 30 degrees plus 15 degrees.
32. Install the serpentine accessory drive belt. Refer to
Section 6B, Power Steering Pump.
33. Install the right front wheel well splash shield.
34. Install the right front wheel. Refer to Section 2E,
Tires and Wheels.
35. Install the air cleaner housing.
36. Install the air cleaner housing bolts.
Tighten
Tighten the air cleaner housing bolts to 10 NSm (89 lb–
in).
1C1 – 34I1.4L/1.6L DOHC ENGINE MECHANICAL
DAEWOO V–121 BL4
37. Connect the air cleaner outlet hose to the throttle
body.
38. Connect the breather tube to the camshaft cover.
39. Connect the negative battery cable.
TIMING BELT
Tools Required
J–42492 Timing Belt Adjuster
KM–470–B Angular Torque Gauge
Removal Procedure
1. Disconnect the negative battery cable.
2. Disconnect the air cleaner outlet hose from the
throttle body.
3. Disconnect the breather tube from the camshaft
cover.
4. Remove the air cleaner housing bolts.
5. Remove the air cleaner housing.
6. Remove the right front wheel. Refer to Section 2E,
Tires and Wheels.
7. Remove the right front wheel well splash shield.
8. Remove the serpentine accessory drive belt. Refer
to Section 6B, Power Steering Pump.
9. Remove the crankshaft pulley bolt.
10. Remove the crankshaft pulley.
1.4L/1.6L DOHC ENGINE MECHANICAL 1C1 – 35
DAEWOO V–121 BL4
11. Remove the upper front timing belt cover bolts.
12. Remove the upper front timing belt cover.
13. Remove the lower front timing belt cover bolts.
14. Remove the lower front timing belt cover.
15. Install the crankshaft pulley bolt.
16. Using the crankshaft pulley bolt, rotate the crank-
shaft clockwise until the timing mark on the crank-
shaft gear is aligned with the notch at the bottom of
the rear timing belt cover.
17. Slightly loosen the water pump retaining bolts.
18. Using the timing belt adjuster J–42492, rotate the
water pump counterclockwise to release the tension
on the timing belt.
19. Remove the right engine mount bracket. Refer to
”Engine Mount” in this section.
20. Remove the timing belt.
1C1 – 36I1.4L/1.6L DOHC ENGINE MECHANICAL
DAEWOO V–121 BL4
Installation Procedure
1. Align the timing mark on the crankshaft gear with
the notch on the bottom of the rear timing belt cov-
er.
2. Align the timing marks on the camshaft gears.
3. Install the timing belt.
4. Install the right engine mount bracket. Refer to ”En-
gine Mount” in this section.
5. Rotate the water pump clockwise using the timing
belt adjuster J–42492.
6. Rotate the water pump clockwise until the adjust
arm pointer of the timing belt automatic tensioner is
aligned with the notch in the timing belt automatic
tensioner bracket.
7. Tighten the water pump retaining bolts.
8. Rotate the crankshaft two full turns clockwise using
the crankshaft pulley bolt.
9. Loosen the water pump retaining bolts.
10. Rotate the water pump until the adjust arm pointer
of the timing belt automatic tensioner is aligned with
the pointer on the timing belt automatic tensioner
bracket.
1.4L/1.6L DOHC ENGINE MECHANICAL 1C1 – 37
DAEWOO V–121 BL4
11. Tighten the water pump retaining bolts.
Tighten
Tighten the water pump retaining bolts to 10 NSm (89
lb–in).
12. Remove the crankshaft pulley bolt.
13. Install the upper and lower front timing belt covers.
14. Install the upper and lower front timing belt cover
bolts.
Tighten
Tighten the front timing belt cover bolts to 10 NSm (89
lb–in).
15. Install the crankshaft pulley.
16. Install the crankshaft pulley bolt.
Tighten
Tighten the crankshaft pulley bolt to 95 NSm (70 lb–ft)
and retighten 30 degrees plus 15 degrees.
17. Install the serpentine accessory drive belt. Refer to
Section 6B, Power Steering Pump.
18. Install the right front wheel well splash shield.
19. Install the right front wheel. Refer to Section 2E,
Tires and Wheels.
20. Install the air cleaner housing.
21. Install the air cleaner housing bolts.
Tighten
Tighten the air cleaner housing bolts to 10 NSm (89 lb–
in).
22. Connect the air cleaner outlet hose to the throttle
body.
23. Connect the breather tube to the camshaft cover.
24. Connect the negative battery cable.
1C1 – 38I1.4L/1.6L DOHC ENGINE MECHANICAL
DAEWOO V–121 BL4
OIL PAN
Removal Procedure
1. Disconnect the negative battery cable.
2. Drain the Engine oil from the engine crankcase.
3. Remove the catalytic converter retaining nuts from
the exhaust pipe.
4. Remove the lower crossmember bracket.
5. Remove the exhaust connecting pipe.
6. Remove the oil pan bolts to the transaxle case.
7. Remove the oil pan retaining bolts to the engine
block.
8. Remove the oil pan from the engine block.
1.4L/1.6L DOHC ENGINE MECHANICAL 1C1 – 39
DAEWOO V–121 BL4
Cleaning Procedure
1. Clean the oil pan sealing surface.
2. Clean the engine block sealing surface.
3. Clean the oil pan retaining bolts.
4. Clean the oil pan attaching bolt holes in the engine
block.
Installation Procedure
1. Coat the new oil pan gasket with sealant.
Important : Install the oil pan within 5 minutes after apply-
ing the liquid gasket to the oil pan.
2. Install the oil pan to the engine block.
3. Install the oil pan retaining bolts.
Tighten
Tighten the oil pan retaining bolts to 10 NSm (89 lb–in).
4. Install the oil pan bolts to the transaxle case.
Tighten
Tighten the oil pan to the transaxle case bolts to 31
NSm (23 lb–ft).
5. Install the exhaust connecting pipe.
6. Install the catalytic converter retaining nuts to the
exhaust pipe.
Tighten
Tighten the catalytic converter to exhaust pipe retain-
ing nuts to 40 NSm (30 lb–ft).
7. Install the lower crossmember bracket.
8. Connect the negative battery cable.
9. Install the oil pan drain plug.
Tighten
Tighten the oil pan drain plug to 55 NSm (40 lb–ft).
10. Refill the engine crankcase with engine oil.
1C1 – 40I1.4L/1.6L DOHC ENGINE MECHANICAL
DAEWOO V–121 BL4
OIL PUMP
Tools Required
KM–498–B Pressure Gauge
KM–135 Adapter
Engine Oil Pressure Inspection Procedure
1. Remove the right front wheel, wheel well splash
shield and engine undercover.
2. Disconnect the oil pressure switch connector.
3. Install the adapter KM–135 in place of the oil pres-
sure switch.
4. Connect the pressure gauge KM–498–B to the
adapter.
5. Start the engine and check the oil pressure at idle
speed and engine temperature of 80°C (176°F).
The minimum oil pressure should be 30 kPa (4.35
psi).
6. Stop the engine and remove the pressure gauge
KM–498–B and the adapter KM–135.
7. Install the oil pressure switch.
Tighten
Tighten the oil pressure switch to 40 NSm (30 lb–ft).
8. Connect the oil pressure switch connector.
9. Install the right front wheel well splash shield, en-
gine undercover and wheel.
10. Check the oil level. Pour oil until it reaches the full
mark.
Removal Procedure
1. Disconnect the negative battery cable.
2. Remove the power steering pump, if equipped. Re-
fer to Section 6A, Power Steering System.
3. Remove the timing belt. Refer to”Timing Belt” in this
section.
4. Remove the rear timing belt cover. Refer to ”Rear
Timing Belt Cover” in this section.
5. Disconnect the oil pressure switch connector.
1.4L/1.6L DOHC ENGINE MECHANICAL 1C1 – 41
DAEWOO V–121 BL4
6. Remove the oil pan. Refer to ”Oil Pan” in this sec-
tion.
7. Remove the oil suction pipe and support bracket
bolts.
8. Remove the oil suction pipe.
9. Remove the oil pump retaining bolts.
10. Carefully separate the oil pump and gasket from
the engine block and the oil pan.
11. Remove the oil pump.
Inspection Procedure
1. Clean the oil pump and the engine block gasket
mating surface areas.
2. Remove the safety relief valve bolt.
3. Remove the safety relief valve and the spring.
4. Remove the oil pump–to–crankshaft seal.
5. Remove the oil pump rear cover bolts.
6. Remove the oil pump rear cover bolts.
1C1 – 42I1.4L/1.6L DOHC ENGINE MECHANICAL
DAEWOO V–121 BL4
7. Clean the oil pump housing and all the oil pump
parts.
8. Inspect all the oil pump parts for signs of wear. Re-
fer to ”Engine Specifications” in this section. Re-
place the worn oil pump parts.
Notice : Pack the oil pump gear cavity with petroleum jelly
to ensure an oil pump prime, or engine damage could re-
sult.
9. Coat all the oil pump parts with clean engine oil.
Install the oil pump parts.
10. Apply Loctite® 242 to the oil pump rear cover bolts
and install the cover and bolts.
Tighten
Tighten the oil pump rear cover bolts to 8 NSm (71 lb–
in).
11. Install the safety relief valve, spring, washer and
bolt.
Tighten
Tighten the safety relief valve bolt to 30 NSm (22 lb–ft).
Installation Procedure
1. Apply Loctite® 242 to the oil pump bolts and room
temperature vulcanizing (RTV) sealant to the new
oil pump gasket.
2. Install the gasket to the oil pump and install the oil
pump to the engine block with the bolts.
Tighten
Tighten the oil pump bolts to 10 NSm (89 lb–in).
3. Install a new oil pump–to–crankshaft seal. Coat the
lip of the seal with a thin coat of grease.
1.4L/1.6L DOHC ENGINE MECHANICAL 1C1 – 43
DAEWOO V–121 BL4
4. Coat the threads of the oil suction pipe and support
bracket bolts with Loctite® 242.
5. Install the oil suction pipe and bolts.
Tighten
Tighten the oil suction pipe and support bracket bolts
to 10 NSm (89 lb–in).
6. Install the oil pan. Refer to ”Oil Pan” in this section.
7. Connect the oil pressure switch connector.
8. Install the rear timing belt cover. Refer to ”Rear
Timing Belt Cover” in this section.
9. Install the timing belt. Refer to ”Timing Belt” in this
section.
10. Install the power steering pump, if equipped. Refer
to Section 6A, Power Steering System.
11. Connect the negative battery cable.
ENGINE MOUNT
Tools Required
DW110–060 Engine Support Fixture
Removal Procedure
1. Disconnect the negative battery cable.
2. Support the engine assembly using the engine sup-
port fixture DW110–060.
3. Remove the engine mount bracket attaching bolts/
nuts.
4. Remove the front timing belt cover. Refer to ”Timing
Belt” in this section.
1C1 – 44I1.4L/1.6L DOHC ENGINE MECHANICAL
DAEWOO V–121 BL4
5. Remove the engine mount attaching bolts/nuts.
6. Remove the engine mount.
Installation Procedure
1. Install the engine mount.
2. Install the engine mount retaining bolts.
Tighten
Tighten the engine mount attaching bolts to 30 NSm
(22 lb–ft).
3. Install the front timing belt cover. Refer to ”Timing
Belt” in this section.
4. Install the engine mount bracket attaching bolts/
nuts.
Tighten
Tighten the engine mount bracket attaching bolts/
nuts to 55 NSm (41 lb–ft).
5. Remove engine assembly support fixture
DW110–060.
6. Connect the negative battery cable.
1.4L/1.6L DOHC ENGINE MECHANICAL 1C1 – 45
DAEWOO V–121 BL4
CAMSHAFT GEARS
Removal Procedure
1. Disconnect the negative battery cable.
2. Remove the engine cover.
3. Remove the timing belt. Refer to ”Timing Belt” in
this section.
4. Disconnect the ignition wires from the spark plugs.
5. Disconnect the engine ventilation hoses from the
camshaft cover.
6. Remove the camshaft cover bolts.
7. Remove the camshaft cover and the camshaft cov-
er gasket.
Notice : Take extreme care to prevent any scratches,
nicks or damage to the camshafts.
8. While holding the intake camshaft firmly in place,
remove the intake camshaft gear bolt.
9. Remove the intake camshaft gear.
10. While holding the exhaust camshaft firmly in place,
remove the exhaust camshaft gear bolt.
11. Remove the exhaust camshaft gear.
Installation Procedure
Notice : Take extreme care to prevent any scratches,
nicks or damage to the camshafts.
1. Install the intake camshaft gear.
2. While holding the intake camshaft firmly in place,
install the intake camshaft gear bolt.
Tighten
Tighten the intake camshaft gear bolt to 67.5 NSm (49
lb–ft).
1C1 – 46I1.4L/1.6L DOHC ENGINE MECHANICAL
DAEWOO V–121 BL4
3. Install the exhaust camshaft gear.
4. While holding the exhaust camshaft firmly in place,
install the exhaust camshaft gear bolt.
Tighten
Tighten the exhaust camshaft gear bolt to 67.5 NSm
(49 lb–ft).
5. Apply a small amount of gasket sealant to the cor-
ners of the front camshaft caps and to the top of
the rear camshaft cover–to–cylinder head seal.
6. Install the camshaft cover and the camshaft cover
gasket.
7. Install the camshaft cover bolts.
Tighten
Tighten the camshaft cover nuts to 10 NSm (89 lb–in).
8. Connect the engine ventilation hoses to the cam-
shaft cover.
9. Connect the ignition wires to the spark plugs.
10. Install the timing belt. Refer to ”Timing Belt” in this
section.
11. Install the engine cover. Refer to ”Engine Cover” in
this section.
12. Connect the negative battery cable.
REAR TIMING BELT COVER
Removal Procedure
1. Remove the timing belt and the timing belt cover.
Refer to ”Timing Belt” in this section.
2. Remove the camshaft gears. Refer to ”Camshaft
Gears” in this section.
3. Remove the crankshaft gear.
4. Remove the timing belt automatic tensioner bolts.
5. Remove the timing belt automatic tensioner.
1.4L/1.6L DOHC ENGINE MECHANICAL 1C1 – 47
DAEWOO V–121 BL4
6. Remove the timing belt idler pulley bolt.
7. Remove the timing belt idler pulley.
8. Remove the rear timing belt cover bolts.
9. Remove the rear timing belt cover.
Installation Procedure
1. Install the rear timing belt cover.
2. Install the rear timing belt cover bolts.
Tighten
Tighten the rear timing belt cover bolts to 10 NSm (89
lb–in).
3. Install the timing belt idler pulley.
4. Install the timing belt idler pulley bolt.
Tighten
Tighten the timing belt idler pulley bolt to 40 NSm (30
lb–ft).
1C1 – 48I1.4L/1.6L DOHC ENGINE MECHANICAL
DAEWOO V–121 BL4
5. Install the timing belt automatic tensioner.
6. Install the timing belt automatic tensioner bolts.
Tighten
Tighten the timing belt automatic tensioner bolts to 25
NSm (18 lb–ft).
7. Install the crankshaft gear.
Notice : Take extreme care to prevent any scratches,
nicks or damage to the camshafts.
8. Install the camshaft gears. Refer to ”Camshaft
Gears” in this section.
9. Install the timing belt and timing belt cover. Refer to
”Timing Belt” in this section.
ENGINE
Removal Procedure
1. Remove the fuel pump fuse.
2. Start the engine. After it stalls, crank the engine for
10 seconds to rid the fuel system of fuel pressure.
3. Remove the hood. Refer to Section 9R, Body Front
End.
4. Drain the engine oil.
5. Disconnect the negative battery cable.
6. Remove the air cleaner outlet hose from the throttle
body and air cleaner housing.
7. Disconnect the breather tubes from the camshaft
cover.
8. Remove the serpentine accessory drive belt. Refer
to Section 6B, Power Steering Pump.
9. Remove the right front wheel. Refer to Section 2E,
Tires and Wheels.
10. Remove the right front wheel well splash shield.
11. Drain the engine coolant. Refer to Section 1D, En-
gine Cooling.
12. Remove the cooling system radiator and the engine
cooling fans. Refer to Section 1D, Engine Cooling.
13. Disconnect the upper radiator hose from the ther-
mostat housing.
14. Disconnect the power steering return hose from the
power steering pump. Refer to Section 6A, Power
Steering System.
15. Disconnect the power steering pressure hose from
the power steering pump. Refer to Section 6A,
Power Steering System.
16. Disconnect the electrical connector at the direct
ignition system (DIS) coil and the electronic control
module (ECM) ground terminal at the intake man-
ifold and at the starter motor.
1.4L/1.6L DOHC ENGINE MECHANICAL 1C1 – 49
DAEWOO V–121 BL4
17. Disconnect the oxygen (O2) sensor connector, if
equipped.
18. Disconnect the fuel injector harness connectors.
19. Disconnect the MAT, MAP sensor connectors.
20. Disconnect the throttle position sensor (TPS) con-
nector.
21. Disconnect the generator voltage regulator connec-
tor and power lead.
22. Remove the electrical harness clamp bolt.
23. Disconnect all of the necessary vacuum lines, in-
cluding the brake booster vacuum hose.
24. Disconnect the fuel feed line at the fuel rail.
25. Disconnect the throttle cable from the throttle body
and the intake manifold bracket.
26. Disconnect the surge tank coolant hose at the
throttle body.
27. Disconnect the heater outlet hose at the coolant
pipe.
28. Disconnect the heater inlet hose from the cylinder
head.
29. Disconnect the surge tank coolant hose from the
coolant pipe.
30. Disconnect the lower radiator hose from the coolant
pipe. Disconnect the starter solenoid ”S” terminal
wire. Remove the A/C compressor, if equipped. Re-
fer to Section 7B, Manual Control Heating, Ventila-
tion, and Air Conditioning Systems.
31. Remove the catalytic converter retaining nuts from
the exhaust pipe.
32. Remove the exhaust pipe.
1C1 – 50I1.4L/1.6L DOHC ENGINE MECHANICAL
DAEWOO V–121 BL4
33. Remove the crankshaft pulley bolt.
34. Remove the crankshaft pulley.
35. Disconnect the vacuum lines at the charcoal canis-
ter purge solenoid.
36. Disconnect the electrical connector at the charcoal
canister purge (CCP) solenoid and at the knock
sensor.
37. Disconnect the electrical connector at the oil pres-
sure switch and at the exhaust gas recirculation
(EGR) solenoid.
38. Disconnect the crankshaft position sensor (CPS)
connector.
39. Remove the transaxle torque converter bolts, if au-
tomatic transaxle equipped.
40. Remove the stater motor. Refer to Section 1E, En-
gine Electrical.
41. Remove the transaxle bell housing bolts.
42. Support the transaxle with a floor jack.
43. Install the engine lifting device.
44. Disconnect the right engine mount bracket from the
engine mount and the engine by removing the at-
taching bolts and the nuts.
45. Remove the right engine mount from the engine
block. Refer to ”Engine Mount” in this section.
46. Separate the engine block from the transaxle.
47. Remove the engine.
Installation Procedure
1. Install the engine into the engine compartment.
2. Align the engine alignment pins to the transaxle.
3. Install the transaxle bell housing bolts.
Tighten
Tighten the transaxle bell housing bolts to 75 NSm (55
lb–ft).
4. Install the right engine mount to the engine block.
Refer to ”Engine Mount” in this section.
1.4L/1.6L DOHC ENGINE MECHANICAL 1C1 – 51
DAEWOO V–121 BL4
5. Connect the right engine mount bracket to the en-
gine mount and the engine by installing the attach-
ing bolts and the nuts.
Tighten
Tighten the engine mount bracket attaching bolts and
the nuts to 55 NSm (41 lb–ft).
6. Remove the floor jack used for support of the trans-
axle.
7. Remove the engine lifting device.
8. Install the transaxle torque converter bolts, if auto-
matic transaxle equipped.
Tighten
Tighten the transaxle torque converter bolts to 45
NSm (33 lb–ft).
9. Install the starter motor. Refer to Section 1E, En-
gine Electrical.
10. Connect the vacuum lines at the CCP solenoid.
11. Connect the electrical connector at the CCP sole-
noid and at the knock sensor.
12. Connect the oil pressure switch and the EGR sole-
noid connectors.
13. Install the crankshaft pulley.
14. Install the crankshaft pulley bolt.
Tighten
Tighten the crankshaft pulley bolt to 95 NSm (70 lb–ft)
and retighten 30 degrees plus 15 degrees.
15. Connect the CPS connector.
16. Install the exhaust front pipe.
17. Install the catalytic converter retaining nuts to the
exhaust pipe.
Tighten
Tighten the catalytic converter to exhaust pipe retain-
ing nuts to 35 NSm (26 lb–ft).
1C1 – 52I1.4L/1.6L DOHC ENGINE MECHANICAL
DAEWOO V–121 BL4
18. Connect the power steering pressure hose.
19. Connect the power steering return hose.
20. Install the A/C compressor, if equipped. Refer to
Section 7B, Manual Control Heating, Ventilation,
and Air Conditioning Systems.
21. Install the generator. Refer to Section 1E, Engine
Electrical.
22. Install the serpentine accessory drive belt. Refer to
Section 6B, Power Steering Pump.
23. Install the right front wheel well splash shield.
24. Install the right front wheel. Refer to Section 2E,
Tires and Wheels.
25. Connect the fuel feed line to the fuel rail.
26. Connect all of the necessary vacuum lines, includ-
ing the brake booster vacuum hose.
27. Connect the O2 sensor connector, if equipped.
28. Connect the starter solenoid ”S” terminal wire and
power lead.
29. Connect the generator voltage regulator connector
and power lead.
30. Connect the CTS connector.
31. Connect the MAP, MAT sensor connectors.
32. Connect the TPS connector.
33. Install the electrical wiring harness clamp at the
intake manifold support bracket.
34. Connect the fuel injector harness connectors.
35. Connect the electrical connector at the DIS coil and
the ECM ground terminal at the starter.
36. Install the air cleaner outlet hose between the
throttle body and the air cleaner housing.
37. Connect the breather tubes to the camshaft cover.
38. Install the cooling system radiator and the engine
cooling fans. Refer to Section 1D, Engine Cooling.
1.4L/1.6L DOHC ENGINE MECHANICAL 1C1 – 53
DAEWOO V–121 BL4
39. Connect the lower radiator hose to the coolant pipe.
40. Connect the upper radiator hose to the thermostat
housing.
41. Connect the surge tank coolant hose to the radia-
tor.
42. Connect the heater inlet hose to the cylinder head.
43. Connect the heater outlet hose to the coolant pipe.
44. Connect the coolant surge tank hose to the coolant
pipe.
45. Connect the surge tank coolant hose to the throttle
body.
46. Connect the throttle cable to the throttle body and
the intake manifold bracket.
47. Install the fuel pump fuse.
48. Connect the negative battery cable.
49. Refill the engine crankcase with engine oil.
50. Refill the engine coolant system. Refer to Section
1D, Engine Cooling.
51. Bleed the power steering system. Refer to Section
6A, Power Steering System.
52. Refill the A/C refrigerant system, if equipped. Refer
to Section 7B, Manual Control Heating, Ventilation,
and Air Conditioning System.
53. Install the hood. Refer to Section 9R, Body Front
End.
PISTONS AND RODS
Tools Required
KM–427 Piston Pin Service Set
KM 470–B Angular Torque Gauge
Removal Procedure
1. Remove the cylinder head with the intake manifold
and the exhaust manifold attached. Refer to ”Cylin-
der Head and Gasket” in this section.
2. Remove the oil pan. Refer to ”Oil Pan” in this sec-
tion.
3. Remove the oil suction pipe bolts.
4. Remove the oil suction pipe.
5. Move the piston to the bottom of the piston stroke.
6. Mark the connecting rod cap for position.
7. Remove the connecting rod cap bolts.
8. Remove the connecting rod cap and the lower con-
necting rod bearing.
9. Remove the upper piston connecting rod bearing.
10. Ridge ream the cylinder wall.
1C1 – 54I1.4L/1.6L DOHC ENGINE MECHANICAL
DAEWOO V–121 BL4
CAUTION : Use care when handling the piston. Worn
piston rings are sharp and may cause injury.
11. Remove the piston.
12. Use a piston ring expander tool to expand the pis-
ton rings.
13. Remove the piston rings.
14. Remove the piston pin from the piston and connect-
ing rod assembly using the piston pin service set
KM–427.
15. Separate the piston from the connecting rod.
Inspection Procedure
1. Inspect the connecting rod for bending or twisting. If
the connecting rod is bent or twisted, replace the
connecting rod.
2. Inspect the connecting rod bearings.
3. Inspect the connecting rod lower end for wear.
4. Inspect the connecting rod upper end for scoring.
5. Inspect the crankshaft rod bearing journal for wear.
Refer to ”Engine Specifications” in this section.
6. Inspect the piston for scoring, cracks, and wear.
7. Inspect the piston for taper using a micrometer.
8. Inspect the piston for fit to the connecting rod.
1.4L/1.6L DOHC ENGINE MECHANICAL 1C1 – 55
DAEWOO V–121 BL4
9. Inspect the engine block deck surface for flatness
using a straight edge and a feeler gauge. Refer to
”Engine Specifications” in this section.
10. Inspect the bearing bore for concentricity and align-
ment using a bore gauge. Refer to ”Engine Specifi-
cations” in this section. If the bearing bore is be-
yond specifications, replace the engine block.
11. Inspect the engine block cylinder bore for wear,
runout, ridging and taper using a bore gauge. Refer
to ”Engine Specifications” in this section.
12. Inspect the engine block cylinder bore for glazing.
Lightly hone the cylinder bore as necessary.
Installation Procedure
1. Align the notch on the piston and the connecting
rod so that the proper sides will be facing the front
of the engine.
2. Install the piston pin guide through the piston and
the connecting rod.
3. Coat the piston pin with clean oil.
4. Install the piston pin into the opposite side of the
piston.
5. Install the piston pin into the piston and connecting
rod assembly using the piston pin service set
KM–427.
6. Select a set of new piston rings.
7. Measure the piston ring gap using a feeler gauge.
Refer to ”Engine Specifications” in this section.
8. Increase the piston ring gap by carefully filing off
excess material if the piston ring gap is below spec-
ifications.
9. Measure the piston ring side clearance using a feel-
er gauge. Refer to ”Engine Specifications’’ in this
section.
10. If the piston ring is too thick, try another piston ring.
11. If no piston ring can be found that fits to specifica-
tions, the piston ring may be ground to size with
emery paper placed on a sheet of glass.
1C1 – 56I1.4L/1.6L DOHC ENGINE MECHANICAL
DAEWOO V–121 BL4
12. Install a piston oil ring, the expander, then the sec-
ond piston oil ring to the bottom ring groove of the
piston.
13. Install the second compression ring to the middle
ring groove of the piston.
14. Install the top compression ring to the top ring
groove of the piston.
15. Use a piston ring expander to install the piston
rings. Do not expand the piston rings beyond the
expansion necessary for installation.
16. Stagger the piston oil rings, the oil ring rail gaps,
the second compression ring, and the top compres-
sion ring in relation to the notch on the top of the
piston.
17. Lubricate the cylinder wall and the piston rings with
clean engine oil.
18. Install the piston using a ring compressor and a
wood handle. Guide the lower connecting rod end
to prevent damaging the crankshaft journal.
19. Install the connecting rod cap and bearings. Refer
to ”Crankshaft Bearings and Connecting Rod Bear-
ings – Gauging Plastic” in this section.
20. Install the connecting rod cap bolts.
Tighten
Tighten the connecting rod bearing cap bolts to 25
NSm (18 lb–ft). Using the angular torque gauge
KM–470–B, tighten the bolts one turn of 30 degrees
plus one turn of 15 degrees.
1.4L/1.6L DOHC ENGINE MECHANICAL 1C1 – 57
DAEWOO V–121 BL4
21. Install the oil suction pipe.
22. Install the oil suction pipe bolts.
Tighten
Tighten the oil suction pipe bolts to 10 NSm (89 lb–in).
23. Install the oil pan. Refer to ”Oil Pan” in this section.
24. Install the cylinder head with the intake manifold
and the exhaust manifold attached. Refer to ”Cylin-
der Head and Gasket” in this section.
1C1 – 58I1.4L/1.6L DOHC ENGINE MECHANICAL
DAEWOO V–121 BL4
UNIT REPAIR
CYLINDER HEAD AND VALVE TRAIN
COMPONENTS
Tools Required
MKM–571–B Gauge
KM–340–0 Cutter Set
KM–340–7 Guide Drift
KM–340–13 Cutters
KM–340–26 Cutters
KM–348 Valve Spring Compressor
KM–653 Adapter
KM–805 Valve Guide Reamer
Disassembly Procedure
1. Remove the cylinder head with the intake manifold
and the exhaust manifold attached. Refer to ”Cylin-
der Head and Gasket” in this section.
2. Remove the engine coolant temperature sensor.
3. Remove the exhaust manifold heat shield bolts.
4. Remove the exhaust manifold heat shield.
5. Remove the exhaust manifold retaining nuts in the
sequence shown.
6. Remove the exhaust manifold.
7. Remove the exhaust manifold gasket.
8. Remove the exhaust manifold studs.
9. Remove the thermostat housing mounting bolts.
10. Remove the thermostat housing assembly.
11. Remove the fuel rail retaining bolts and the fuel rail
assembly.
12. Remove the intake manifold retaining nuts and re-
taining bolts in the sequence shown.
13. Remove the intake manifold.
14. Remove the intake manifold studs.
1.4L/1.6L DOHC ENGINE MECHANICAL 1C1 – 59
DAEWOO V–121 BL4
15. Remove the direct ignition system (DIS) coil mount-
ing bolts.
16. Remove the DIS coil with the ignition wires at-
tached.
17. Remove the DIS coil mounting bracket bolts.
18. Remove the DIS coil mounting bracket.
19. Remove the electrical exhaust gas recirculation
(EEGR) valve adapter bolts.
20. Remove the EEGR valve adapter.
21. Remove the EEGR valve adapter gasket.
22. Remove the spark plugs.
23. Remove the camshaft cap bolts gradually and in
the sequence shown for each camshaft cap.
24. Remove the intake camshaft caps. Maintain the
correct positions for installation.
25. Remove the intake camshaft.
26. Remove the intake valve tappet adjusters.
27. Remove the exhaust camshaft caps. Maintain the
correct positions for installation.
28. Remove the exhaust camshaft.
29. Remove the exhaust valve tappet adjusters.
30. Compress the valve springs with the valve spring
compressor KM–348 and the adapter KM–653.
31. Remove the valve keys.
32. Remove the valve spring compressor KM–348 and
the adapter KM–653.
33. Remove the valve spring caps.
34. Remove the valve springs. Maintain the original
position of the valve springs for installation.
1C1 – 60I1.4L/1.6L DOHC ENGINE MECHANICAL
DAEWOO V–121 BL4
35. Remove the valves. Maintain the original position of
the valves for installation.
36. Remove the valve stem seals.
Cylinder Head Inspection
1. Clean the sealing surfaces.
2. Inspect the cylinder head gasket and mating sur-
faces for leaks, corrosion, and blowby.
3. Inspect the cylinder head for cracks.
4. Inspect the length and the width of the cylinder
head using a feeler gauge and a straight edge.
5. Check the sealing surfaces for deformation and
warpage. The cylinder head sealing surfaces must
be flat within 0.050 mm (0.002 inch) maximum.
6. Measure the height of the cylinder head from seal-
ing surface to sealing surface. The cylinder head
height should be 134.08 to 134.23 mm. If the cylin-
der head height is less than 134.08 mm, replace
the cylinder head.
7. Inspect all threaded holes for damage.
8. Inspect valve seats for excessive wear and burned
spots.
Valve Inspection
1. Inspect the valve stem tip for wear.
2. Inspect the valve key grooves and the oil seal
grooves for chips and wear.
3. Inspect the valves for burns or cracks.
4. Inspect the valve stem for burrs and scratches.
5. Inspect the valve stem. The valve stem must be
straight.
6. Inspect the valve face for grooving. If the groove is
so deep that refacing the valve would result in a
sharp edge, replace the valve.
1.4L/1.6L DOHC ENGINE MECHANICAL 1C1 – 61
DAEWOO V–121 BL4
7. Inspect the valve spring. If the valve spring ends
are not parallel, replace the valve spring.
8. Measure the valve spring height. Refer to ”Engine
Specifications” in this section. If the valve spring
height does not match the specifications, replace
the valve spring.
9. Inspect the valve spring seating surface of the
valve rotators for wear or gouges. Replace as re-
quired.
Cleaning Procedure
1. Clean the cylinder head.
2. Clean the valve guides.
3. Clean all of the threaded holes.
4. Clean the valves of carbon, oil, and varnish.
Cylinder Head Overhaul
Valve Grind–in
1. Lubricate the valve stem using a fine–grained
paste.
2. Lift the valve rhythmically from the seat with a com-
mercially available valve grinding tool in order to
distribute the paste.
3. Check the contact pattern on the valve head and in
the cylinder head.
4. Clean the valves, the valve guides, and the cylinder
head.
1C1 – 62I1.4L/1.6L DOHC ENGINE MECHANICAL
DAEWOO V–121 BL4
Valve Grind
1. Ensure that there are no crater line burns on the
valve cone.
2. The valve may be reground only two times. Do not
grind the valve stem end.
3. The angle at the valve face is 45 degrees.
4. Inspect the assembly height of the intake valves
and the exhaust valves.
Valve Guide – Ream
1. Measure the diameter of the valve guide using the
gauge MKM–571–B and a commercially available
inside micrometer.
Important : Valve oversizes may already have been fitted
in production.
2. An oversize service code is on the valve guide and
the valve stem end. The following table gives the
correct size, reamer, and production code for each
service.
Size Reamer Production
Code
Service
Code
Normal – – K
0.075 KM–805 1 K1
0.150 – 2 K2
3. Ream the valve guide from the upper side of the
cylinder head to the next oversize.
4. After reaming, cross out the code and emboss the
valve guide with the new code.
Valve Seat – Cut
1. Place the cylinder head on wooden blocks.
2. Cut the intake and the exhaust valve seats using
the guide drift KM–340–7 as follows:
S Valve seat – A 45–degree surface using the cut-
ter KM–340–13.
S Upper correction angle – A 30–degree surface
using the cutter KM–340–13.
S Lower correction angle – A 60–degree surface
using the cutter KM–340–26.
3. Clean the chippings from the cylinder head.
1.4L/1.6L DOHC ENGINE MECHANICAL 1C1 – 63
DAEWOO V–121 BL4
4. Inspect the dimension for the valve seat width.
S Intake: 1.17 to 1.57 mm (0.046 to 0.062 inch).
S Exhaust: 1.4 to 1.8 mm (0.055 to 0.071 inch).
5. Inspect the assembly height of the intake valves
and the exhaust valves. If the dimension is exceed-
ed, install new valves. Inspect the assembly height
of the intake valves and the exhaust valves again. If
the valve assembly height is still too large despite
replacing the valves, replace the cylinder head.
Assembly Procedure
1. Install the valve stem seals.
2. Lubricate the valve stems with engine oil.
3. Carefully install the valves in their original positions.
Do not damage the valve stem seals.
4. Install the valve springs in their original positions.
5. Install the valve spring caps.
6. Compress the valve springs with the valve spring
compressor KM–348 and adapter KM–653.
7. Install the valve keys.
8. Remove the valve spring compressor KM–348 and
adapter KM–653.
9. Lubricate the valve tappet adjusters with engine oil.
10. Install the valve tappet adjusters.
1C1 – 64I1.4L/1.6L DOHC ENGINE MECHANICAL
DAEWOO V–121 BL4
11. Install the intake camshaft.
12. Install the intake camshaft caps in their original
positions.
13. Install the exhaust camshaft.
14. Install the exhaust camshaft caps in their original
positions.
15. Install the camshaft cap bolts.
16. Tighten the camshaft cap bolts gradually and in the
sequence shown for each camshaft cap.
Tighten
Tighten the camshaft cap bolts to 16 NSm (12 lb–ft).
17. Install the spark plugs.
Tighten
Tighten the spark plugs to 25 NSm (18 lb–ft).
18. Install the EGR valve adapter gasket.
19. Install the EGR valve adapter.
20. Install the EGR valve adapter bolts.
Tighten
Tighten the exhaust gas recirculation valve adapter
bolts to 25 NSm (18 lb–ft).
21. Install the DIS coil mounting bracket.
22. Install the DIS coil mounting bracket bolts.
Tighten
Tighten the direct ignition system coil mounting brack-
et bolts to 10 NSm (89 lb–in).
23. Install the DIS coil with the ignition wires attached.
24. Install the DIS coil mounting bolts.
Tighten
Tighten the direct ignition system coil mounting bolts
to 10 NSm (89 lb–in).
25. Install the intake manifold studs.
26. Install the intake manifold.
27. Install the intake manifold retaining nuts and retain-
ing bolts in the sequence shown.
Tighten
Tighten the intake manifold retaining nuts and retain-
ing bolts to 25 NSm (18 lb–ft).
1.4L/1.6L DOHC ENGINE MECHANICAL 1C1 – 65
DAEWOO V–121 BL4
28. Install the fuel rail assembly with the bolts.
Tighten
Tighten the fuel rail assembly retaining bolts to 25
NSm (18 lb–ft).
29. Install the thermostat housing assembly.
30. Install the thermostat housing mounting bolts.
Tighten
Tighten the thermostat housing mounting bolts to 20
NSm (15 lb–ft).
31. Install the exhaust manifold studs.
32. Install the exhaust manifold gasket.
33. Install the exhaust manifold.
34. Install the exhaust manifold retaining nuts in the
sequence shown.
Tighten
Tighten the exhaust manifold retaining nuts to 25 NSm
(18 lb–ft).
35. Install the exhaust manifold heat shield.
36. Install the exhaust manifold heat shield bolts.
Tighten
Tighten the exhaust manifold heat shield bolts to 15
NSm (11 lb–ft).
37. Install the ECT sensor.
Tighten
Tighten the engine coolant temperature sensor to 20
NSm (15 lb–ft).
38. Install the cylinder head with the intake manifold
and the exhaust manifold attached. Refer to ”Cylin-
der Head and Gasket” in this section.
CRANKSHAFT
Tools Required
KM–412 Engine Overhaul Stand
J–42492 Timing Belt Adjuster
KM–470–B Angular Torque Gauge
J–36792 or KM–635 Crankshaft Rear Oil Seal Installer
Notice : Take extreme care to prevent any scratches,
nicks, or damage to the camshafts.
Disassembly Procedure
1. Remove the engine. Refer to ”Engine” in this sec-
tion.
2. Remove the flywheel or flexible plate bolts.
3. Remove the flywheel or the flexible plate.
1C1 – 66I1.4L/1.6L DOHC ENGINE MECHANICAL
DAEWOO V–121 BL4
4. Remove the crankshaft rear oil seal.
5. Mount the engine assembly on the engine overhaul
stand KM–412.
6. Remove the upper and the lower front timing belt
cover bolts.
7. Remove the upper and the lower front timing belt
cover.
8. Slightly loosen the water pump retaining bolts.
9. Rotate the water pump using the timing belt adjust-
er J–42492 to remove the tension from the timing
belt.
10. Remove the spark plug cover bolts.
1.4L/1.6L DOHC ENGINE MECHANICAL 1C1 – 67
DAEWOO V–121 BL4
11. Disconnect the engine ventilation hoses from the
camshaft cover.
12. Disconnect the oil filler cap.
13. Remove the spark plug cover bolts.
14. Remove the spark plug cover.
15. Disconnect the ignition wires from the spark plugs.
16. Remove the camshaft cover nuts.
17. Remove the camshaft cover washers.
18. Remove the camshaft cover and the camshaft cov-
er gasket.
Notice : Take extreme care to prevent any scratches,
nicks or damage to the camshafts.
19. While holding the intake camshaft firmly in place,
remove the intake camshaft bolt.
20. Remove the intake camshaft gear.
21. While holding the exhaust camshaft firmly in place,
remove the exhaust camshaft bolt.
22. Remove the exhaust camshaft gear.
23. Remove the timing belt automatic tensioner bolts.
24. Remove the timing belt automatic tensioner.
25. Remove the timing belt idler pulley bolt.
26. Remove the timing belt idler pulley.
27. Remove the crankshaft timing belt gear.
28. Remove the rear timing belt cover bolts.
29. Remove the rear timing belt cover.
1C1 – 68I1.4L/1.6L DOHC ENGINE MECHANICAL
DAEWOO V–121 BL4
30. Rotate the engine on the engine overhaul stand
KM–412.
31. Remove the oil pan retaining bolts.
32. Remove the oil pan.
33. Remove the oil suction pipe bolts.
34. Remove the oil suction pipe.
35. Remove the oil pump retaining bolts.
36. Remove the oil pump.
37. Mark the order of the connecting rod bearing caps.
38. Remove the connecting rod bearing cap bolts for all
of the pistons.
39. Remove the connecting rod bearing caps and the
lower connecting rod bearings.
40. Remove the upper connecting rod bearings.
1.4L/1.6L DOHC ENGINE MECHANICAL 1C1 – 69
DAEWOO V–121 BL4
41. Mark the order of the crankshaft bearing caps.
42. Remove the crankshaft bearing cap bolts.
43. Remove the crankshaft bearing caps and the lower
crankshaft bearings.
44. Remove the crankshaft.
45. Remove the upper crankshaft bearings.
46. Clean the parts, as needed.
Assembly Procedure
1. Coat the crankshaft bearings with the engine oil.
2. Install the upper crankshaft bearings in the engine
block.
3. Install the crankshaft.
4. Install the lower crankshaft bearings in the bearing
caps.
5. Inspect the crankshaft end play with the crankshaft
bearings installed.
6. Check for permissible crankshaft end play. Refer to
”Engine Specifications” in this section.
7. With the crankshaft mounted on the front and the
rear crankshaft bearings, check the middle crank-
shaft journal for permissible out–of–round (runout).
Refer to ”Engine Specifications” in this section.
1C1 – 70I1.4L/1.6L DOHC ENGINE MECHANICAL
DAEWOO V–121 BL4
Important :Grease the crankshaft journals and lubri–cate
the crankshaft bearings slightly so that the plastic gauging
thread does not tear when the crankshaft bearing caps are
removed.
8. Inspect all of the crankshaft bearing clearances us-
ing a commercially available plastic gauging (ductile
plastic threads).
9. Cut the plastic gauging threads to the length of the
bearing width. Lay them axially between the crank-
shaft journals and the crankshaft bearings.
10. Install the crankshaft bearing caps and the bolts.
Tighten
Tighten the crankshaft bearing cap bolts to 50 NSm
(37 lb–ft) plus 45 degrees plus 15 degrees.
11. Remove the crankshaft bearing cap bolts and the
caps.
12. Measure the width of the flattened plastic thread of
the plastic gauging using a ruler. (Plastic gauging is
available for different tolerance ranges.)
13. Inspect the bearing clearance for permissible toler-
ance ranges. Refer to ”Engine Specifications” in
this section.
14. Apply a bead of adhesive sealing compound to the
grooves of the crankshaft bearing caps.
15. Install the crankshaft bearing caps to the engine
block.
16. Tighten the crankshaft bearing caps using new
bolts.
Tighten
Tighten the crankshaft bearing cap bolts to 50 NSm
(37 lb–ft) using a torque wrench. Use the angular
torque gauge KM–470–B to tighten the crankshaft
bearings 45 degrees plus 15 degrees.
Important : Grease the connecting rod journals and lubri-
cate the connecting rod bearings slightly so that the plastic
gauging thread does not tear when the connecting rod
bearing caps are removed.
17. Inspect all of the connecting rod bearing clearances
using a commercially available plastic gauging
(ductile plastic threads).
18. Cut the plastic gauging threads to the length of the
connecting rod bearing width. Lay them axially be-
tween the connecting rod journals and the connect-
ing rod bearings.
19. Install the connecting rod bearing caps.
1.4L/1.6L DOHC ENGINE MECHANICAL 1C1 – 71
DAEWOO V–121 BL4
Tighten
Tighten the connecting rod bearing cap bolts to 25
NSm (18 lb–ft) using a torque wrench. Use the angular
torque gauge KM–470–B to tighten the connecting
rod bearing cap bolts 30 degrees plus 15 degrees.
20. Remove the connecting rod bearing caps.
21. Measure the width of the flattened plastic thread of
the plastic gauging using a ruler. (Plastic gauging is
available for different tolerance ranges.)
22. Inspect the bearing clearance for permissible toler-
ance ranges. Refer to ”Engine Specifications” in
this section.
23. Install the connecting rod bearing caps to the con-
necting rods.
24. Tighten the connecting rod bearing caps using new
bolts.
Tighten
Tighten the connecting rod bearing cap bolts to 25
NSm (18 lb–ft) using a torque wrench. Use the angular
torque gauge KM–470–B to tighten the connecting
rod cap bolts 30 degrees plus 15 degrees.
25. Install the oil pump.
26. Install the oil pump retaining bolts.
Tighten
Tighten the oil pump retaining bolts to 10 NSm (89 lb–
in).
1C1 – 72I1.4L/1.6L DOHC ENGINE MECHANICAL
DAEWOO V–121 BL4
27. Install the oil suction pipe.
28. Install the oil suction pipe bolts.
Tighten
Tighten the oil suction pipe bolts to 10 NSm (89 lb–in).
29. Coat the new oil pan gasket with sealant.
30. Install the oil pan gasket to the oil pan.
31. Install the oil pan.
32. Install the oil pan retaining bolts.
Tighten
Tighten the oil pan retaining bolts to 10 NSm (89 lb–in).
33. Rotate the engine on the engine overhaul stand
KM–412.
34. Install the rear timing belt cover.
35. Install the rear timing belt cover bolts.
Tighten
Tighten the rear timing belt cover bolts to 10 NSm (89
lb–in).
1.4L/1.6L DOHC ENGINE MECHANICAL 1C1 – 73
DAEWOO V–121 BL4
36. Install the crankshaft timing belt gear.
37. Install the timing belt automatic tensioner.
38. Install the timing belt automatic tensioner bolts.
Tighten
Tighten the timing belt automatic tensioner bolts to 25
NSm (18 lb–ft).
39. Install the timing belt idler pulley.
40. Install the timing belt idler pulley bolt.
Tighten
Tighten the timing belt idler pulley bolt to 40 NSm (30
lb–ft).
Notice : Take extreme care to prevent any scratches,
nicks or damage to the camshafts.
41. Install the intake camshaft gear.
42. Install the intake camshaft gear bolt while holding
the intake camshaft firmly in place.
Tighten
Tighten the intake camshaft gear bolt to 67.5 NSm (49
lb–ft).
43. Install the exhaust camshaft gear.
44. Install the exhaust camshaft gear bolt while holding
the exhaust camshaft firmly in place.
Tighten
Tighten the exhaust camshaft gear bolt to 67.5 NSm
(49 lb–ft).
45. Install the timing belt. Refer to ”Timing Belt” in this
section.
46. Adjust the timing belt tension. Refer to ”Timing Belt
Check and Adjust” in this section.
47. Apply a small amount of gasket sealant to the cor-
ners of the front camshaft caps and to the top of
the rear camshaft cover–to–cylinder head seal.
48. Install the camshaft cover and the camshaft cover
gasket.
49. Install the camshaft cover washers.
50. Install the camshaft cover nuts.
Tighten
Tighten the camshaft cover nuts to 10 NSm (89 lb–in).
51. Connect the ignition wires to the spark plugs.
52. Connect the oil filler cap.
53. Connect the engine ventilation hose to the cam-
shaft cover.
54. Install the upper and the lower front timing belt cov-
ers.
55. Install the upper and the lower front timing belt cov-
er bolts.
Tighten
Tighten the upper and the lower front timing belt cover
bolts to 10 NSm (89 lb–in).
1C1 – 74I1.4L/1.6L DOHC ENGINE MECHANICAL
DAEWOO V–121 BL4
56. Install the engine lifting device.
57. Remove the engine from the engine overhaul stand
KM–412.
58. Install a new crankshaft rear oil seal using the in-
staller J–36792 or KM–635.
59. Install the flywheel or the flexible plate.
60. Install the flywheel or the flexible plate bolts.
Tighten
Tighten the flywheel bolts to 35 NSm (25 lb–ft). Use
the angular torque gauge KM–470–B to tighten the
flywheel bolts another 30 degrees plus 15 degrees. If
the vehicle is equipped with an automatic transaxle,
tighten the flexible plate bolts to 45 NSm (33 lb–ft).
61. Install the engine. Refer to ”Engine” in this section.
CRANKSHAFT BEARINGS AND
CONNECTING ROD BEARINGS –
GAUGING PLASTIC
Tools Required
KM–470–B Angular Torque Gauge
Inspection Procedure – Crankshaft
1. Coat the crankshaft bearings with engine oil.
2. Install the upper crankshaft bearings into the engine
block crankshaft journals.
3. Install the lower crankshaft bearings into the crank-
shaft bearing caps.
1.4L/1.6L DOHC ENGINE MECHANICAL 1C1 – 75
DAEWOO V–121 BL4
4. Install the crankshaft.
5. Inspect the crankshaft end play with the crankshaft
bearings installed.
6. Check for permissible crankshaft end play. Refer to
”Engine Specifications” in this section.
7. With the crankshaft mounted on the front and rear
crankshaft bearings, check the middle crankshaft
journal for permissible out–of–round (runout). Refer
to ”Engine Specifications” in this section.
Notice : Grease the crankshaft journals and lubricate the
crankshaft bearings slightly so that the plastic gauging
thread does not tear when the crankshaft bearing caps are
removed.
8. Inspect all of the crankshaft bearing clearances us-
ing a commercially available plastic gauging (ductile
plastic threads).
9. Cut the plastic gauging threads to the length of the
bearing width. Lay them axially between the crank-
shaft journals and the crankshaft bearings.
10. Install the crankshaft bearing caps.
11. Install the crankshaft bearing cap bolts.
Tighten
Tighten the crankshaft bearing cap bolts to 50 NSm
(37 lb–ft). Using the angular torque gauge
KM–470–B, tighten the crankshaft bearing cap bolts
45 degrees plus 15 degrees.
1C1 – 76I1.4L/1.6L DOHC ENGINE MECHANICAL
DAEWOO V–121 BL4
12. Remove the crankshaft bearing caps.
13. Measure the width of the flattened plastic thread of
the plastic gauging using a ruler. (Plastic gauging is
available for different tolerance ranges.)
14. Inspect the bearing clearances for permissible toler-
ance ranges. Refer to ”Engine Specifications” in
this section.
Inspection Procedure – Connecting Rods
1. Coat the connecting rod bearings with engine oil.
2. Install the upper connecting rod bearings into the
connecting rod journals.
3. Install the lower connecting rod bearings into the
connecting rod bearing caps.
Notice : Grease the connecting rod journals and lubricate
the connecting rod bearings slightly so that the plastic
gauging thread does not tear when the connecting rod
bearing caps are removed.
4. Inspect all of the connecting rod bearing clearances
using a commercially available plastic gauging
(ductile plastic threads).
5. Cut the plastic gauging threads to the length of the
bearing width. Lay them axially between the con-
necting rod journals and the connecting rod bear-
ings.
6. Install the connecting rod bearing caps.
7. Install the connecting rod bearing cap bolts.
Tighten
Tighten the connecting rod bearing cap bolts to 25
NSm (18 lb–ft). Using the angular torque gauge
KM–470–B, tighten the connecting rod bearing cap
bolts another 30 degrees plus 15 degrees.
8. Remove the connecting rod bearing caps.
9. Measure the width of the flattened plastic thread of
the plastic gauging using a ruler. (Plastic gauging is
available for different tolerance ranges.)
10. Inspect the bearing clearance for permissible toler-
ance ranges. Refer to ”Engine Specifications” in
this section.
1.4L/1.6L DOHC ENGINE MECHANICAL 1C1 – 77
DAEWOO V–121 BL4
GENERAL DESCRIPTION
AND SYSTEM OPERATION
CYLINDER HEAD AND GASKET
The cylinder head is made of an aluminum alloy. The cylin-
der head uses cross–flow intake and exhaust ports. A
spark plug is located in the center of each combustion
chamber. The cylinder head houses the dual camshafts.
CRANKSHAFT
The crankshaft has eight integral weights which are cast
with it for balancing. Oil holes run through the center of the
crankshaft to supply oil to the connecting rods, the bear-
ings, the pistons, and the other components. The end
thrust load is taken by the thrust washers installed at the
center journal.
TIMING BELT
The timing belt coordinates the crankshaft and the dual
overhead camshafts and keeps them synchronized. The
timing belt also turns the water pump. The timing belt and
the pulleys are toothed so that there is no slippage be-
tween them. There are two idler pulleys. An automatic ten-
sioner pulley maintains the timing belt’s correct tension.
The timing belt is made of a tough reinforced rubber similar
to that used on the serpentine accessory drive belt. The
timing belt requires no lubrication.
OIL PUMP
The oil pump draws engine oil from the oil pan and feeds
it under pressure to the various parts of the engine. An oil
strainer is mounted before the inlet of the oil pump to re-
move impurities which could clog or damage the oil pump
or other engine components. When the drive gear rotates,
the driven gear rotates. This causes the space between
the gears to constantly open and narrow, pulling oil in from
the oil pan when the space opens and pumping the oil out
to the engine as it narrows.
At high engine speeds, the oil pump supplies a much high-
er amount of oil than is required for lubrication of the en-
gine. The oil pressure regulator prevents too much oil from
entering the engine lubrication passages. During normal
oil supply, a coil spring and valve keep the bypass closed,
directing all of the oil pumped to the engine. When the
amount of oil being pumped increases, the pressure be-
comes high enough to overcome the force of the spring.
This opens the valve of the oil pressure regulator, allowing
the excess oil to flow through the valve and drain back to
the oil pan.
OIL PAN
The engine oil pan is mounted to the bottom of the cylinder
block. The engine oil pan houses the crankcase and is
made of cast metal.
Engine oil is pumped from the oil pan by the oil pump. After
it passes through the oil filter, it is fed through two paths
to lubricate the cylinder block and the cylinder head. In one
path, the oil is pumped through the oil passages in the
crankshaft to the connecting rods, then to the pistons and
the cylinders. It then drains back to the oil pan. In the sec-
ond path, the oil is pumped through the oil passages to the
camshaft. The oil passes through the internal passage-
ways in the camshafts to lubricate the valve assemblies
before draining back to the oil pan.
EXHAUST MANIFOLD
A single four–port, rear–takedown manifold is used with
this engine. The manifold is designed to direct escaping
exhaust gases out of the combustion chambers with a
minimum of back pressure. The oxygen sensor is
mounted to the exhaust manifold.
INTAKE MANIFOLD
The intake manifold has four independent long ports and
uses inertial supercharging to improve engine torque at
low and moderate speeds. The plenum is attached to the
intake manifold.
CAMSHAFTS
This engine is a dual overhead camshaft (DOHC) type,
which means there are two camshafts. One camshaft op-
erates the intake valves, and the other camshaft operates
the exhaust valves. The camshafts sit in journals on the
top of the engine in the cylinder head and are held in place
by camshaft caps. The camshaft journals of the cylinder
head are drilled to create oil passages. Engine oil travels
to the camshafts under pressure where it lubricates each
camshaft journal. The oil returns to the oil pan through
drain holes in the cylinder head. The camshaft lobes are
machined into the solid camshaft to open and close the in-
take and the exhaust valves precisely the correct amount
at the correct time. The camshaft lobes are oiled by splash
action from pressurized oil escaping from the camshaft
journals.

More Related Content

What's hot

232 Cambio automatico 09A 09B.pdf
232 Cambio automatico 09A 09B.pdf232 Cambio automatico 09A 09B.pdf
232 Cambio automatico 09A 09B.pdfjcarrey
 
JCB 3.0D 4×4, 3.5D 4×4 TELETRUK Service Repair Manual SN(78001 Onwards)
JCB 3.0D 4×4, 3.5D 4×4 TELETRUK Service Repair Manual SN(78001 Onwards)JCB 3.0D 4×4, 3.5D 4×4 TELETRUK Service Repair Manual SN(78001 Onwards)
JCB 3.0D 4×4, 3.5D 4×4 TELETRUK Service Repair Manual SN(78001 Onwards)sjehfd ksejfm
 
Manual engine ZD30 nissan
Manual engine ZD30 nissanManual engine ZD30 nissan
Manual engine ZD30 nissanInês Krug
 
Caterpillar engine speed timing sensor circuit test
Caterpillar engine speed timing sensor circuit  testCaterpillar engine speed timing sensor circuit  test
Caterpillar engine speed timing sensor circuit testnoelsalazar
 
Caterpillar cat 950 h wheel loader (prefix jad) service repair manual (jad000...
Caterpillar cat 950 h wheel loader (prefix jad) service repair manual (jad000...Caterpillar cat 950 h wheel loader (prefix jad) service repair manual (jad000...
Caterpillar cat 950 h wheel loader (prefix jad) service repair manual (jad000...fjjskkemsmee
 
MANUAL ENGINE 1/2KD-FTV TOYOTA SISTEMA COMNON RAIL
MANUAL ENGINE 1/2KD-FTV TOYOTA SISTEMA COMNON RAILMANUAL ENGINE 1/2KD-FTV TOYOTA SISTEMA COMNON RAIL
MANUAL ENGINE 1/2KD-FTV TOYOTA SISTEMA COMNON RAILInês Krug
 
Manual técnico motores yanmar série tne
Manual técnico motores yanmar série tneManual técnico motores yanmar série tne
Manual técnico motores yanmar série tneJunior Iung
 
perkins 2800 series workshop manual
perkins 2800 series workshop manualperkins 2800 series workshop manual
perkins 2800 series workshop manualIanJameson4
 
Manual servicio-diferencial-r770-camiones-scania
Manual servicio-diferencial-r770-camiones-scaniaManual servicio-diferencial-r770-camiones-scania
Manual servicio-diferencial-r770-camiones-scaniaroberto rincon robles
 
308 Cambio automatico DSG 02E.pdf
308 Cambio automatico DSG 02E.pdf308 Cambio automatico DSG 02E.pdf
308 Cambio automatico DSG 02E.pdfjcarrey
 
Cummins qsb6.7 engines service repair manual
Cummins qsb6.7 engines service repair manualCummins qsb6.7 engines service repair manual
Cummins qsb6.7 engines service repair manualfjkskmmdmme
 
Manual scania-diagramas-electricos-autobuses (1)
Manual scania-diagramas-electricos-autobuses (1)Manual scania-diagramas-electricos-autobuses (1)
Manual scania-diagramas-electricos-autobuses (1)Fredy Muñoz
 

What's hot (20)

Manual de Partes Motor 3456 - Engine Caterpillar
Manual de Partes Motor 3456 - Engine Caterpillar Manual de Partes Motor 3456 - Engine Caterpillar
Manual de Partes Motor 3456 - Engine Caterpillar
 
Motor Scania Dc 12
Motor Scania Dc 12 Motor Scania Dc 12
Motor Scania Dc 12
 
232 Cambio automatico 09A 09B.pdf
232 Cambio automatico 09A 09B.pdf232 Cambio automatico 09A 09B.pdf
232 Cambio automatico 09A 09B.pdf
 
Heui
HeuiHeui
Heui
 
JCB 3.0D 4×4, 3.5D 4×4 TELETRUK Service Repair Manual SN(78001 Onwards)
JCB 3.0D 4×4, 3.5D 4×4 TELETRUK Service Repair Manual SN(78001 Onwards)JCB 3.0D 4×4, 3.5D 4×4 TELETRUK Service Repair Manual SN(78001 Onwards)
JCB 3.0D 4×4, 3.5D 4×4 TELETRUK Service Repair Manual SN(78001 Onwards)
 
Manual engine ZD30 nissan
Manual engine ZD30 nissanManual engine ZD30 nissan
Manual engine ZD30 nissan
 
Manual de montagem_de_motor
Manual de montagem_de_motorManual de montagem_de_motor
Manual de montagem_de_motor
 
Caterpillar engine speed timing sensor circuit test
Caterpillar engine speed timing sensor circuit  testCaterpillar engine speed timing sensor circuit  test
Caterpillar engine speed timing sensor circuit test
 
Manual de Partes Tractor de Cadenas D6T Caterpillar - www.oroscocat.com
Manual de Partes Tractor de Cadenas D6T Caterpillar -  www.oroscocat.comManual de Partes Tractor de Cadenas D6T Caterpillar -  www.oroscocat.com
Manual de Partes Tractor de Cadenas D6T Caterpillar - www.oroscocat.com
 
Caterpillar cat 950 h wheel loader (prefix jad) service repair manual (jad000...
Caterpillar cat 950 h wheel loader (prefix jad) service repair manual (jad000...Caterpillar cat 950 h wheel loader (prefix jad) service repair manual (jad000...
Caterpillar cat 950 h wheel loader (prefix jad) service repair manual (jad000...
 
Tabela de parede linha diesel
Tabela de parede linha dieselTabela de parede linha diesel
Tabela de parede linha diesel
 
MANUAL ENGINE 1/2KD-FTV TOYOTA SISTEMA COMNON RAIL
MANUAL ENGINE 1/2KD-FTV TOYOTA SISTEMA COMNON RAILMANUAL ENGINE 1/2KD-FTV TOYOTA SISTEMA COMNON RAIL
MANUAL ENGINE 1/2KD-FTV TOYOTA SISTEMA COMNON RAIL
 
Manual técnico motores yanmar série tne
Manual técnico motores yanmar série tneManual técnico motores yanmar série tne
Manual técnico motores yanmar série tne
 
perkins 2800 series workshop manual
perkins 2800 series workshop manualperkins 2800 series workshop manual
perkins 2800 series workshop manual
 
Manual servicio-diferencial-r770-camiones-scania
Manual servicio-diferencial-r770-camiones-scaniaManual servicio-diferencial-r770-camiones-scania
Manual servicio-diferencial-r770-camiones-scania
 
Manual volvo
Manual volvoManual volvo
Manual volvo
 
4 sistemas de inyeccion diesel
4 sistemas de inyeccion diesel4 sistemas de inyeccion diesel
4 sistemas de inyeccion diesel
 
308 Cambio automatico DSG 02E.pdf
308 Cambio automatico DSG 02E.pdf308 Cambio automatico DSG 02E.pdf
308 Cambio automatico DSG 02E.pdf
 
Cummins qsb6.7 engines service repair manual
Cummins qsb6.7 engines service repair manualCummins qsb6.7 engines service repair manual
Cummins qsb6.7 engines service repair manual
 
Manual scania-diagramas-electricos-autobuses (1)
Manual scania-diagramas-electricos-autobuses (1)Manual scania-diagramas-electricos-autobuses (1)
Manual scania-diagramas-electricos-autobuses (1)
 

Similar to Manual de servicio Daewoo Lanos

New holland ts90 tractor service repair manual
New holland ts90 tractor service repair manualNew holland ts90 tractor service repair manual
New holland ts90 tractor service repair manualfjsjekkdmmemm
 
New holland ts90 tractor service repair manual
New holland ts90 tractor service repair manualNew holland ts90 tractor service repair manual
New holland ts90 tractor service repair manualfujsjfjkskekmm
 
New holland ts100 tractor service repair manual
New holland ts100 tractor service repair manualNew holland ts100 tractor service repair manual
New holland ts100 tractor service repair manualfusjejfjsekksem
 
New holland ts110 tractor service repair manual
New holland ts110 tractor service repair manualNew holland ts110 tractor service repair manual
New holland ts110 tractor service repair manualifksjejdkemm
 
New holland t3010 tractor service repair manual
New holland t3010 tractor service repair manualNew holland t3010 tractor service repair manual
New holland t3010 tractor service repair manualfjskeazqkkdmme
 
New holland t3020 tractor service repair manual
New holland t3020 tractor service repair manualNew holland t3020 tractor service repair manual
New holland t3020 tractor service repair manualfjskkesmdmm
 
New holland t3010 tractor service repair manual
New holland t3010 tractor service repair manualNew holland t3010 tractor service repair manual
New holland t3010 tractor service repair manualifosodkmsme
 
New holland t3040 tractor service repair manual
New holland t3040 tractor service repair manualNew holland t3040 tractor service repair manual
New holland t3040 tractor service repair manualpfiskdmjekm
 
New holland t3030 tractor service repair manual
New holland t3030 tractor service repair manualNew holland t3030 tractor service repair manual
New holland t3030 tractor service repair manualfksjksmmde
 
Komatsu PW220-7K Hydraulic Excavator Service Repair Manual SN:K40001 and up
Komatsu PW220-7K Hydraulic Excavator Service Repair Manual SN:K40001 and upKomatsu PW220-7K Hydraulic Excavator Service Repair Manual SN:K40001 and up
Komatsu PW220-7K Hydraulic Excavator Service Repair Manual SN:K40001 and upjfksmemfmm
 
New holland t3010 tractor service repair manual
New holland t3010 tractor service repair manualNew holland t3010 tractor service repair manual
New holland t3010 tractor service repair manualfusjjefjkskemem
 
New holland t3030 tractor service repair manual
New holland t3030 tractor service repair manualNew holland t3030 tractor service repair manual
New holland t3030 tractor service repair manualfisejfjsekfksem
 
New holland t3030 tractor service repair manual
New holland t3030 tractor service repair manualNew holland t3030 tractor service repair manual
New holland t3030 tractor service repair manualfujsjefjksekfsmem
 
New holland t3020 tractor service repair manual
New holland t3020 tractor service repair manualNew holland t3020 tractor service repair manual
New holland t3020 tractor service repair manualfujsjejfkskemm
 
New holland t3020 tractor service repair manual
New holland t3020 tractor service repair manualNew holland t3020 tractor service repair manual
New holland t3020 tractor service repair manualufjjsejfjksekmem
 
New holland t3040 tractor service repair manual
New holland t3040 tractor service repair manualNew holland t3040 tractor service repair manual
New holland t3040 tractor service repair manualfijsfjskekmme
 
New holland t3030 tractor service repair manual
New holland t3030 tractor service repair manualNew holland t3030 tractor service repair manual
New holland t3030 tractor service repair manualuudjjjkskkmem
 
New holland t3010 tractor service repair manual
New holland t3010 tractor service repair manualNew holland t3010 tractor service repair manual
New holland t3010 tractor service repair manualfujdjffjkskemme
 
New holland t3040 tractor service repair manual
New holland t3040 tractor service repair manualNew holland t3040 tractor service repair manual
New holland t3040 tractor service repair manualudjjsjkkddkmme
 

Similar to Manual de servicio Daewoo Lanos (19)

New holland ts90 tractor service repair manual
New holland ts90 tractor service repair manualNew holland ts90 tractor service repair manual
New holland ts90 tractor service repair manual
 
New holland ts90 tractor service repair manual
New holland ts90 tractor service repair manualNew holland ts90 tractor service repair manual
New holland ts90 tractor service repair manual
 
New holland ts100 tractor service repair manual
New holland ts100 tractor service repair manualNew holland ts100 tractor service repair manual
New holland ts100 tractor service repair manual
 
New holland ts110 tractor service repair manual
New holland ts110 tractor service repair manualNew holland ts110 tractor service repair manual
New holland ts110 tractor service repair manual
 
New holland t3010 tractor service repair manual
New holland t3010 tractor service repair manualNew holland t3010 tractor service repair manual
New holland t3010 tractor service repair manual
 
New holland t3020 tractor service repair manual
New holland t3020 tractor service repair manualNew holland t3020 tractor service repair manual
New holland t3020 tractor service repair manual
 
New holland t3010 tractor service repair manual
New holland t3010 tractor service repair manualNew holland t3010 tractor service repair manual
New holland t3010 tractor service repair manual
 
New holland t3040 tractor service repair manual
New holland t3040 tractor service repair manualNew holland t3040 tractor service repair manual
New holland t3040 tractor service repair manual
 
New holland t3030 tractor service repair manual
New holland t3030 tractor service repair manualNew holland t3030 tractor service repair manual
New holland t3030 tractor service repair manual
 
Komatsu PW220-7K Hydraulic Excavator Service Repair Manual SN:K40001 and up
Komatsu PW220-7K Hydraulic Excavator Service Repair Manual SN:K40001 and upKomatsu PW220-7K Hydraulic Excavator Service Repair Manual SN:K40001 and up
Komatsu PW220-7K Hydraulic Excavator Service Repair Manual SN:K40001 and up
 
New holland t3010 tractor service repair manual
New holland t3010 tractor service repair manualNew holland t3010 tractor service repair manual
New holland t3010 tractor service repair manual
 
New holland t3030 tractor service repair manual
New holland t3030 tractor service repair manualNew holland t3030 tractor service repair manual
New holland t3030 tractor service repair manual
 
New holland t3030 tractor service repair manual
New holland t3030 tractor service repair manualNew holland t3030 tractor service repair manual
New holland t3030 tractor service repair manual
 
New holland t3020 tractor service repair manual
New holland t3020 tractor service repair manualNew holland t3020 tractor service repair manual
New holland t3020 tractor service repair manual
 
New holland t3020 tractor service repair manual
New holland t3020 tractor service repair manualNew holland t3020 tractor service repair manual
New holland t3020 tractor service repair manual
 
New holland t3040 tractor service repair manual
New holland t3040 tractor service repair manualNew holland t3040 tractor service repair manual
New holland t3040 tractor service repair manual
 
New holland t3030 tractor service repair manual
New holland t3030 tractor service repair manualNew holland t3030 tractor service repair manual
New holland t3030 tractor service repair manual
 
New holland t3010 tractor service repair manual
New holland t3010 tractor service repair manualNew holland t3010 tractor service repair manual
New holland t3010 tractor service repair manual
 
New holland t3040 tractor service repair manual
New holland t3040 tractor service repair manualNew holland t3040 tractor service repair manual
New holland t3040 tractor service repair manual
 

More from Jordan Felipe Cabrera Nuñez

43.PDF Manual del mecanismo de la caja de velocidades.
43.PDF Manual del mecanismo de la caja de velocidades.43.PDF Manual del mecanismo de la caja de velocidades.
43.PDF Manual del mecanismo de la caja de velocidades.Jordan Felipe Cabrera Nuñez
 
41.PDF Manual del sistema de embrague mecánico Hyundai
41.PDF Manual del sistema de embrague mecánico Hyundai41.PDF Manual del sistema de embrague mecánico Hyundai
41.PDF Manual del sistema de embrague mecánico HyundaiJordan Felipe Cabrera Nuñez
 
DATSUN MOTOR J16-18.pdf AJUSTES Y EL PROCESO DE ARMADO DEL MOTOR.
DATSUN MOTOR J16-18.pdf AJUSTES Y EL PROCESO DE ARMADO DEL MOTOR.DATSUN MOTOR J16-18.pdf AJUSTES Y EL PROCESO DE ARMADO DEL MOTOR.
DATSUN MOTOR J16-18.pdf AJUSTES Y EL PROCESO DE ARMADO DEL MOTOR.Jordan Felipe Cabrera Nuñez
 
01 Motor.pdf Kia cerato, puede estar equipado con 4 tipos de motores.
01 Motor.pdf Kia cerato, puede estar equipado con 4 tipos de motores.01 Motor.pdf Kia cerato, puede estar equipado con 4 tipos de motores.
01 Motor.pdf Kia cerato, puede estar equipado con 4 tipos de motores.Jordan Felipe Cabrera Nuñez
 
02 opirus motor.pdf, veremos el suministro de combustible.
02 opirus motor.pdf, veremos el suministro de combustible.02 opirus motor.pdf, veremos el suministro de combustible.
02 opirus motor.pdf, veremos el suministro de combustible.Jordan Felipe Cabrera Nuñez
 
TEMA CAMBIO DE ANILLOS DEL MOTOR TICO 30-11-23.pptx
TEMA CAMBIO DE ANILLOS DEL MOTOR TICO 30-11-23.pptxTEMA CAMBIO DE ANILLOS DEL MOTOR TICO 30-11-23.pptx
TEMA CAMBIO DE ANILLOS DEL MOTOR TICO 30-11-23.pptxJordan Felipe Cabrera Nuñez
 
Daewoo-Tico_1998_ES__manual_de_taller_78f95ad86b (2).pdf
Daewoo-Tico_1998_ES__manual_de_taller_78f95ad86b (2).pdfDaewoo-Tico_1998_ES__manual_de_taller_78f95ad86b (2).pdf
Daewoo-Tico_1998_ES__manual_de_taller_78f95ad86b (2).pdfJordan Felipe Cabrera Nuñez
 
Daewoo-Tico_1998_ES__manual_de_taller_78f95ad86b.pdf
Daewoo-Tico_1998_ES__manual_de_taller_78f95ad86b.pdfDaewoo-Tico_1998_ES__manual_de_taller_78f95ad86b.pdf
Daewoo-Tico_1998_ES__manual_de_taller_78f95ad86b.pdfJordan Felipe Cabrera Nuñez
 
Especificaciones técnica (TORQUE) Engine torque specs 7 09
Especificaciones técnica (TORQUE) Engine torque specs 7 09Especificaciones técnica (TORQUE) Engine torque specs 7 09
Especificaciones técnica (TORQUE) Engine torque specs 7 09Jordan Felipe Cabrera Nuñez
 
Manual de servicio- funcionamiento common Rail Sistem
Manual de servicio- funcionamiento common Rail SistemManual de servicio- funcionamiento common Rail Sistem
Manual de servicio- funcionamiento common Rail SistemJordan Felipe Cabrera Nuñez
 

More from Jordan Felipe Cabrera Nuñez (20)

43.PDF Manual del mecanismo de la caja de velocidades.
43.PDF Manual del mecanismo de la caja de velocidades.43.PDF Manual del mecanismo de la caja de velocidades.
43.PDF Manual del mecanismo de la caja de velocidades.
 
41.PDF Manual del sistema de embrague mecánico Hyundai
41.PDF Manual del sistema de embrague mecánico Hyundai41.PDF Manual del sistema de embrague mecánico Hyundai
41.PDF Manual del sistema de embrague mecánico Hyundai
 
DATSUN MOTOR J16-18.pdf AJUSTES Y EL PROCESO DE ARMADO DEL MOTOR.
DATSUN MOTOR J16-18.pdf AJUSTES Y EL PROCESO DE ARMADO DEL MOTOR.DATSUN MOTOR J16-18.pdf AJUSTES Y EL PROCESO DE ARMADO DEL MOTOR.
DATSUN MOTOR J16-18.pdf AJUSTES Y EL PROCESO DE ARMADO DEL MOTOR.
 
01 Motor.pdf Kia cerato, puede estar equipado con 4 tipos de motores.
01 Motor.pdf Kia cerato, puede estar equipado con 4 tipos de motores.01 Motor.pdf Kia cerato, puede estar equipado con 4 tipos de motores.
01 Motor.pdf Kia cerato, puede estar equipado con 4 tipos de motores.
 
02 opirus motor.pdf, veremos el suministro de combustible.
02 opirus motor.pdf, veremos el suministro de combustible.02 opirus motor.pdf, veremos el suministro de combustible.
02 opirus motor.pdf, veremos el suministro de combustible.
 
TEMA CAMBIO DE ANILLOS DEL MOTOR TICO 30-11-23.pptx
TEMA CAMBIO DE ANILLOS DEL MOTOR TICO 30-11-23.pptxTEMA CAMBIO DE ANILLOS DEL MOTOR TICO 30-11-23.pptx
TEMA CAMBIO DE ANILLOS DEL MOTOR TICO 30-11-23.pptx
 
Daewoo-Tico_1998_ES__manual_de_taller_78f95ad86b (2).pdf
Daewoo-Tico_1998_ES__manual_de_taller_78f95ad86b (2).pdfDaewoo-Tico_1998_ES__manual_de_taller_78f95ad86b (2).pdf
Daewoo-Tico_1998_ES__manual_de_taller_78f95ad86b (2).pdf
 
Daewoo-Tico_1998_ES__manual_de_taller_78f95ad86b.pdf
Daewoo-Tico_1998_ES__manual_de_taller_78f95ad86b.pdfDaewoo-Tico_1998_ES__manual_de_taller_78f95ad86b.pdf
Daewoo-Tico_1998_ES__manual_de_taller_78f95ad86b.pdf
 
Silabo soldadura III 2021 i-convertido
Silabo soldadura III 2021 i-convertidoSilabo soldadura III 2021 i-convertido
Silabo soldadura III 2021 i-convertido
 
Inyeccioncommonrailbosch
InyeccioncommonrailboschInyeccioncommonrailbosch
Inyeccioncommonrailbosch
 
Curso inyector-bosch-cr
Curso inyector-bosch-crCurso inyector-bosch-cr
Curso inyector-bosch-cr
 
Bosh diesel la_tecnologia_del_futuro
Bosh diesel la_tecnologia_del_futuroBosh diesel la_tecnologia_del_futuro
Bosh diesel la_tecnologia_del_futuro
 
Laboratorio diesel silabo 2020 II
Laboratorio diesel silabo 2020 IILaboratorio diesel silabo 2020 II
Laboratorio diesel silabo 2020 II
 
Silabo de motores diesel 2020 II
Silabo de motores diesel 2020 IISilabo de motores diesel 2020 II
Silabo de motores diesel 2020 II
 
Silabo sistema de encendido 2020-II
Silabo sistema de encendido 2020-IISilabo sistema de encendido 2020-II
Silabo sistema de encendido 2020-II
 
Kia Cerato transmisión automática.
Kia Cerato transmisión automática.Kia Cerato transmisión automática.
Kia Cerato transmisión automática.
 
Especificaciones técnica (TORQUE) Engine torque specs 7 09
Especificaciones técnica (TORQUE) Engine torque specs 7 09Especificaciones técnica (TORQUE) Engine torque specs 7 09
Especificaciones técnica (TORQUE) Engine torque specs 7 09
 
Common+rail+bosch+(kia+motors)
Common+rail+bosch+(kia+motors)Common+rail+bosch+(kia+motors)
Common+rail+bosch+(kia+motors)
 
Manual de servicio- funcionamiento common Rail Sistem
Manual de servicio- funcionamiento common Rail SistemManual de servicio- funcionamiento common Rail Sistem
Manual de servicio- funcionamiento common Rail Sistem
 
Maxisys pro manual usuario IESTP, "G.L.B.R.)
Maxisys pro manual usuario IESTP, "G.L.B.R.)Maxisys pro manual usuario IESTP, "G.L.B.R.)
Maxisys pro manual usuario IESTP, "G.L.B.R.)
 

Recently uploaded

Call Girls in Dwarka Mor Delhi Contact Us 9654467111
Call Girls in Dwarka Mor Delhi Contact Us 9654467111Call Girls in Dwarka Mor Delhi Contact Us 9654467111
Call Girls in Dwarka Mor Delhi Contact Us 9654467111Sapana Sha
 
Separation of Lanthanides/ Lanthanides and Actinides
Separation of Lanthanides/ Lanthanides and ActinidesSeparation of Lanthanides/ Lanthanides and Actinides
Separation of Lanthanides/ Lanthanides and ActinidesFatimaKhan178732
 
Interactive Powerpoint_How to Master effective communication
Interactive Powerpoint_How to Master effective communicationInteractive Powerpoint_How to Master effective communication
Interactive Powerpoint_How to Master effective communicationnomboosow
 
_Math 4-Q4 Week 5.pptx Steps in Collecting Data
_Math 4-Q4 Week 5.pptx Steps in Collecting Data_Math 4-Q4 Week 5.pptx Steps in Collecting Data
_Math 4-Q4 Week 5.pptx Steps in Collecting DataJhengPantaleon
 
Accessible design: Minimum effort, maximum impact
Accessible design: Minimum effort, maximum impactAccessible design: Minimum effort, maximum impact
Accessible design: Minimum effort, maximum impactdawncurless
 
How to Make a Pirate ship Primary Education.pptx
How to Make a Pirate ship Primary Education.pptxHow to Make a Pirate ship Primary Education.pptx
How to Make a Pirate ship Primary Education.pptxmanuelaromero2013
 
URLs and Routing in the Odoo 17 Website App
URLs and Routing in the Odoo 17 Website AppURLs and Routing in the Odoo 17 Website App
URLs and Routing in the Odoo 17 Website AppCeline George
 
Introduction to AI in Higher Education_draft.pptx
Introduction to AI in Higher Education_draft.pptxIntroduction to AI in Higher Education_draft.pptx
Introduction to AI in Higher Education_draft.pptxpboyjonauth
 
Science 7 - LAND and SEA BREEZE and its Characteristics
Science 7 - LAND and SEA BREEZE and its CharacteristicsScience 7 - LAND and SEA BREEZE and its Characteristics
Science 7 - LAND and SEA BREEZE and its CharacteristicsKarinaGenton
 
Hybridoma Technology ( Production , Purification , and Application )
Hybridoma Technology  ( Production , Purification , and Application  ) Hybridoma Technology  ( Production , Purification , and Application  )
Hybridoma Technology ( Production , Purification , and Application ) Sakshi Ghasle
 
Presiding Officer Training module 2024 lok sabha elections
Presiding Officer Training module 2024 lok sabha electionsPresiding Officer Training module 2024 lok sabha elections
Presiding Officer Training module 2024 lok sabha electionsanshu789521
 
“Oh GOSH! Reflecting on Hackteria's Collaborative Practices in a Global Do-It...
“Oh GOSH! Reflecting on Hackteria's Collaborative Practices in a Global Do-It...“Oh GOSH! Reflecting on Hackteria's Collaborative Practices in a Global Do-It...
“Oh GOSH! Reflecting on Hackteria's Collaborative Practices in a Global Do-It...Marc Dusseiller Dusjagr
 
Crayon Activity Handout For the Crayon A
Crayon Activity Handout For the Crayon ACrayon Activity Handout For the Crayon A
Crayon Activity Handout For the Crayon AUnboundStockton
 
Enzyme, Pharmaceutical Aids, Miscellaneous Last Part of Chapter no 5th.pdf
Enzyme, Pharmaceutical Aids, Miscellaneous Last Part of Chapter no 5th.pdfEnzyme, Pharmaceutical Aids, Miscellaneous Last Part of Chapter no 5th.pdf
Enzyme, Pharmaceutical Aids, Miscellaneous Last Part of Chapter no 5th.pdfSumit Tiwari
 
Sanyam Choudhary Chemistry practical.pdf
Sanyam Choudhary Chemistry practical.pdfSanyam Choudhary Chemistry practical.pdf
Sanyam Choudhary Chemistry practical.pdfsanyamsingh5019
 
Incoming and Outgoing Shipments in 1 STEP Using Odoo 17
Incoming and Outgoing Shipments in 1 STEP Using Odoo 17Incoming and Outgoing Shipments in 1 STEP Using Odoo 17
Incoming and Outgoing Shipments in 1 STEP Using Odoo 17Celine George
 
How to Configure Email Server in Odoo 17
How to Configure Email Server in Odoo 17How to Configure Email Server in Odoo 17
How to Configure Email Server in Odoo 17Celine George
 
MENTAL STATUS EXAMINATION format.docx
MENTAL     STATUS EXAMINATION format.docxMENTAL     STATUS EXAMINATION format.docx
MENTAL STATUS EXAMINATION format.docxPoojaSen20
 
The basics of sentences session 2pptx copy.pptx
The basics of sentences session 2pptx copy.pptxThe basics of sentences session 2pptx copy.pptx
The basics of sentences session 2pptx copy.pptxheathfieldcps1
 

Recently uploaded (20)

Call Girls in Dwarka Mor Delhi Contact Us 9654467111
Call Girls in Dwarka Mor Delhi Contact Us 9654467111Call Girls in Dwarka Mor Delhi Contact Us 9654467111
Call Girls in Dwarka Mor Delhi Contact Us 9654467111
 
Separation of Lanthanides/ Lanthanides and Actinides
Separation of Lanthanides/ Lanthanides and ActinidesSeparation of Lanthanides/ Lanthanides and Actinides
Separation of Lanthanides/ Lanthanides and Actinides
 
Interactive Powerpoint_How to Master effective communication
Interactive Powerpoint_How to Master effective communicationInteractive Powerpoint_How to Master effective communication
Interactive Powerpoint_How to Master effective communication
 
_Math 4-Q4 Week 5.pptx Steps in Collecting Data
_Math 4-Q4 Week 5.pptx Steps in Collecting Data_Math 4-Q4 Week 5.pptx Steps in Collecting Data
_Math 4-Q4 Week 5.pptx Steps in Collecting Data
 
Accessible design: Minimum effort, maximum impact
Accessible design: Minimum effort, maximum impactAccessible design: Minimum effort, maximum impact
Accessible design: Minimum effort, maximum impact
 
How to Make a Pirate ship Primary Education.pptx
How to Make a Pirate ship Primary Education.pptxHow to Make a Pirate ship Primary Education.pptx
How to Make a Pirate ship Primary Education.pptx
 
URLs and Routing in the Odoo 17 Website App
URLs and Routing in the Odoo 17 Website AppURLs and Routing in the Odoo 17 Website App
URLs and Routing in the Odoo 17 Website App
 
Introduction to AI in Higher Education_draft.pptx
Introduction to AI in Higher Education_draft.pptxIntroduction to AI in Higher Education_draft.pptx
Introduction to AI in Higher Education_draft.pptx
 
Science 7 - LAND and SEA BREEZE and its Characteristics
Science 7 - LAND and SEA BREEZE and its CharacteristicsScience 7 - LAND and SEA BREEZE and its Characteristics
Science 7 - LAND and SEA BREEZE and its Characteristics
 
Hybridoma Technology ( Production , Purification , and Application )
Hybridoma Technology  ( Production , Purification , and Application  ) Hybridoma Technology  ( Production , Purification , and Application  )
Hybridoma Technology ( Production , Purification , and Application )
 
Presiding Officer Training module 2024 lok sabha elections
Presiding Officer Training module 2024 lok sabha electionsPresiding Officer Training module 2024 lok sabha elections
Presiding Officer Training module 2024 lok sabha elections
 
“Oh GOSH! Reflecting on Hackteria's Collaborative Practices in a Global Do-It...
“Oh GOSH! Reflecting on Hackteria's Collaborative Practices in a Global Do-It...“Oh GOSH! Reflecting on Hackteria's Collaborative Practices in a Global Do-It...
“Oh GOSH! Reflecting on Hackteria's Collaborative Practices in a Global Do-It...
 
Crayon Activity Handout For the Crayon A
Crayon Activity Handout For the Crayon ACrayon Activity Handout For the Crayon A
Crayon Activity Handout For the Crayon A
 
Enzyme, Pharmaceutical Aids, Miscellaneous Last Part of Chapter no 5th.pdf
Enzyme, Pharmaceutical Aids, Miscellaneous Last Part of Chapter no 5th.pdfEnzyme, Pharmaceutical Aids, Miscellaneous Last Part of Chapter no 5th.pdf
Enzyme, Pharmaceutical Aids, Miscellaneous Last Part of Chapter no 5th.pdf
 
Sanyam Choudhary Chemistry practical.pdf
Sanyam Choudhary Chemistry practical.pdfSanyam Choudhary Chemistry practical.pdf
Sanyam Choudhary Chemistry practical.pdf
 
Incoming and Outgoing Shipments in 1 STEP Using Odoo 17
Incoming and Outgoing Shipments in 1 STEP Using Odoo 17Incoming and Outgoing Shipments in 1 STEP Using Odoo 17
Incoming and Outgoing Shipments in 1 STEP Using Odoo 17
 
How to Configure Email Server in Odoo 17
How to Configure Email Server in Odoo 17How to Configure Email Server in Odoo 17
How to Configure Email Server in Odoo 17
 
MENTAL STATUS EXAMINATION format.docx
MENTAL     STATUS EXAMINATION format.docxMENTAL     STATUS EXAMINATION format.docx
MENTAL STATUS EXAMINATION format.docx
 
The basics of sentences session 2pptx copy.pptx
The basics of sentences session 2pptx copy.pptxThe basics of sentences session 2pptx copy.pptx
The basics of sentences session 2pptx copy.pptx
 
Código Creativo y Arte de Software | Unidad 1
Código Creativo y Arte de Software | Unidad 1Código Creativo y Arte de Software | Unidad 1
Código Creativo y Arte de Software | Unidad 1
 

Manual de servicio Daewoo Lanos

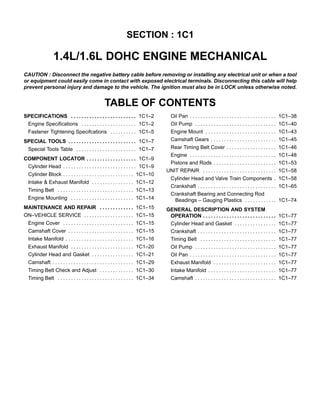
  • 1. SECTION : 1C1 1.4L/1.6L DOHC ENGINE MECHANICAL CAUTION : Disconnect the negative battery cable before removing or installing any electrical unit or when a tool or equipment could easily come in contact with exposed electrical terminals. Disconnecting this cable will help prevent personal injury and damage to the vehicle. The ignition must also be in LOCK unless otherwise noted. TABLE OF CONTENTS SPECIFICATIONS 1C1–2 . . . . . . . . . . . . . . . . . . . . . . . . . Engine Specifications 1C1–2 . . . . . . . . . . . . . . . . . . . . . Fastener Tightening Specifcations 1C1–5 . . . . . . . . . . SPECIAL TOOLS 1C1–7 . . . . . . . . . . . . . . . . . . . . . . . . . . Special Tools Table 1C1–7 . . . . . . . . . . . . . . . . . . . . . . . COMPONENT LOCATOR 1C1–9 . . . . . . . . . . . . . . . . . . . Cylinder Head 1C1–9 . . . . . . . . . . . . . . . . . . . . . . . . . . . . Cylinder Block 1C1–10 . . . . . . . . . . . . . . . . . . . . . . . . . . . Intake & Exhaust Manifold 1C1–12 . . . . . . . . . . . . . . . . Timing Belt 1C1–13 . . . . . . . . . . . . . . . . . . . . . . . . . . . . . Engine Mounting 1C1–14 . . . . . . . . . . . . . . . . . . . . . . . . MAINTENANCE AND REPAIR 1C1–15 . . . . . . . . . . . . . ON–VEHICLE SERVICE 1C1–15 . . . . . . . . . . . . . . . . . . . Engine Cover 1C1–15 . . . . . . . . . . . . . . . . . . . . . . . . . . . Camshaft Cover 1C1–15 . . . . . . . . . . . . . . . . . . . . . . . . . Intake Manifold 1C1–16 . . . . . . . . . . . . . . . . . . . . . . . . . . Exhaust Manifold 1C1–20 . . . . . . . . . . . . . . . . . . . . . . . . Cylinder Head and Gasket 1C1–21 . . . . . . . . . . . . . . . . Camshaft 1C1–29 . . . . . . . . . . . . . . . . . . . . . . . . . . . . . . . Timing Belt Check and Adjust 1C1–30 . . . . . . . . . . . . . Timing Belt 1C1–34 . . . . . . . . . . . . . . . . . . . . . . . . . . . . . Oil Pan 1C1–38 . . . . . . . . . . . . . . . . . . . . . . . . . . . . . . . . . Oil Pump 1C1–40 . . . . . . . . . . . . . . . . . . . . . . . . . . . . . . . Engine Mount 1C1–43 . . . . . . . . . . . . . . . . . . . . . . . . . . . Camshaft Gears 1C1–45 . . . . . . . . . . . . . . . . . . . . . . . . . Rear Timing Belt Cover 1C1–46 . . . . . . . . . . . . . . . . . . . Engine 1C1–48 . . . . . . . . . . . . . . . . . . . . . . . . . . . . . . . . . Pistons and Rods 1C1–53 . . . . . . . . . . . . . . . . . . . . . . . . UNIT REPAIR 1C1–58 . . . . . . . . . . . . . . . . . . . . . . . . . . . . Cylinder Head and Valve Train Components 1C1–58 . Crankshaft 1C1–65 . . . . . . . . . . . . . . . . . . . . . . . . . . . . . . Crankshaft Bearing and Connecting Rod Beadings – Gauging Plastics 1C1–74 . . . . . . . . . . . . GENERAL DESCRIPTION AND SYSTEM OPERATION 1C1–77 . . . . . . . . . . . . . . . . . . . . . . . . . . . . Cylinder Head and Gasket 1C1–77 . . . . . . . . . . . . . . . . Crankshaft 1C1–77 . . . . . . . . . . . . . . . . . . . . . . . . . . . . . . Timing Belt 1C1–77 . . . . . . . . . . . . . . . . . . . . . . . . . . . . . Oil Pump 1C1–77 . . . . . . . . . . . . . . . . . . . . . . . . . . . . . . . Oil Pan 1C1–77 . . . . . . . . . . . . . . . . . . . . . . . . . . . . . . . . . Exhaust Manifold 1C1–77 . . . . . . . . . . . . . . . . . . . . . . . . Intake Manifold 1C1–77 . . . . . . . . . . . . . . . . . . . . . . . . . . Camshaft 1C1–77 . . . . . . . . . . . . . . . . . . . . . . . . . . . . . . .
  • 2. 1C1 – 2I1.4L/1.6L DOHC ENGINE MECHANICAL DAEWOO V–121 BL4 SPECIFICATIONS ENGINE SPECIFICATIONS Application Description (Manual and Automatic) 1.4L DOHC 1.6L DOHC General Data: Engine Type F14D F16D Displacement 1399 cm3 1598 cm3 (97.51 in3) Bore Stroke 77.9 x 73.4 mm (3.01 in. x 2.89 in.) 79.0 x 81.5 mm (3.1 in. X 3.21 in.) Compression Ratio 9.5 ± 0.2:1 9.5 ± 0.2:1 Firing Oder 1–3–4–2 1–3–4–2 Cylinder Bore: Diameter 77.9 mm (3.07 in.) 79 mm (3.1 in.) Out of Round (Maximum) 0.0065 mm (0.00025 in.) 0.0065 mm (0.00025 in.) Taper (Maximum) 0.07 x 30° 0.0065 mm (0.00025 in.) Pistion: Diameter 77.87 mm (3.07 in.) 78.970 mm (3.1090 in.) Clearance to Bore 0.030 mm (0.0012 in.) 0.030 mm (0.0012 in.) Piston Rings: Ring, End Gap: Top Compression 2nd Compression 0.15–0.30 mm (0.0059–0.0118 in.) 0.3–0.5 mm (0.0118–0.0197 in.) 0.2–0.3 mm (0.008–0.012 in.) 0.5–0.6 mm (0.02–0.024 in.) Groove Clearance: Top Compression 2nd Compression 0.05–0.09 mm (0.00197–0.00354 in.) 0.06–0.1 mm (0.00236–0.00393 in.) 0.016 mm (0.0006 in.) 0.066 mm (0.0026 in.) Piston Pin: Diameter 18.00 mm (0.708 in.) 18.00 mm (0.708 in.) Pin Off–Set 0.5 ± 0.1 mm (0.0197 ± 0.00787 in.) 0.7–0.9 mm (0.028–0.036 in.) Camshaft: Lift Intake 7.2 mm (0.283 in.) 8.5 mm (0.335 in.) Lift Exhaust 7.2 mm (0.283 in.) 8.5 mm (0.335 in.) End Play 0.1–0.25 mm (0.00394–0.00787 in.) 0.10–0.25 mm (0.004–0.0089 in.) Journal OD: No. 1 No. 2 No. 3 No. 4 No. 5 29.94 mm (1.179 in.) 26.94 mm (1.061 in.) 26.94 mm (1.061 in.) 26.94 mm (1.061 in.) 26.94 mm (1.061 in.) 30 mm (1.18 in.) 27 mm (1.06 in.) 27 mm (1.06 in.) 27 mm (1.06 in.) 27 mm (1.06 in.)
  • 3. 1.4L/1.6L DOHC ENGINE MECHANICAL 1C1 – 3 DAEWOO V–121 BL4 Application Description (Manual and Automatic) 1.4L DOHC 1.6L DOHC Crankshaft: Main Journal: Diameter (All) Taper (Maximum) Out of Round (Maximum) 55 mm (2.71 in.) 0.005 mm (0.0001 in.) 0.004 mm (0.0001 in.) 54.982–54.994 mm (2.164–2.165 in.) 0.005 mm (0.0001 in.) 0.004 mm (0.0001 in.) Main Bearing Clearance (All) 0.026–0.042 mm (0.001–0.002 in.) 0.026–0.042 mm (0.001–0.002 in.) Crankshaft End Play 0.1 mm (0.003 in.) 0.05–0.28 mm (0.002–0.011 in.) Connecting Rod Journal: Diameter (All) 43 mm (1.69 in.) 42.971–42.987 mm (1.691–1.692 in.) Taper (Maximum) 0.005 mm (0.0001 in.) 0.005 mm (0.0001 in.) Out of Round (Maximum) 0.004 mm (0.0001 in.) 0.004 mm (0.0001 in.) Rod Bearing Clearance (All) 0.019–0.070 mm (0.0007–0.0028 in.) 0.019–0.071 mm (0.0007–0.0028 in.) Rod Side Clearance 0.070–0.242 mm (0.0027–0.009 in.) 0.070–0.242 mm (0.0027–0.009 in.) Valve System: Valve Lash Compensators Hydraulic Hydraulic Face Angle (All) 45°~45.25° 90°~90.5° Seat Angle (All) 44.5°~45° 89°~90° Seat Runout (Maximum, All) 0.05 mm (0.002 in.) 0.05 mm (0.002 in.) Face Runout (Maximum, All) 0.03 mm (0.0012 in.) 0.03 mm (0.0012 in.) Seat Width: Intake Exhaust 1.17–1.57 mm (0.046–0.062 in.) 1.4–1.8 mm (0.055–0.071 in.) 1.17–1.57 mm (0.046–0.062 in.) 1.4–1.8 mm (0.055–0.071 in.) Valve Guide Inside Diameter (All) 6.00–6.02 mm (0.236–0.237 in.) 6.00–6.02 mm (0.236–0.237 in.) Valve Stem Diameter (All) 6 mm (0.236 in.) 6 mm (0.236 in.) Valve Diameter (All): Intake Exhaust 28.57 mm (1.125 in.) 27.24 mm (1.074 in.) 28.6 mm (1.126 in.) 27.2 mm (1.072 in.) Valve Spring Loads: Valve Open Valve Closed 580 ± 29N (426 ± 21 lbs) 260 ± 13N (191 ± 9.6 lbs) 580–26N (428–19 lbs) @23.0 mm(0.90 in.) 260”13N(192” 9 lbs) @ 32.0mm(1.25 in.) Valve Spring Free Length 41.2 mm (1.622 in.) 41.2 mm (1.622 in.) Oil Pump: Gap Between Oil Pump Body and Out Rotor 0.400~0.484 mm (0.0157~0.019 in.) 0.400~0.484 mm (0.0157~0.019 in.) Out Rotor Side Clearance 0.045~0.100 mm (0.0018~0.0039 in.) 0.045~0.100 mm (0.02~0.004 in.)
  • 4. 1C1 – 4I1.4L/1.6L DOHC ENGINE MECHANICAL DAEWOO V–121 BL4 Application Description (Manual and Automatic) 1.4L DOHC 1.6L DOHC Inner Rotor Side Clearance 0.035~0.085 mm (0.001~0.003 in.) 0.035~0.085 mm (0.001~0.003 in.) Relief Valve Spring Free Length 81 mm (3.2 in.) 81 mm (3.2 in.) Sealants and Adhesives: Rear Main Bearing Cap GE p/n RTV 159 Camshaft Carrier to Cylinder Head HN 1581 (Loctite® 515) Oil Pan Bolts HN 1256 (Loctite® 242) Oil Pump Bolts HN 1256 (Loctite® 242) Oil Pan Pickup Tube Bolts HN 1256 (Loctite® 242) Oil Gallery Plug HN 1256 (Loctite® 242) Coolant Jacket Caps and Plugs (Freeze Plugs) HN 1756 (Loctite® 176) Exhaust Manifold Studs/Nuts Anti–seize Compound (HMC Spec HN1325)
  • 5. 1.4L/1.6L DOHC ENGINE MECHANICAL 1C1 – 5 DAEWOO V–121 BL4 FASTENER TIGHTENING SPECIFCATIONS Application NSm Lb–Ft Lb–In Air Cleaner Housing Bolts 10 – 89 Camshaft Cap Bolts 16 12 – Camshaft Cover Nuts 10 – 89 Connecting Rod Bearing Cap Bolts 25 + 30° + 15° 18 + 30° + 15° – Coolant Temperature Sensor 20 15 – Crankshaft Bearing Cap Bolts 50 + 45° + 15° 37 + 45°+ 15° – Crankshaft Cover Nuts 5~8 – 44~71 Crankshaft Pulley Bolt 95 NSm + 30° + 15° – – Cylinder Head Bolts (Cylinder Head Mounting Bolts) 25 + 70° + 70° + 50° 18 + 70° + 70° + 50° – Direct Ignition System Coil Mounting Bolts 10 – 89 Direct Ignition System Coil Mounting Bracket Bolts 10 – 89 Engine Mount Attaching Bolts 30 22 – Engine Mount Bracket Attaching Bolts/Nuts 50 37 – Exhaust Camshaft Gear Bolt 67.5 49 – Exhaust Flex Pipe–to–Catalytic Converter or Connecting Pipe Retaining Nut 35 26 – Exhaust Flex Pipe–to–Exhaust Manifold Retaining Nuts 35 26 – Exhaust Gas Recirculation Valve Adapter Bolts 25 18 – Exhaust Manifold Heat Shield Bolts 15 11 – Exhaust Manifold Retaining Nuts 25 18 – Flexible Plate Bolts 60 44 – Flexible Plate Inspection Cover Bolts 10 – 89 Flywheel Bolts 35 + 30° + 15° 25 + 30° + 15° – Flywheel Inspection Cover Bolts 12 – 106 Front Timing Belt Cover Bolts (Upper and Lower) 10 – 89 Fuel Rail Assembly Retaining Bolts 25 18 – Fuel Rail Retaining Bolts 25 18 – Generator Upper Retaining Bolt 20 15 – Intake Camshaft Gear Bolt 67.5 49 – Intake Manifold Retaining Bolts/Nuts 25 18 – Intake Manifold Support Bracket Lower Bolt 25 18 – Intake Manifold Support Bracket Upper Bolts 25 18 – Lower Front Timing Belt Cover Bolts 10 – 89 Oil Pan Flange Bolts 75 55 – Oil Pan Retaining Bolts 10 – 89 Oil Pan Drain Plug 35 26 – OIl Pressure Switch 40 30 –
  • 6. 1C1 – 6I1.4L/1.6L DOHC ENGINE MECHANICAL DAEWOO V–121 BL4 Application Lb–In Lb–Ft NSm Oil Pump Bolts 10 – 89 Oil Pump Rear Cover Bolts 8 – 71 Oil Pump Retaining Bolts 10 – 89 Oil Suction Pipe or Support Bracket Bolts 10 – 89 Rear Timing Belt Cover Bolts 10 – 89 Safety Relief Valve Bolt 30 3022 – Spark Plugs 25 18 – Thermostat Housing Mounting Bolts 20 15 – Timing Belt Automatic Tensioner Bolts 25 18 – Timing Belt Idler Pulley Bolt 40 30 – Transaxle Bell Housing Bolts 75 55 – Transaxle Torque Converter Bolts 45 33 – Upper Front Timing Belt Cover Bolts 10 – 89 Water Pump Retaining Bolts 10 – 89
  • 7. 1.4L/1.6L DOHC ENGINE MECHANICAL 1C1 – 7 DAEWOO V–121 BL4 SPECIAL TOOLS SPECIAL TOOLS TABLE J–42492 Timing Belt Adjuster KM–470–B Angular Torque Gauge J–28467–B Engine Assembly Support Fixture KM–427 Piston Pin Service Set KM–571–B Gauge KM–340–0 Cutter Set Includes: KM–340–7 Guide Drift KM–340–13 Cutters KM–340–26 Cutters KM–348 Valve Spring Compressor KM–653 Adapter
  • 8. 1C1 – 8I1.4L/1.6L DOHC ENGINE MECHANICAL DAEWOO V–121 BL4 KM–805 Valve Guide Reamer KM–412 Engine Overhaul Stand KM–498–B Pressure Gauge KM–635 Crankshaft Rear Oil Seal Installer J–36792 Crankshaft Rear Oil Seal Installer KM–135 Adapter
  • 9. 1.4L/1.6L DOHC ENGINE MECHANICAL 1C1 – 9 DAEWOO V–121 BL4 COMPONENT LOCATOR CYLINDER HEAD 1. Oil Filler Cap 2. Engine Cover 3. Camshaft Cover 4. Camshaft Cover Gasket 5. Camshaft Cover Bolt 6. Hydraulic Tappet Adjuster 7. Valve Key 8. Valve Spring Cap 9. Valve Spring 10. Valve Stem Seal 11. EGR Vaccum Hose 12. EGR Valve 13. EGR Valve Gasket 14. EGR Valve Adaptor 15. EGR Valve Adaptor Gasket 16. Cylinder Head 17. Front Camshaft Cap 18. Valve Guide 19. Plug 20. Freeze Plug 21. Oil Duct Cap 22. Intake Valve 23. Exhaust Valve 24. Cylinder Head Gasket 25. Engine Coolant Temperature Sensor 26. Heat Take Off Pipe 27. Camshaft 28. Camshaft Seal 29. Thermostat
  • 10. 1C1 – 10I1.4L/1.6L DOHC ENGINE MECHANICAL DAEWOO V–121 BL4 CYLINDER BLOCK
  • 11. 1.4L/1.6L DOHC ENGINE MECHANICAL 1C1 – 11 DAEWOO V–121 BL4 1. Piston Ring Set 2. Piston 3. Piston Pin 4. Connecting Rod 5. Connecting Rod Bearing Set 6. Oil Level Gauge Stick 7. Gauge Stic Tube 8. Sleeve 9. Clutch Housing Sleeve 10. Cylinder Block 11. Plug 12. Gap 13. Bypass Valve 14. Connecting Piece 15. Oil Filter 16. Oil Pump Body Gasket 17. Water Inlet Neck 18. Knock Sensor 19. Fly Wheel (M/T) 20. Flexible Plate (A/T) 21. Shaft Seal Ring 22. Crank Shaft Upper Bearing Set 23. Crank Shaft 24. Crank Shaft Lower Bearing Set 25. Transmitter Disc 26. Crankshaft Bearing Cap 27. Oil Pan 28. Threaded Ring 29. Washer 30. Oil Pan Drain Plug 31. Oil Pump 32. Oil Pump Cover 33. Oil Pump Inner Rotor 34. Oil Pump Outer Rotor 35. Oil Pump Plug 36. Shaft Sealing 37. Pressure Relief Valve Plunger 38. Relief Valve Spring 39. Sealing 40. Relief Valve 41. Oil Pressure Switch 42. Sleeve 43. Oil Suction Pipe Bracket 44. Oil Suction Pipe 45. Sealing
  • 12. 1C1 – 12I1.4L/1.6L DOHC ENGINE MECHANICAL DAEWOO V–121 BL4 INTAKE & EXHAUST MANIFOLD 1. Oxygen Sensor 2. Heat Shield 3. Exhaust Manifold 4. Exhaust Manifold Gasket 5. Intake Manifold 6. Main Throttle Idle Actuator (MTIA) Gasket 7. MTIA 8. Clamp 9. Intake Air Tube 10. Breethe Hose 11. Aircleaner Assembly 12. Aircleaner Upper Hosing 13. Aircleaner Eliment 14. Aircleaner Lower Housing 15. Resoinator 16. Air Intet Hose
  • 13. 1.4L/1.6L DOHC ENGINE MECHANICAL 1C1 – 13 DAEWOO V–121 BL4 TIMING BELT 1. Water Pump Sealing 2. Water Pump 3. Timing Belt Rear Cover 4. Camshaft Position Sensor 5. Auto Temsioner 6. Camshaft Gear 7. Idler pulley 8. Crankshaft Gear 9. Torque Roll Axis Support 10. Timing Belt 11. Timing Belt Front Upper Cover 12. Timing Belt Front Lower Cover 13. Crankshaft Pulley 14. Crankshaft Position Sensor
  • 14. 1C1 – 14I1.4L/1.6L DOHC ENGINE MECHANICAL DAEWOO V–121 BL4 ENGINE MOUNTING 1. Rear Power Unit Damping Block 2. Rear Transaxle Mounting Bracket (A/T) 3. Rear Transaxle Mounting Bracket (M/T) 4. Transaxle Mounting Cage 5. Transaxle Mounting Bracket (M/T) 6. Transaxle Mounting Bracket (A/T) 7. Engine Undercover 8. Hydro Mounting 9. Engine Mounting Bracket
  • 15. 1.4L/1.6L DOHC ENGINE MECHANICAL 1C1 – 15 DAEWOO V–121 BL4 MAINTENANCE AND REPAIR ON–VEHICLE SERVICE ENGINE COVER Removal Procedure 1. Remove the bolts and nuts from the engine cover. 2. Remove the engine cover. Installation Procedure 1. Position the engine cover on the engine. 2. Install the engine cover bolts and nuts. Tighten Tighten the engine cover bolts and nuts to 10 NSm(89 lb–ft). CAMSHAFT COVER Removal Procedure 1. Disconnect the negative battery cable. 2. Remove the engine cover. Refer to ”Engine” in this section. 3. Remove the breather hose, ventilation hose and cam position sensor wiring connector from the cam- shaft cover.
  • 16. 1C1 – 16I1.4L/1.6L DOHC ENGINE MECHANICAL DAEWOO V–121 BL4 4. Remove the ignition wires from the spark plug. 5. Remove the camshaft cover bolts and camshaft cover. 6. Remove the camshaft cover gasket. Installation Procedure 1. Install the camshaft cover gasket on the camshaft cover. 2. Position the camshaft cover on the engine block. 3. Install the camshaft cover bolts. Tighten Tighten the camshaft cover bolts to 10 NSm(89 lb–ft). 4. Install the ignition wires to the spark plugs and con- nect the breather hose, ventilation hose and cam position sensor wiring connector to the canshaft cover. 5. Install the engine cover. 6. Connect the negative battery cable. INTAKE MANIFOLD Removal Procedure 1. Remove the fuel pump fuse. 2. Start the engine. After it stalls, crank the engine for 10 seconds to rid the fuel system of fuel pressure. 3. Disconnect the negative battery calbe. 4. Drain the engine coolant. Refer to Section 1D, En- gine Cooling. 5. Remove the engine cover and throttle body. Refer to Section 1F, Engine Control.
  • 17. 1.4L/1.6L DOHC ENGINE MECHANICAL 1C1 – 17 DAEWOO V–121 BL4 6. Disconnect the intake manifold pressure sensor connector, attaching bolt and vaccum hose. 7. Disconnect the intake manifold air temperature sen- sor(MAT) connector and remove the MAT sensor. 8. Remove the intake manifold upper bracket. 9. Remove the fule rail bolt and the fuel rail. 10. Remove the all the vaccum hoses from the intake manifold including PCV hose and brake booster vaccum hose. 11. Remove the exhaust gas recirculation(EGR) pipe.
  • 18. 1C1 – 18I1.4L/1.6L DOHC ENGINE MECHANICAL DAEWOO V–121 BL4 12. Remove the alternator. Refer to Section 1E, Engine Electrical. 13. Remove the intake manifold support bracket. 14. Remove the intake manifold retaining bolts/nuts in the sequence shown. 15. Remove the intake manifold and gasket. 16. Clean the sealing surfaces of the intake manifold and the cylinder head. Installation Procedure 1. Install the fule rail. Tighten Tighten the fule rail bolts to 25 NSm (18 lb–ft). 2. Install the new intake manifold gasket and intake manifold. Tighten Tighten the intake manifold bolts and nuts to 25 NSm (18 lb–ft). 3. Install the exhaust gas recirculation(EGR) pipe. Tighten Tighten the exhaust gas recirculation(EGR) pipe bolts to 10 NSm (89 lb–ft).
  • 19. 1.4L/1.6L DOHC ENGINE MECHANICAL 1C1 – 19 DAEWOO V–121 BL4 4. Install the intake manifold support bracket. Tighten Tighten the intake manifold support bracket upper bolts to 25 NSm (18 lb–ft) and lower bolts to 45 NSm (33 lb–ft). 5. Install the alternater. 6. Install the fuel rail. 7. Install the fuel rail bolts. 8. Install the intake manifold upper bracket. 9. Install the intake manifold upper bracket bolts. 10. Install the intake manifold air temperature sen- sor(MAT) and connect the MAT sensor connecter. 11. Install the intake manifold pressure sensor and vac- cum hose.
  • 20. 1C1 – 20I1.4L/1.6L DOHC ENGINE MECHANICAL DAEWOO V–121 BL4 12. Install the throttle body and engine cover. 13. Refill the engine cooling system. Refer to Section 1D, Engine Cooling. 14. Install the fuel pump fuse and connect the negative battery cable. EXHAUST MANIFOLD Removal Procedure 1. Disconnect the negative battery cable. 2. Disconnect the oxygen sensor connecter. 3. Remove the exhaust manifold heat shield. 4. Remove the exhaust manifold nuts from the pup converter. 5. Remove the exhaust manifold retaining nuts in the sequence shown and remove the exhaust manifold. 6. Remove the exhaust manifold gasket. 7. Clean the sealing surfaces of the exhaust manifold and the cylinder head.
  • 21. 1.4L/1.6L DOHC ENGINE MECHANICAL 1C1 – 21 DAEWOO V–121 BL4 Installation Procedure 1. Install the exhaust manifold and gasket. 2. Install the exhaust manifold retaining nuts and tight- en in the sequence shown. Tighten Tighten the exhaust manifold retaining nuts to 25 NSm (18 lb–ft). 3. Install the exhaust manifold nuts to the catalytic converter. Tighten Tighten the exhaust manifold nuts to 40 NSm (30 lb– ft). 4. Install the heat shield. Tighten Tighten the the heat shield bolts to 13 NSm (10 lb–ft). 5. Connect the oxygen sensor connecter. 6. Connect the negative battery cable. CYLINDER HEAD AND GASKET Tools Required J–42492 Timing Belt Adjuster KM–470–B Angular Torque Gauge Removal Procedure 1. Remove the fuel pump fuse. 2. Start the engine. After it stalls, crank the engine for 10 seconds to rid the fuel system of fuel pressure. 3. Disconnect the negative battery calbe. 4. Disconnect the electronic control module(ECM) ground terminal from the intake manifold. 5. Drain the engine coolant. Refer to Section 1D, En- gine Cooling.
  • 22. 1C1 – 22I1.4L/1.6L DOHC ENGINE MECHANICAL DAEWOO V–121 BL4 6. Drain the engine oil and remove the camshaft cov- er. Refer to this section. 7. Remove the air cleaner housing. 8. Remove the throttle cable and inlet/outlet coolant hoses. 9. Remove the thermostat upper hose. 10. Remove the intake manifold pressure sensor, in- take air temperature sensor and coolant tempera- ture sensor. 11. Remove the intake manifold support bracket.
  • 23. 1.4L/1.6L DOHC ENGINE MECHANICAL 1C1 – 23 DAEWOO V–121 BL4 12. Remove the all the vaccum hoses from the intake manifold including brake booster vaccum hose. 13. Remove the ignition cables from the spark plugs. 14. Remove the direct ignition coil(DIS) and the bracket from the cylinder head. 15. Remove the serpentine accessory drive belt by ro- tating the tensioner pulley bolt to clockwise using DW110–080. Refer to Section 6B, Power Steering Pump. 16. Remove the front passenger side tire. Refer to Sec- tion 2E, Tires and Wheels. 17. Remove front wheel housing shield. 18. Remove the upper front timing belt cover bolts. 19. Remove the upper front timing belt cover. 20. Align the camshaft gear timing marks. 21. Remove the crank shaft pulley. 22. Remove the lower front timing belt cover bolts and cover.
  • 24. 1C1 – 24I1.4L/1.6L DOHC ENGINE MECHANICAL DAEWOO V–121 BL4 23. Slightly loosen the water pump retaining bolts. 24. Rotate the water pump counterclockwise using the timing belt adjuster J–42492 to relieve the timing belt tension. 25. Remove the timing belt.Refer to ”Timing Belt” in this section. 26. Remove the engine mounting bracket.Refer to ”En- gine Mount” in this section. 27. Remove the camshaft cover. Refer to ”Camshaft Cover” in this section. 28. While holding the intake camshaft firmly in place, remove the intake camshaft gear bolt and gear. 29. While holding the exhaust camshaft firmly in place, remove the exhaust camshaft gear bolt and gear. Notice : Take extreme care to prevent any scratches, nicks or damage to the camshafts. 30. Remove the timing belt automatic tensioner. 31. Remove the timing belt idler pulley. 32. Remove the right engine mount. Refer to ”Engine Mount” in this section. 33. Remove the rear timing belt cover.
  • 25. 1.4L/1.6L DOHC ENGINE MECHANICAL 1C1 – 25 DAEWOO V–121 BL4 34. Remove the intake/exhaust manifold. Refer to ”In- take/Exhaust Manifold” in the section. 35. Remove the cylinder head bolts gradually in the sequence shown and remove the cylinder head. Notice : Prevent any engine oil or coolant from entering the cylinders when removing the cylinder head. 36. Remove the cylinder head gasket. Cleaning Procedure 1. Clean the gasket sitting surfaces of the cylinder head and the engine block. 2. Make sure the gasket sitting surfaces of the cylin- der head and the engine block are free of nicks and heavy scratches. 3. Clean the cylinder head bolts. 4. Inspect the cylinder head for warpage. Refer to ”Cylinder Head and Valve Train Components” in this section. Installation Procedure 1. Install the new cylinder head gasket. 2. Install the intake/exhaust manifold to the cylinder head. Refer to ”Intake/Exhaust Manifold” in the section. 3. Install the cylinder head bolts gradually in the se- quence shown. Tighten Tighten the cylinder head bolts to 25 NSm (18 lb–ft) and retighten the cylinder head bolts 70 degrees plus 70 degrees plus 50 degrees using the angular torque gauge KM–470–B. 4. Install the right engine mount. Refer to ”Engine Mount” in this section.
  • 26. 1C1 – 26I1.4L/1.6L DOHC ENGINE MECHANICAL DAEWOO V–121 BL4 5. Connect the throttle cable at the throttle body and the intake manifold. 6. Install the intake manifold support bracket upper bolts to the intake manifold. Tighten Tighten the intake manifold support bracket upper bolts to the intake manifold to 25 NSm (18 lb–ft). 7. Connect the surge tank coolant hose at the throttle body. 8. Connect the heater inlet hose to the cylinder head. 9. Install the generator upper retaining bolt. Tighten Tighten the generator upper retaining bolt to 20 NSm (15 lb–ft). 10. Connect the fuel feed line at the fuel rail. 11. Connect all the disconnected vacuum hoses and the brake booster vacuum hose at the intake man- ifold. 12. Install the catalytic converter retaining nuts at the exhaust manifold flange. Tighten Tighten the catalytic converter to exhaust manifold flange nuts to 40 NSm (30 lb–ft). 13. Install the rear timing belt cover. 14. Install the rear timing belt cover bolts. Tighten Tighten the rear timing belt cover bolts to 10 NSm (89 lb–in).
  • 27. 1.4L/1.6L DOHC ENGINE MECHANICAL 1C1 – 27 DAEWOO V–121 BL4 15. Install the timing belt automatic tensioner. Tighten Tighten the timing belt automatic tensioner bolts to 25 NSm (18 lb–ft). 16. Install the timing belt idler pulley. Tighten Tighten the timing belt idler pulley bolt to 25 NSm(18 lb–ft). Notice : Take extreme care to prevent any scratches, nicks or damage to the camshafts. 17. Install the intake/exhaust camshaft gear. Tighten Tighten the intake/exhaust camshaft gear bolts to 67.5 NSm (49 lb–ft). 18. Apply a small amount of gasket sealant to the cor- ners of the front camshaft caps and the top of the rear camshaft cover–to–cylinder head seal. 19. Install the camshaft cover and the gasket. Refer to ”Camshaft Cover” in this section. 20. Connect the ignition wires to the spark plugs. 21. Install the oil filler cap. 22. Connect the engine ventilation hose to the cam- shaft cover. 23. Align the timing marks on the camshaft gears. 24. Align the mark on the crank shaft gear with the notch at the bottom of the rear timing belt cover.
  • 28. 1C1 – 28I1.4L/1.6L DOHC ENGINE MECHANICAL DAEWOO V–121 BL4 25. Install the timing belt. 26. Rotate the water pump clockwise using the timing belt adjuster J–42492 to apply tension to the timing belt. Tighten Tighten the water pump retaining bolts to 10 NSm (89 lb–in). 27. Check and adjust the timing belt tension. Refer to ”Timing Belt Check and Adjust” in this section. 28. Install the upper and lower front timing belt covers. Tighten Tighten the upper and lower front timing belt covers bolts to 10 NSm (89 lb–in). 29. Install the crank shaft pulley bolt. Tighten Tighten the crank shaft pulley bolt to 95 NSm (70 lb–ft) and retighten 30 degrees plus 15 degrees. 30. Install the serpentine accessory drive belt. Refer to Section 6B, Power Steering Pump. 31. Connect the upper radiator hose to the thermostat housing. 32. Install the front wheel and splash shield. Refer to Section 2E, Tires and Wheels. 33. Install the air cleaner housing. Tighten Tighten the air cleaner housing bolts to 10 NSm (89 lb– in). 34. Connect the breather tube to the cam shaft cover. 35. Install the crank shaft pulley bolt. 36. Connect the MAT sensor connector. 37. Connect the intake manifold pressure sensor, in- take air temperature sensor and coolant tempera- ture sensor connector.
  • 29. 1.4L/1.6L DOHC ENGINE MECHANICAL 1C1 – 29 DAEWOO V–121 BL4 38. Connect the DIS coil connector. 39. Connect the fuel injector harness connectors. 40. Connect the oxygen sensor connector and the ECM ground terminal at the intake manifold. 41. Install the fuel pump fuse. 42. Connect the negative battery ground cable. 43. Refill the engine cooling system. Refer to Sec- tion1D, Engine Cooling. CAMSHAFTS Removal Procedure 1. Remove the camshaft cover. Refer to ”Camshaft Cover” in this section. 2. Remove the timing belt. Refer to ”Timing Belt” in this section. Notice : Take extreme care to prevent any scratches, nicks or damage to the camshafts. 3. While holding the intake camshaft firmly in place, remove the intake camshaft gear bolt and gear. 4. While holding the exhaust camshaft firmly in place, remove the exhaust camshaft gear bolt and gear. 5. Remove the camshaft cap bolts gradually in the sequence shown for each camshaft cap.
  • 30. 1C1 – 30I1.4L/1.6L DOHC ENGINE MECHANICAL DAEWOO V–121 BL4 6. Remove the intake/exhaust camshaft caps. Main- tain the correct positions for installation. 7. Remove the intake/exhaust camshaft. Installation Procedure Notice : Take extreme care to prevent any scratches, nicks or damage to the camshafts. 1. Lubricate the camshaft journals and the camshaft caps with engine oil. 2. Install the intake/exhaust camshafts. 3. Install the intake/exhaust camshaft caps in their original positions. Tighten Tighten the intake/exhaust camshaft caps bolts to 16 NSm (12 lb–ft). 4. Measure the intake/exhaust camshaft end play.Ref- er to the ”Engine Specifications” in this section. 5. Install the intake/exhaust camshaft gear. 6. While holding the intake/exhaust camshafts firmly in place, install the intake/exhaust camshaft gear bolts. Tighten Tighten the intake/exhaust camshaft gear bolts to 67.5 NSm (49 lb–ft). 7. Install the timing belt. Refer to ”Timing Belt” in this section. 8. Install the camshaft cover. Refer to ”Camshaft Cov- er” in this section.
  • 31. 1.4L/1.6L DOHC ENGINE MECHANICAL 1C1 – 31 DAEWOO V–121 BL4 TIMING BELT CHECK AND ADJUST Tools Required J–42492 Timing Belt Adjuster KM–470–B Angular Torque Gauge Adjustment Procedure 1. Disconnect the negative battery cable. 2. Remove the air cleaner outlet hose from the throttle body. 3. Remove the breather tube from the camshaft cover. 4. Remove the air cleaner housing bolts. 5. Remove the air cleaner housing. 6. Remove the right front wheel. Refer to Section 2E, Tires and Wheels. 7. Remove the right front wheel well splash shield. 8. Remove the serpentine accessory drive belt. Refer to Section 6B, Power Steering Pump. 9. Remove the crankshaft pulley bolt. 10. Remove the crankshaft pulley. 11. Remove the upper front timing belt cover bolts. 12. Remove the upper front timing belt cover. 13. Remove the lower front timing belt cover bolts. 14. Remove the lower front timing belt cover. 15. Install the crankshaft pulley bolt.
  • 32. 1C1 – 32I1.4L/1.6L DOHC ENGINE MECHANICAL DAEWOO V–121 BL4 16. Rotate the crankshaft at least one full turn clock- wise using the crankshaft pulley bolt. 17. Align the mark on the crankshaft gear with the notch at the bottom of the rear timing belt cover. 18. Align the camshaft gear timing marks. 19. Slightly loosen the water pump retaining bolts. 20. Rotate the water pump clockwise using the timing belt adjuster J–42492. 21. Rotate the water pump clockwise until the adjust arm pointer of the timing belt automatic tensioner is aligned with the notch in the timing belt automatic tensioner bracket. 22. Tighten the water pump retaining bolts. 23. Rotate the crankshaft two full turns clockwise using the crankshaft pulley. 24. Loosen the water pump retaining bolts.
  • 33. 1.4L/1.6L DOHC ENGINE MECHANICAL 1C1 – 33 DAEWOO V–121 BL4 25. Using the timing belt adjuster J–42492, rotate the water pump until the adjust arm pointer of the tim- ing belt automatic tensioner is aligned with the pointer on the timing belt automatic tensioner bracket. 26. Tighten the water pump retaining bolts. Tighten Tighten the water pump retaining bolts to 10 NSm (89 lb–in). 27. Remove the crankshaft pulley bolt. 28. Install the upper and lower front timing belt covers. 29. Install the upper and lower front timing belt cover bolts. Tighten Tighten the front timing belt cover bolts to 10 NSm (89 lb–in). 30. Install the crankshaft pulley. 31. Install the crankshaft pulley bolt. Tighten Tighten the crankshaft pulley bolt to 95 NSm (70 lb–ft) and retighten 30 degrees plus 15 degrees. 32. Install the serpentine accessory drive belt. Refer to Section 6B, Power Steering Pump. 33. Install the right front wheel well splash shield. 34. Install the right front wheel. Refer to Section 2E, Tires and Wheels. 35. Install the air cleaner housing. 36. Install the air cleaner housing bolts. Tighten Tighten the air cleaner housing bolts to 10 NSm (89 lb– in).
  • 34. 1C1 – 34I1.4L/1.6L DOHC ENGINE MECHANICAL DAEWOO V–121 BL4 37. Connect the air cleaner outlet hose to the throttle body. 38. Connect the breather tube to the camshaft cover. 39. Connect the negative battery cable. TIMING BELT Tools Required J–42492 Timing Belt Adjuster KM–470–B Angular Torque Gauge Removal Procedure 1. Disconnect the negative battery cable. 2. Disconnect the air cleaner outlet hose from the throttle body. 3. Disconnect the breather tube from the camshaft cover. 4. Remove the air cleaner housing bolts. 5. Remove the air cleaner housing. 6. Remove the right front wheel. Refer to Section 2E, Tires and Wheels. 7. Remove the right front wheel well splash shield. 8. Remove the serpentine accessory drive belt. Refer to Section 6B, Power Steering Pump. 9. Remove the crankshaft pulley bolt. 10. Remove the crankshaft pulley.
  • 35. 1.4L/1.6L DOHC ENGINE MECHANICAL 1C1 – 35 DAEWOO V–121 BL4 11. Remove the upper front timing belt cover bolts. 12. Remove the upper front timing belt cover. 13. Remove the lower front timing belt cover bolts. 14. Remove the lower front timing belt cover. 15. Install the crankshaft pulley bolt. 16. Using the crankshaft pulley bolt, rotate the crank- shaft clockwise until the timing mark on the crank- shaft gear is aligned with the notch at the bottom of the rear timing belt cover. 17. Slightly loosen the water pump retaining bolts. 18. Using the timing belt adjuster J–42492, rotate the water pump counterclockwise to release the tension on the timing belt. 19. Remove the right engine mount bracket. Refer to ”Engine Mount” in this section. 20. Remove the timing belt.
  • 36. 1C1 – 36I1.4L/1.6L DOHC ENGINE MECHANICAL DAEWOO V–121 BL4 Installation Procedure 1. Align the timing mark on the crankshaft gear with the notch on the bottom of the rear timing belt cov- er. 2. Align the timing marks on the camshaft gears. 3. Install the timing belt. 4. Install the right engine mount bracket. Refer to ”En- gine Mount” in this section. 5. Rotate the water pump clockwise using the timing belt adjuster J–42492. 6. Rotate the water pump clockwise until the adjust arm pointer of the timing belt automatic tensioner is aligned with the notch in the timing belt automatic tensioner bracket. 7. Tighten the water pump retaining bolts. 8. Rotate the crankshaft two full turns clockwise using the crankshaft pulley bolt. 9. Loosen the water pump retaining bolts. 10. Rotate the water pump until the adjust arm pointer of the timing belt automatic tensioner is aligned with the pointer on the timing belt automatic tensioner bracket.
  • 37. 1.4L/1.6L DOHC ENGINE MECHANICAL 1C1 – 37 DAEWOO V–121 BL4 11. Tighten the water pump retaining bolts. Tighten Tighten the water pump retaining bolts to 10 NSm (89 lb–in). 12. Remove the crankshaft pulley bolt. 13. Install the upper and lower front timing belt covers. 14. Install the upper and lower front timing belt cover bolts. Tighten Tighten the front timing belt cover bolts to 10 NSm (89 lb–in). 15. Install the crankshaft pulley. 16. Install the crankshaft pulley bolt. Tighten Tighten the crankshaft pulley bolt to 95 NSm (70 lb–ft) and retighten 30 degrees plus 15 degrees. 17. Install the serpentine accessory drive belt. Refer to Section 6B, Power Steering Pump. 18. Install the right front wheel well splash shield. 19. Install the right front wheel. Refer to Section 2E, Tires and Wheels. 20. Install the air cleaner housing. 21. Install the air cleaner housing bolts. Tighten Tighten the air cleaner housing bolts to 10 NSm (89 lb– in). 22. Connect the air cleaner outlet hose to the throttle body. 23. Connect the breather tube to the camshaft cover. 24. Connect the negative battery cable.
  • 38. 1C1 – 38I1.4L/1.6L DOHC ENGINE MECHANICAL DAEWOO V–121 BL4 OIL PAN Removal Procedure 1. Disconnect the negative battery cable. 2. Drain the Engine oil from the engine crankcase. 3. Remove the catalytic converter retaining nuts from the exhaust pipe. 4. Remove the lower crossmember bracket. 5. Remove the exhaust connecting pipe. 6. Remove the oil pan bolts to the transaxle case. 7. Remove the oil pan retaining bolts to the engine block. 8. Remove the oil pan from the engine block.
  • 39. 1.4L/1.6L DOHC ENGINE MECHANICAL 1C1 – 39 DAEWOO V–121 BL4 Cleaning Procedure 1. Clean the oil pan sealing surface. 2. Clean the engine block sealing surface. 3. Clean the oil pan retaining bolts. 4. Clean the oil pan attaching bolt holes in the engine block. Installation Procedure 1. Coat the new oil pan gasket with sealant. Important : Install the oil pan within 5 minutes after apply- ing the liquid gasket to the oil pan. 2. Install the oil pan to the engine block. 3. Install the oil pan retaining bolts. Tighten Tighten the oil pan retaining bolts to 10 NSm (89 lb–in). 4. Install the oil pan bolts to the transaxle case. Tighten Tighten the oil pan to the transaxle case bolts to 31 NSm (23 lb–ft). 5. Install the exhaust connecting pipe. 6. Install the catalytic converter retaining nuts to the exhaust pipe. Tighten Tighten the catalytic converter to exhaust pipe retain- ing nuts to 40 NSm (30 lb–ft). 7. Install the lower crossmember bracket. 8. Connect the negative battery cable. 9. Install the oil pan drain plug. Tighten Tighten the oil pan drain plug to 55 NSm (40 lb–ft). 10. Refill the engine crankcase with engine oil.
  • 40. 1C1 – 40I1.4L/1.6L DOHC ENGINE MECHANICAL DAEWOO V–121 BL4 OIL PUMP Tools Required KM–498–B Pressure Gauge KM–135 Adapter Engine Oil Pressure Inspection Procedure 1. Remove the right front wheel, wheel well splash shield and engine undercover. 2. Disconnect the oil pressure switch connector. 3. Install the adapter KM–135 in place of the oil pres- sure switch. 4. Connect the pressure gauge KM–498–B to the adapter. 5. Start the engine and check the oil pressure at idle speed and engine temperature of 80°C (176°F). The minimum oil pressure should be 30 kPa (4.35 psi). 6. Stop the engine and remove the pressure gauge KM–498–B and the adapter KM–135. 7. Install the oil pressure switch. Tighten Tighten the oil pressure switch to 40 NSm (30 lb–ft). 8. Connect the oil pressure switch connector. 9. Install the right front wheel well splash shield, en- gine undercover and wheel. 10. Check the oil level. Pour oil until it reaches the full mark. Removal Procedure 1. Disconnect the negative battery cable. 2. Remove the power steering pump, if equipped. Re- fer to Section 6A, Power Steering System. 3. Remove the timing belt. Refer to”Timing Belt” in this section. 4. Remove the rear timing belt cover. Refer to ”Rear Timing Belt Cover” in this section. 5. Disconnect the oil pressure switch connector.
  • 41. 1.4L/1.6L DOHC ENGINE MECHANICAL 1C1 – 41 DAEWOO V–121 BL4 6. Remove the oil pan. Refer to ”Oil Pan” in this sec- tion. 7. Remove the oil suction pipe and support bracket bolts. 8. Remove the oil suction pipe. 9. Remove the oil pump retaining bolts. 10. Carefully separate the oil pump and gasket from the engine block and the oil pan. 11. Remove the oil pump. Inspection Procedure 1. Clean the oil pump and the engine block gasket mating surface areas. 2. Remove the safety relief valve bolt. 3. Remove the safety relief valve and the spring. 4. Remove the oil pump–to–crankshaft seal. 5. Remove the oil pump rear cover bolts. 6. Remove the oil pump rear cover bolts.
  • 42. 1C1 – 42I1.4L/1.6L DOHC ENGINE MECHANICAL DAEWOO V–121 BL4 7. Clean the oil pump housing and all the oil pump parts. 8. Inspect all the oil pump parts for signs of wear. Re- fer to ”Engine Specifications” in this section. Re- place the worn oil pump parts. Notice : Pack the oil pump gear cavity with petroleum jelly to ensure an oil pump prime, or engine damage could re- sult. 9. Coat all the oil pump parts with clean engine oil. Install the oil pump parts. 10. Apply Loctite® 242 to the oil pump rear cover bolts and install the cover and bolts. Tighten Tighten the oil pump rear cover bolts to 8 NSm (71 lb– in). 11. Install the safety relief valve, spring, washer and bolt. Tighten Tighten the safety relief valve bolt to 30 NSm (22 lb–ft). Installation Procedure 1. Apply Loctite® 242 to the oil pump bolts and room temperature vulcanizing (RTV) sealant to the new oil pump gasket. 2. Install the gasket to the oil pump and install the oil pump to the engine block with the bolts. Tighten Tighten the oil pump bolts to 10 NSm (89 lb–in). 3. Install a new oil pump–to–crankshaft seal. Coat the lip of the seal with a thin coat of grease.
  • 43. 1.4L/1.6L DOHC ENGINE MECHANICAL 1C1 – 43 DAEWOO V–121 BL4 4. Coat the threads of the oil suction pipe and support bracket bolts with Loctite® 242. 5. Install the oil suction pipe and bolts. Tighten Tighten the oil suction pipe and support bracket bolts to 10 NSm (89 lb–in). 6. Install the oil pan. Refer to ”Oil Pan” in this section. 7. Connect the oil pressure switch connector. 8. Install the rear timing belt cover. Refer to ”Rear Timing Belt Cover” in this section. 9. Install the timing belt. Refer to ”Timing Belt” in this section. 10. Install the power steering pump, if equipped. Refer to Section 6A, Power Steering System. 11. Connect the negative battery cable. ENGINE MOUNT Tools Required DW110–060 Engine Support Fixture Removal Procedure 1. Disconnect the negative battery cable. 2. Support the engine assembly using the engine sup- port fixture DW110–060. 3. Remove the engine mount bracket attaching bolts/ nuts. 4. Remove the front timing belt cover. Refer to ”Timing Belt” in this section.
  • 44. 1C1 – 44I1.4L/1.6L DOHC ENGINE MECHANICAL DAEWOO V–121 BL4 5. Remove the engine mount attaching bolts/nuts. 6. Remove the engine mount. Installation Procedure 1. Install the engine mount. 2. Install the engine mount retaining bolts. Tighten Tighten the engine mount attaching bolts to 30 NSm (22 lb–ft). 3. Install the front timing belt cover. Refer to ”Timing Belt” in this section. 4. Install the engine mount bracket attaching bolts/ nuts. Tighten Tighten the engine mount bracket attaching bolts/ nuts to 55 NSm (41 lb–ft). 5. Remove engine assembly support fixture DW110–060. 6. Connect the negative battery cable.
  • 45. 1.4L/1.6L DOHC ENGINE MECHANICAL 1C1 – 45 DAEWOO V–121 BL4 CAMSHAFT GEARS Removal Procedure 1. Disconnect the negative battery cable. 2. Remove the engine cover. 3. Remove the timing belt. Refer to ”Timing Belt” in this section. 4. Disconnect the ignition wires from the spark plugs. 5. Disconnect the engine ventilation hoses from the camshaft cover. 6. Remove the camshaft cover bolts. 7. Remove the camshaft cover and the camshaft cov- er gasket. Notice : Take extreme care to prevent any scratches, nicks or damage to the camshafts. 8. While holding the intake camshaft firmly in place, remove the intake camshaft gear bolt. 9. Remove the intake camshaft gear. 10. While holding the exhaust camshaft firmly in place, remove the exhaust camshaft gear bolt. 11. Remove the exhaust camshaft gear. Installation Procedure Notice : Take extreme care to prevent any scratches, nicks or damage to the camshafts. 1. Install the intake camshaft gear. 2. While holding the intake camshaft firmly in place, install the intake camshaft gear bolt. Tighten Tighten the intake camshaft gear bolt to 67.5 NSm (49 lb–ft).
  • 46. 1C1 – 46I1.4L/1.6L DOHC ENGINE MECHANICAL DAEWOO V–121 BL4 3. Install the exhaust camshaft gear. 4. While holding the exhaust camshaft firmly in place, install the exhaust camshaft gear bolt. Tighten Tighten the exhaust camshaft gear bolt to 67.5 NSm (49 lb–ft). 5. Apply a small amount of gasket sealant to the cor- ners of the front camshaft caps and to the top of the rear camshaft cover–to–cylinder head seal. 6. Install the camshaft cover and the camshaft cover gasket. 7. Install the camshaft cover bolts. Tighten Tighten the camshaft cover nuts to 10 NSm (89 lb–in). 8. Connect the engine ventilation hoses to the cam- shaft cover. 9. Connect the ignition wires to the spark plugs. 10. Install the timing belt. Refer to ”Timing Belt” in this section. 11. Install the engine cover. Refer to ”Engine Cover” in this section. 12. Connect the negative battery cable. REAR TIMING BELT COVER Removal Procedure 1. Remove the timing belt and the timing belt cover. Refer to ”Timing Belt” in this section. 2. Remove the camshaft gears. Refer to ”Camshaft Gears” in this section. 3. Remove the crankshaft gear. 4. Remove the timing belt automatic tensioner bolts. 5. Remove the timing belt automatic tensioner.
  • 47. 1.4L/1.6L DOHC ENGINE MECHANICAL 1C1 – 47 DAEWOO V–121 BL4 6. Remove the timing belt idler pulley bolt. 7. Remove the timing belt idler pulley. 8. Remove the rear timing belt cover bolts. 9. Remove the rear timing belt cover. Installation Procedure 1. Install the rear timing belt cover. 2. Install the rear timing belt cover bolts. Tighten Tighten the rear timing belt cover bolts to 10 NSm (89 lb–in). 3. Install the timing belt idler pulley. 4. Install the timing belt idler pulley bolt. Tighten Tighten the timing belt idler pulley bolt to 40 NSm (30 lb–ft).
  • 48. 1C1 – 48I1.4L/1.6L DOHC ENGINE MECHANICAL DAEWOO V–121 BL4 5. Install the timing belt automatic tensioner. 6. Install the timing belt automatic tensioner bolts. Tighten Tighten the timing belt automatic tensioner bolts to 25 NSm (18 lb–ft). 7. Install the crankshaft gear. Notice : Take extreme care to prevent any scratches, nicks or damage to the camshafts. 8. Install the camshaft gears. Refer to ”Camshaft Gears” in this section. 9. Install the timing belt and timing belt cover. Refer to ”Timing Belt” in this section. ENGINE Removal Procedure 1. Remove the fuel pump fuse. 2. Start the engine. After it stalls, crank the engine for 10 seconds to rid the fuel system of fuel pressure. 3. Remove the hood. Refer to Section 9R, Body Front End. 4. Drain the engine oil. 5. Disconnect the negative battery cable. 6. Remove the air cleaner outlet hose from the throttle body and air cleaner housing. 7. Disconnect the breather tubes from the camshaft cover. 8. Remove the serpentine accessory drive belt. Refer to Section 6B, Power Steering Pump. 9. Remove the right front wheel. Refer to Section 2E, Tires and Wheels. 10. Remove the right front wheel well splash shield. 11. Drain the engine coolant. Refer to Section 1D, En- gine Cooling. 12. Remove the cooling system radiator and the engine cooling fans. Refer to Section 1D, Engine Cooling. 13. Disconnect the upper radiator hose from the ther- mostat housing. 14. Disconnect the power steering return hose from the power steering pump. Refer to Section 6A, Power Steering System. 15. Disconnect the power steering pressure hose from the power steering pump. Refer to Section 6A, Power Steering System. 16. Disconnect the electrical connector at the direct ignition system (DIS) coil and the electronic control module (ECM) ground terminal at the intake man- ifold and at the starter motor.
  • 49. 1.4L/1.6L DOHC ENGINE MECHANICAL 1C1 – 49 DAEWOO V–121 BL4 17. Disconnect the oxygen (O2) sensor connector, if equipped. 18. Disconnect the fuel injector harness connectors. 19. Disconnect the MAT, MAP sensor connectors. 20. Disconnect the throttle position sensor (TPS) con- nector. 21. Disconnect the generator voltage regulator connec- tor and power lead. 22. Remove the electrical harness clamp bolt. 23. Disconnect all of the necessary vacuum lines, in- cluding the brake booster vacuum hose. 24. Disconnect the fuel feed line at the fuel rail. 25. Disconnect the throttle cable from the throttle body and the intake manifold bracket. 26. Disconnect the surge tank coolant hose at the throttle body. 27. Disconnect the heater outlet hose at the coolant pipe. 28. Disconnect the heater inlet hose from the cylinder head. 29. Disconnect the surge tank coolant hose from the coolant pipe. 30. Disconnect the lower radiator hose from the coolant pipe. Disconnect the starter solenoid ”S” terminal wire. Remove the A/C compressor, if equipped. Re- fer to Section 7B, Manual Control Heating, Ventila- tion, and Air Conditioning Systems. 31. Remove the catalytic converter retaining nuts from the exhaust pipe. 32. Remove the exhaust pipe.
  • 50. 1C1 – 50I1.4L/1.6L DOHC ENGINE MECHANICAL DAEWOO V–121 BL4 33. Remove the crankshaft pulley bolt. 34. Remove the crankshaft pulley. 35. Disconnect the vacuum lines at the charcoal canis- ter purge solenoid. 36. Disconnect the electrical connector at the charcoal canister purge (CCP) solenoid and at the knock sensor. 37. Disconnect the electrical connector at the oil pres- sure switch and at the exhaust gas recirculation (EGR) solenoid. 38. Disconnect the crankshaft position sensor (CPS) connector. 39. Remove the transaxle torque converter bolts, if au- tomatic transaxle equipped. 40. Remove the stater motor. Refer to Section 1E, En- gine Electrical. 41. Remove the transaxle bell housing bolts. 42. Support the transaxle with a floor jack. 43. Install the engine lifting device. 44. Disconnect the right engine mount bracket from the engine mount and the engine by removing the at- taching bolts and the nuts. 45. Remove the right engine mount from the engine block. Refer to ”Engine Mount” in this section. 46. Separate the engine block from the transaxle. 47. Remove the engine. Installation Procedure 1. Install the engine into the engine compartment. 2. Align the engine alignment pins to the transaxle. 3. Install the transaxle bell housing bolts. Tighten Tighten the transaxle bell housing bolts to 75 NSm (55 lb–ft). 4. Install the right engine mount to the engine block. Refer to ”Engine Mount” in this section.
  • 51. 1.4L/1.6L DOHC ENGINE MECHANICAL 1C1 – 51 DAEWOO V–121 BL4 5. Connect the right engine mount bracket to the en- gine mount and the engine by installing the attach- ing bolts and the nuts. Tighten Tighten the engine mount bracket attaching bolts and the nuts to 55 NSm (41 lb–ft). 6. Remove the floor jack used for support of the trans- axle. 7. Remove the engine lifting device. 8. Install the transaxle torque converter bolts, if auto- matic transaxle equipped. Tighten Tighten the transaxle torque converter bolts to 45 NSm (33 lb–ft). 9. Install the starter motor. Refer to Section 1E, En- gine Electrical. 10. Connect the vacuum lines at the CCP solenoid. 11. Connect the electrical connector at the CCP sole- noid and at the knock sensor. 12. Connect the oil pressure switch and the EGR sole- noid connectors. 13. Install the crankshaft pulley. 14. Install the crankshaft pulley bolt. Tighten Tighten the crankshaft pulley bolt to 95 NSm (70 lb–ft) and retighten 30 degrees plus 15 degrees. 15. Connect the CPS connector. 16. Install the exhaust front pipe. 17. Install the catalytic converter retaining nuts to the exhaust pipe. Tighten Tighten the catalytic converter to exhaust pipe retain- ing nuts to 35 NSm (26 lb–ft).
  • 52. 1C1 – 52I1.4L/1.6L DOHC ENGINE MECHANICAL DAEWOO V–121 BL4 18. Connect the power steering pressure hose. 19. Connect the power steering return hose. 20. Install the A/C compressor, if equipped. Refer to Section 7B, Manual Control Heating, Ventilation, and Air Conditioning Systems. 21. Install the generator. Refer to Section 1E, Engine Electrical. 22. Install the serpentine accessory drive belt. Refer to Section 6B, Power Steering Pump. 23. Install the right front wheel well splash shield. 24. Install the right front wheel. Refer to Section 2E, Tires and Wheels. 25. Connect the fuel feed line to the fuel rail. 26. Connect all of the necessary vacuum lines, includ- ing the brake booster vacuum hose. 27. Connect the O2 sensor connector, if equipped. 28. Connect the starter solenoid ”S” terminal wire and power lead. 29. Connect the generator voltage regulator connector and power lead. 30. Connect the CTS connector. 31. Connect the MAP, MAT sensor connectors. 32. Connect the TPS connector. 33. Install the electrical wiring harness clamp at the intake manifold support bracket. 34. Connect the fuel injector harness connectors. 35. Connect the electrical connector at the DIS coil and the ECM ground terminal at the starter. 36. Install the air cleaner outlet hose between the throttle body and the air cleaner housing. 37. Connect the breather tubes to the camshaft cover. 38. Install the cooling system radiator and the engine cooling fans. Refer to Section 1D, Engine Cooling.
  • 53. 1.4L/1.6L DOHC ENGINE MECHANICAL 1C1 – 53 DAEWOO V–121 BL4 39. Connect the lower radiator hose to the coolant pipe. 40. Connect the upper radiator hose to the thermostat housing. 41. Connect the surge tank coolant hose to the radia- tor. 42. Connect the heater inlet hose to the cylinder head. 43. Connect the heater outlet hose to the coolant pipe. 44. Connect the coolant surge tank hose to the coolant pipe. 45. Connect the surge tank coolant hose to the throttle body. 46. Connect the throttle cable to the throttle body and the intake manifold bracket. 47. Install the fuel pump fuse. 48. Connect the negative battery cable. 49. Refill the engine crankcase with engine oil. 50. Refill the engine coolant system. Refer to Section 1D, Engine Cooling. 51. Bleed the power steering system. Refer to Section 6A, Power Steering System. 52. Refill the A/C refrigerant system, if equipped. Refer to Section 7B, Manual Control Heating, Ventilation, and Air Conditioning System. 53. Install the hood. Refer to Section 9R, Body Front End. PISTONS AND RODS Tools Required KM–427 Piston Pin Service Set KM 470–B Angular Torque Gauge Removal Procedure 1. Remove the cylinder head with the intake manifold and the exhaust manifold attached. Refer to ”Cylin- der Head and Gasket” in this section. 2. Remove the oil pan. Refer to ”Oil Pan” in this sec- tion. 3. Remove the oil suction pipe bolts. 4. Remove the oil suction pipe. 5. Move the piston to the bottom of the piston stroke. 6. Mark the connecting rod cap for position. 7. Remove the connecting rod cap bolts. 8. Remove the connecting rod cap and the lower con- necting rod bearing. 9. Remove the upper piston connecting rod bearing. 10. Ridge ream the cylinder wall.
  • 54. 1C1 – 54I1.4L/1.6L DOHC ENGINE MECHANICAL DAEWOO V–121 BL4 CAUTION : Use care when handling the piston. Worn piston rings are sharp and may cause injury. 11. Remove the piston. 12. Use a piston ring expander tool to expand the pis- ton rings. 13. Remove the piston rings. 14. Remove the piston pin from the piston and connect- ing rod assembly using the piston pin service set KM–427. 15. Separate the piston from the connecting rod. Inspection Procedure 1. Inspect the connecting rod for bending or twisting. If the connecting rod is bent or twisted, replace the connecting rod. 2. Inspect the connecting rod bearings. 3. Inspect the connecting rod lower end for wear. 4. Inspect the connecting rod upper end for scoring. 5. Inspect the crankshaft rod bearing journal for wear. Refer to ”Engine Specifications” in this section. 6. Inspect the piston for scoring, cracks, and wear. 7. Inspect the piston for taper using a micrometer. 8. Inspect the piston for fit to the connecting rod.
  • 55. 1.4L/1.6L DOHC ENGINE MECHANICAL 1C1 – 55 DAEWOO V–121 BL4 9. Inspect the engine block deck surface for flatness using a straight edge and a feeler gauge. Refer to ”Engine Specifications” in this section. 10. Inspect the bearing bore for concentricity and align- ment using a bore gauge. Refer to ”Engine Specifi- cations” in this section. If the bearing bore is be- yond specifications, replace the engine block. 11. Inspect the engine block cylinder bore for wear, runout, ridging and taper using a bore gauge. Refer to ”Engine Specifications” in this section. 12. Inspect the engine block cylinder bore for glazing. Lightly hone the cylinder bore as necessary. Installation Procedure 1. Align the notch on the piston and the connecting rod so that the proper sides will be facing the front of the engine. 2. Install the piston pin guide through the piston and the connecting rod. 3. Coat the piston pin with clean oil. 4. Install the piston pin into the opposite side of the piston. 5. Install the piston pin into the piston and connecting rod assembly using the piston pin service set KM–427. 6. Select a set of new piston rings. 7. Measure the piston ring gap using a feeler gauge. Refer to ”Engine Specifications” in this section. 8. Increase the piston ring gap by carefully filing off excess material if the piston ring gap is below spec- ifications. 9. Measure the piston ring side clearance using a feel- er gauge. Refer to ”Engine Specifications’’ in this section. 10. If the piston ring is too thick, try another piston ring. 11. If no piston ring can be found that fits to specifica- tions, the piston ring may be ground to size with emery paper placed on a sheet of glass.
  • 56. 1C1 – 56I1.4L/1.6L DOHC ENGINE MECHANICAL DAEWOO V–121 BL4 12. Install a piston oil ring, the expander, then the sec- ond piston oil ring to the bottom ring groove of the piston. 13. Install the second compression ring to the middle ring groove of the piston. 14. Install the top compression ring to the top ring groove of the piston. 15. Use a piston ring expander to install the piston rings. Do not expand the piston rings beyond the expansion necessary for installation. 16. Stagger the piston oil rings, the oil ring rail gaps, the second compression ring, and the top compres- sion ring in relation to the notch on the top of the piston. 17. Lubricate the cylinder wall and the piston rings with clean engine oil. 18. Install the piston using a ring compressor and a wood handle. Guide the lower connecting rod end to prevent damaging the crankshaft journal. 19. Install the connecting rod cap and bearings. Refer to ”Crankshaft Bearings and Connecting Rod Bear- ings – Gauging Plastic” in this section. 20. Install the connecting rod cap bolts. Tighten Tighten the connecting rod bearing cap bolts to 25 NSm (18 lb–ft). Using the angular torque gauge KM–470–B, tighten the bolts one turn of 30 degrees plus one turn of 15 degrees.
  • 57. 1.4L/1.6L DOHC ENGINE MECHANICAL 1C1 – 57 DAEWOO V–121 BL4 21. Install the oil suction pipe. 22. Install the oil suction pipe bolts. Tighten Tighten the oil suction pipe bolts to 10 NSm (89 lb–in). 23. Install the oil pan. Refer to ”Oil Pan” in this section. 24. Install the cylinder head with the intake manifold and the exhaust manifold attached. Refer to ”Cylin- der Head and Gasket” in this section.
  • 58. 1C1 – 58I1.4L/1.6L DOHC ENGINE MECHANICAL DAEWOO V–121 BL4 UNIT REPAIR CYLINDER HEAD AND VALVE TRAIN COMPONENTS Tools Required MKM–571–B Gauge KM–340–0 Cutter Set KM–340–7 Guide Drift KM–340–13 Cutters KM–340–26 Cutters KM–348 Valve Spring Compressor KM–653 Adapter KM–805 Valve Guide Reamer Disassembly Procedure 1. Remove the cylinder head with the intake manifold and the exhaust manifold attached. Refer to ”Cylin- der Head and Gasket” in this section. 2. Remove the engine coolant temperature sensor. 3. Remove the exhaust manifold heat shield bolts. 4. Remove the exhaust manifold heat shield. 5. Remove the exhaust manifold retaining nuts in the sequence shown. 6. Remove the exhaust manifold. 7. Remove the exhaust manifold gasket. 8. Remove the exhaust manifold studs. 9. Remove the thermostat housing mounting bolts. 10. Remove the thermostat housing assembly. 11. Remove the fuel rail retaining bolts and the fuel rail assembly. 12. Remove the intake manifold retaining nuts and re- taining bolts in the sequence shown. 13. Remove the intake manifold. 14. Remove the intake manifold studs.
  • 59. 1.4L/1.6L DOHC ENGINE MECHANICAL 1C1 – 59 DAEWOO V–121 BL4 15. Remove the direct ignition system (DIS) coil mount- ing bolts. 16. Remove the DIS coil with the ignition wires at- tached. 17. Remove the DIS coil mounting bracket bolts. 18. Remove the DIS coil mounting bracket. 19. Remove the electrical exhaust gas recirculation (EEGR) valve adapter bolts. 20. Remove the EEGR valve adapter. 21. Remove the EEGR valve adapter gasket. 22. Remove the spark plugs. 23. Remove the camshaft cap bolts gradually and in the sequence shown for each camshaft cap. 24. Remove the intake camshaft caps. Maintain the correct positions for installation. 25. Remove the intake camshaft. 26. Remove the intake valve tappet adjusters. 27. Remove the exhaust camshaft caps. Maintain the correct positions for installation. 28. Remove the exhaust camshaft. 29. Remove the exhaust valve tappet adjusters. 30. Compress the valve springs with the valve spring compressor KM–348 and the adapter KM–653. 31. Remove the valve keys. 32. Remove the valve spring compressor KM–348 and the adapter KM–653. 33. Remove the valve spring caps. 34. Remove the valve springs. Maintain the original position of the valve springs for installation.
  • 60. 1C1 – 60I1.4L/1.6L DOHC ENGINE MECHANICAL DAEWOO V–121 BL4 35. Remove the valves. Maintain the original position of the valves for installation. 36. Remove the valve stem seals. Cylinder Head Inspection 1. Clean the sealing surfaces. 2. Inspect the cylinder head gasket and mating sur- faces for leaks, corrosion, and blowby. 3. Inspect the cylinder head for cracks. 4. Inspect the length and the width of the cylinder head using a feeler gauge and a straight edge. 5. Check the sealing surfaces for deformation and warpage. The cylinder head sealing surfaces must be flat within 0.050 mm (0.002 inch) maximum. 6. Measure the height of the cylinder head from seal- ing surface to sealing surface. The cylinder head height should be 134.08 to 134.23 mm. If the cylin- der head height is less than 134.08 mm, replace the cylinder head. 7. Inspect all threaded holes for damage. 8. Inspect valve seats for excessive wear and burned spots. Valve Inspection 1. Inspect the valve stem tip for wear. 2. Inspect the valve key grooves and the oil seal grooves for chips and wear. 3. Inspect the valves for burns or cracks. 4. Inspect the valve stem for burrs and scratches. 5. Inspect the valve stem. The valve stem must be straight. 6. Inspect the valve face for grooving. If the groove is so deep that refacing the valve would result in a sharp edge, replace the valve.
  • 61. 1.4L/1.6L DOHC ENGINE MECHANICAL 1C1 – 61 DAEWOO V–121 BL4 7. Inspect the valve spring. If the valve spring ends are not parallel, replace the valve spring. 8. Measure the valve spring height. Refer to ”Engine Specifications” in this section. If the valve spring height does not match the specifications, replace the valve spring. 9. Inspect the valve spring seating surface of the valve rotators for wear or gouges. Replace as re- quired. Cleaning Procedure 1. Clean the cylinder head. 2. Clean the valve guides. 3. Clean all of the threaded holes. 4. Clean the valves of carbon, oil, and varnish. Cylinder Head Overhaul Valve Grind–in 1. Lubricate the valve stem using a fine–grained paste. 2. Lift the valve rhythmically from the seat with a com- mercially available valve grinding tool in order to distribute the paste. 3. Check the contact pattern on the valve head and in the cylinder head. 4. Clean the valves, the valve guides, and the cylinder head.
  • 62. 1C1 – 62I1.4L/1.6L DOHC ENGINE MECHANICAL DAEWOO V–121 BL4 Valve Grind 1. Ensure that there are no crater line burns on the valve cone. 2. The valve may be reground only two times. Do not grind the valve stem end. 3. The angle at the valve face is 45 degrees. 4. Inspect the assembly height of the intake valves and the exhaust valves. Valve Guide – Ream 1. Measure the diameter of the valve guide using the gauge MKM–571–B and a commercially available inside micrometer. Important : Valve oversizes may already have been fitted in production. 2. An oversize service code is on the valve guide and the valve stem end. The following table gives the correct size, reamer, and production code for each service. Size Reamer Production Code Service Code Normal – – K 0.075 KM–805 1 K1 0.150 – 2 K2 3. Ream the valve guide from the upper side of the cylinder head to the next oversize. 4. After reaming, cross out the code and emboss the valve guide with the new code. Valve Seat – Cut 1. Place the cylinder head on wooden blocks. 2. Cut the intake and the exhaust valve seats using the guide drift KM–340–7 as follows: S Valve seat – A 45–degree surface using the cut- ter KM–340–13. S Upper correction angle – A 30–degree surface using the cutter KM–340–13. S Lower correction angle – A 60–degree surface using the cutter KM–340–26. 3. Clean the chippings from the cylinder head.
  • 63. 1.4L/1.6L DOHC ENGINE MECHANICAL 1C1 – 63 DAEWOO V–121 BL4 4. Inspect the dimension for the valve seat width. S Intake: 1.17 to 1.57 mm (0.046 to 0.062 inch). S Exhaust: 1.4 to 1.8 mm (0.055 to 0.071 inch). 5. Inspect the assembly height of the intake valves and the exhaust valves. If the dimension is exceed- ed, install new valves. Inspect the assembly height of the intake valves and the exhaust valves again. If the valve assembly height is still too large despite replacing the valves, replace the cylinder head. Assembly Procedure 1. Install the valve stem seals. 2. Lubricate the valve stems with engine oil. 3. Carefully install the valves in their original positions. Do not damage the valve stem seals. 4. Install the valve springs in their original positions. 5. Install the valve spring caps. 6. Compress the valve springs with the valve spring compressor KM–348 and adapter KM–653. 7. Install the valve keys. 8. Remove the valve spring compressor KM–348 and adapter KM–653. 9. Lubricate the valve tappet adjusters with engine oil. 10. Install the valve tappet adjusters.
  • 64. 1C1 – 64I1.4L/1.6L DOHC ENGINE MECHANICAL DAEWOO V–121 BL4 11. Install the intake camshaft. 12. Install the intake camshaft caps in their original positions. 13. Install the exhaust camshaft. 14. Install the exhaust camshaft caps in their original positions. 15. Install the camshaft cap bolts. 16. Tighten the camshaft cap bolts gradually and in the sequence shown for each camshaft cap. Tighten Tighten the camshaft cap bolts to 16 NSm (12 lb–ft). 17. Install the spark plugs. Tighten Tighten the spark plugs to 25 NSm (18 lb–ft). 18. Install the EGR valve adapter gasket. 19. Install the EGR valve adapter. 20. Install the EGR valve adapter bolts. Tighten Tighten the exhaust gas recirculation valve adapter bolts to 25 NSm (18 lb–ft). 21. Install the DIS coil mounting bracket. 22. Install the DIS coil mounting bracket bolts. Tighten Tighten the direct ignition system coil mounting brack- et bolts to 10 NSm (89 lb–in). 23. Install the DIS coil with the ignition wires attached. 24. Install the DIS coil mounting bolts. Tighten Tighten the direct ignition system coil mounting bolts to 10 NSm (89 lb–in). 25. Install the intake manifold studs. 26. Install the intake manifold. 27. Install the intake manifold retaining nuts and retain- ing bolts in the sequence shown. Tighten Tighten the intake manifold retaining nuts and retain- ing bolts to 25 NSm (18 lb–ft).
  • 65. 1.4L/1.6L DOHC ENGINE MECHANICAL 1C1 – 65 DAEWOO V–121 BL4 28. Install the fuel rail assembly with the bolts. Tighten Tighten the fuel rail assembly retaining bolts to 25 NSm (18 lb–ft). 29. Install the thermostat housing assembly. 30. Install the thermostat housing mounting bolts. Tighten Tighten the thermostat housing mounting bolts to 20 NSm (15 lb–ft). 31. Install the exhaust manifold studs. 32. Install the exhaust manifold gasket. 33. Install the exhaust manifold. 34. Install the exhaust manifold retaining nuts in the sequence shown. Tighten Tighten the exhaust manifold retaining nuts to 25 NSm (18 lb–ft). 35. Install the exhaust manifold heat shield. 36. Install the exhaust manifold heat shield bolts. Tighten Tighten the exhaust manifold heat shield bolts to 15 NSm (11 lb–ft). 37. Install the ECT sensor. Tighten Tighten the engine coolant temperature sensor to 20 NSm (15 lb–ft). 38. Install the cylinder head with the intake manifold and the exhaust manifold attached. Refer to ”Cylin- der Head and Gasket” in this section. CRANKSHAFT Tools Required KM–412 Engine Overhaul Stand J–42492 Timing Belt Adjuster KM–470–B Angular Torque Gauge J–36792 or KM–635 Crankshaft Rear Oil Seal Installer Notice : Take extreme care to prevent any scratches, nicks, or damage to the camshafts. Disassembly Procedure 1. Remove the engine. Refer to ”Engine” in this sec- tion. 2. Remove the flywheel or flexible plate bolts. 3. Remove the flywheel or the flexible plate.
  • 66. 1C1 – 66I1.4L/1.6L DOHC ENGINE MECHANICAL DAEWOO V–121 BL4 4. Remove the crankshaft rear oil seal. 5. Mount the engine assembly on the engine overhaul stand KM–412. 6. Remove the upper and the lower front timing belt cover bolts. 7. Remove the upper and the lower front timing belt cover. 8. Slightly loosen the water pump retaining bolts. 9. Rotate the water pump using the timing belt adjust- er J–42492 to remove the tension from the timing belt. 10. Remove the spark plug cover bolts.
  • 67. 1.4L/1.6L DOHC ENGINE MECHANICAL 1C1 – 67 DAEWOO V–121 BL4 11. Disconnect the engine ventilation hoses from the camshaft cover. 12. Disconnect the oil filler cap. 13. Remove the spark plug cover bolts. 14. Remove the spark plug cover. 15. Disconnect the ignition wires from the spark plugs. 16. Remove the camshaft cover nuts. 17. Remove the camshaft cover washers. 18. Remove the camshaft cover and the camshaft cov- er gasket. Notice : Take extreme care to prevent any scratches, nicks or damage to the camshafts. 19. While holding the intake camshaft firmly in place, remove the intake camshaft bolt. 20. Remove the intake camshaft gear. 21. While holding the exhaust camshaft firmly in place, remove the exhaust camshaft bolt. 22. Remove the exhaust camshaft gear. 23. Remove the timing belt automatic tensioner bolts. 24. Remove the timing belt automatic tensioner. 25. Remove the timing belt idler pulley bolt. 26. Remove the timing belt idler pulley. 27. Remove the crankshaft timing belt gear. 28. Remove the rear timing belt cover bolts. 29. Remove the rear timing belt cover.
  • 68. 1C1 – 68I1.4L/1.6L DOHC ENGINE MECHANICAL DAEWOO V–121 BL4 30. Rotate the engine on the engine overhaul stand KM–412. 31. Remove the oil pan retaining bolts. 32. Remove the oil pan. 33. Remove the oil suction pipe bolts. 34. Remove the oil suction pipe. 35. Remove the oil pump retaining bolts. 36. Remove the oil pump. 37. Mark the order of the connecting rod bearing caps. 38. Remove the connecting rod bearing cap bolts for all of the pistons. 39. Remove the connecting rod bearing caps and the lower connecting rod bearings. 40. Remove the upper connecting rod bearings.
  • 69. 1.4L/1.6L DOHC ENGINE MECHANICAL 1C1 – 69 DAEWOO V–121 BL4 41. Mark the order of the crankshaft bearing caps. 42. Remove the crankshaft bearing cap bolts. 43. Remove the crankshaft bearing caps and the lower crankshaft bearings. 44. Remove the crankshaft. 45. Remove the upper crankshaft bearings. 46. Clean the parts, as needed. Assembly Procedure 1. Coat the crankshaft bearings with the engine oil. 2. Install the upper crankshaft bearings in the engine block. 3. Install the crankshaft. 4. Install the lower crankshaft bearings in the bearing caps. 5. Inspect the crankshaft end play with the crankshaft bearings installed. 6. Check for permissible crankshaft end play. Refer to ”Engine Specifications” in this section. 7. With the crankshaft mounted on the front and the rear crankshaft bearings, check the middle crank- shaft journal for permissible out–of–round (runout). Refer to ”Engine Specifications” in this section.
  • 70. 1C1 – 70I1.4L/1.6L DOHC ENGINE MECHANICAL DAEWOO V–121 BL4 Important :Grease the crankshaft journals and lubri–cate the crankshaft bearings slightly so that the plastic gauging thread does not tear when the crankshaft bearing caps are removed. 8. Inspect all of the crankshaft bearing clearances us- ing a commercially available plastic gauging (ductile plastic threads). 9. Cut the plastic gauging threads to the length of the bearing width. Lay them axially between the crank- shaft journals and the crankshaft bearings. 10. Install the crankshaft bearing caps and the bolts. Tighten Tighten the crankshaft bearing cap bolts to 50 NSm (37 lb–ft) plus 45 degrees plus 15 degrees. 11. Remove the crankshaft bearing cap bolts and the caps. 12. Measure the width of the flattened plastic thread of the plastic gauging using a ruler. (Plastic gauging is available for different tolerance ranges.) 13. Inspect the bearing clearance for permissible toler- ance ranges. Refer to ”Engine Specifications” in this section. 14. Apply a bead of adhesive sealing compound to the grooves of the crankshaft bearing caps. 15. Install the crankshaft bearing caps to the engine block. 16. Tighten the crankshaft bearing caps using new bolts. Tighten Tighten the crankshaft bearing cap bolts to 50 NSm (37 lb–ft) using a torque wrench. Use the angular torque gauge KM–470–B to tighten the crankshaft bearings 45 degrees plus 15 degrees. Important : Grease the connecting rod journals and lubri- cate the connecting rod bearings slightly so that the plastic gauging thread does not tear when the connecting rod bearing caps are removed. 17. Inspect all of the connecting rod bearing clearances using a commercially available plastic gauging (ductile plastic threads). 18. Cut the plastic gauging threads to the length of the connecting rod bearing width. Lay them axially be- tween the connecting rod journals and the connect- ing rod bearings. 19. Install the connecting rod bearing caps.
  • 71. 1.4L/1.6L DOHC ENGINE MECHANICAL 1C1 – 71 DAEWOO V–121 BL4 Tighten Tighten the connecting rod bearing cap bolts to 25 NSm (18 lb–ft) using a torque wrench. Use the angular torque gauge KM–470–B to tighten the connecting rod bearing cap bolts 30 degrees plus 15 degrees. 20. Remove the connecting rod bearing caps. 21. Measure the width of the flattened plastic thread of the plastic gauging using a ruler. (Plastic gauging is available for different tolerance ranges.) 22. Inspect the bearing clearance for permissible toler- ance ranges. Refer to ”Engine Specifications” in this section. 23. Install the connecting rod bearing caps to the con- necting rods. 24. Tighten the connecting rod bearing caps using new bolts. Tighten Tighten the connecting rod bearing cap bolts to 25 NSm (18 lb–ft) using a torque wrench. Use the angular torque gauge KM–470–B to tighten the connecting rod cap bolts 30 degrees plus 15 degrees. 25. Install the oil pump. 26. Install the oil pump retaining bolts. Tighten Tighten the oil pump retaining bolts to 10 NSm (89 lb– in).
  • 72. 1C1 – 72I1.4L/1.6L DOHC ENGINE MECHANICAL DAEWOO V–121 BL4 27. Install the oil suction pipe. 28. Install the oil suction pipe bolts. Tighten Tighten the oil suction pipe bolts to 10 NSm (89 lb–in). 29. Coat the new oil pan gasket with sealant. 30. Install the oil pan gasket to the oil pan. 31. Install the oil pan. 32. Install the oil pan retaining bolts. Tighten Tighten the oil pan retaining bolts to 10 NSm (89 lb–in). 33. Rotate the engine on the engine overhaul stand KM–412. 34. Install the rear timing belt cover. 35. Install the rear timing belt cover bolts. Tighten Tighten the rear timing belt cover bolts to 10 NSm (89 lb–in).
  • 73. 1.4L/1.6L DOHC ENGINE MECHANICAL 1C1 – 73 DAEWOO V–121 BL4 36. Install the crankshaft timing belt gear. 37. Install the timing belt automatic tensioner. 38. Install the timing belt automatic tensioner bolts. Tighten Tighten the timing belt automatic tensioner bolts to 25 NSm (18 lb–ft). 39. Install the timing belt idler pulley. 40. Install the timing belt idler pulley bolt. Tighten Tighten the timing belt idler pulley bolt to 40 NSm (30 lb–ft). Notice : Take extreme care to prevent any scratches, nicks or damage to the camshafts. 41. Install the intake camshaft gear. 42. Install the intake camshaft gear bolt while holding the intake camshaft firmly in place. Tighten Tighten the intake camshaft gear bolt to 67.5 NSm (49 lb–ft). 43. Install the exhaust camshaft gear. 44. Install the exhaust camshaft gear bolt while holding the exhaust camshaft firmly in place. Tighten Tighten the exhaust camshaft gear bolt to 67.5 NSm (49 lb–ft). 45. Install the timing belt. Refer to ”Timing Belt” in this section. 46. Adjust the timing belt tension. Refer to ”Timing Belt Check and Adjust” in this section. 47. Apply a small amount of gasket sealant to the cor- ners of the front camshaft caps and to the top of the rear camshaft cover–to–cylinder head seal. 48. Install the camshaft cover and the camshaft cover gasket. 49. Install the camshaft cover washers. 50. Install the camshaft cover nuts. Tighten Tighten the camshaft cover nuts to 10 NSm (89 lb–in). 51. Connect the ignition wires to the spark plugs. 52. Connect the oil filler cap. 53. Connect the engine ventilation hose to the cam- shaft cover. 54. Install the upper and the lower front timing belt cov- ers. 55. Install the upper and the lower front timing belt cov- er bolts. Tighten Tighten the upper and the lower front timing belt cover bolts to 10 NSm (89 lb–in).
  • 74. 1C1 – 74I1.4L/1.6L DOHC ENGINE MECHANICAL DAEWOO V–121 BL4 56. Install the engine lifting device. 57. Remove the engine from the engine overhaul stand KM–412. 58. Install a new crankshaft rear oil seal using the in- staller J–36792 or KM–635. 59. Install the flywheel or the flexible plate. 60. Install the flywheel or the flexible plate bolts. Tighten Tighten the flywheel bolts to 35 NSm (25 lb–ft). Use the angular torque gauge KM–470–B to tighten the flywheel bolts another 30 degrees plus 15 degrees. If the vehicle is equipped with an automatic transaxle, tighten the flexible plate bolts to 45 NSm (33 lb–ft). 61. Install the engine. Refer to ”Engine” in this section. CRANKSHAFT BEARINGS AND CONNECTING ROD BEARINGS – GAUGING PLASTIC Tools Required KM–470–B Angular Torque Gauge Inspection Procedure – Crankshaft 1. Coat the crankshaft bearings with engine oil. 2. Install the upper crankshaft bearings into the engine block crankshaft journals. 3. Install the lower crankshaft bearings into the crank- shaft bearing caps.
  • 75. 1.4L/1.6L DOHC ENGINE MECHANICAL 1C1 – 75 DAEWOO V–121 BL4 4. Install the crankshaft. 5. Inspect the crankshaft end play with the crankshaft bearings installed. 6. Check for permissible crankshaft end play. Refer to ”Engine Specifications” in this section. 7. With the crankshaft mounted on the front and rear crankshaft bearings, check the middle crankshaft journal for permissible out–of–round (runout). Refer to ”Engine Specifications” in this section. Notice : Grease the crankshaft journals and lubricate the crankshaft bearings slightly so that the plastic gauging thread does not tear when the crankshaft bearing caps are removed. 8. Inspect all of the crankshaft bearing clearances us- ing a commercially available plastic gauging (ductile plastic threads). 9. Cut the plastic gauging threads to the length of the bearing width. Lay them axially between the crank- shaft journals and the crankshaft bearings. 10. Install the crankshaft bearing caps. 11. Install the crankshaft bearing cap bolts. Tighten Tighten the crankshaft bearing cap bolts to 50 NSm (37 lb–ft). Using the angular torque gauge KM–470–B, tighten the crankshaft bearing cap bolts 45 degrees plus 15 degrees.
  • 76. 1C1 – 76I1.4L/1.6L DOHC ENGINE MECHANICAL DAEWOO V–121 BL4 12. Remove the crankshaft bearing caps. 13. Measure the width of the flattened plastic thread of the plastic gauging using a ruler. (Plastic gauging is available for different tolerance ranges.) 14. Inspect the bearing clearances for permissible toler- ance ranges. Refer to ”Engine Specifications” in this section. Inspection Procedure – Connecting Rods 1. Coat the connecting rod bearings with engine oil. 2. Install the upper connecting rod bearings into the connecting rod journals. 3. Install the lower connecting rod bearings into the connecting rod bearing caps. Notice : Grease the connecting rod journals and lubricate the connecting rod bearings slightly so that the plastic gauging thread does not tear when the connecting rod bearing caps are removed. 4. Inspect all of the connecting rod bearing clearances using a commercially available plastic gauging (ductile plastic threads). 5. Cut the plastic gauging threads to the length of the bearing width. Lay them axially between the con- necting rod journals and the connecting rod bear- ings. 6. Install the connecting rod bearing caps. 7. Install the connecting rod bearing cap bolts. Tighten Tighten the connecting rod bearing cap bolts to 25 NSm (18 lb–ft). Using the angular torque gauge KM–470–B, tighten the connecting rod bearing cap bolts another 30 degrees plus 15 degrees. 8. Remove the connecting rod bearing caps. 9. Measure the width of the flattened plastic thread of the plastic gauging using a ruler. (Plastic gauging is available for different tolerance ranges.) 10. Inspect the bearing clearance for permissible toler- ance ranges. Refer to ”Engine Specifications” in this section.
  • 77. 1.4L/1.6L DOHC ENGINE MECHANICAL 1C1 – 77 DAEWOO V–121 BL4 GENERAL DESCRIPTION AND SYSTEM OPERATION CYLINDER HEAD AND GASKET The cylinder head is made of an aluminum alloy. The cylin- der head uses cross–flow intake and exhaust ports. A spark plug is located in the center of each combustion chamber. The cylinder head houses the dual camshafts. CRANKSHAFT The crankshaft has eight integral weights which are cast with it for balancing. Oil holes run through the center of the crankshaft to supply oil to the connecting rods, the bear- ings, the pistons, and the other components. The end thrust load is taken by the thrust washers installed at the center journal. TIMING BELT The timing belt coordinates the crankshaft and the dual overhead camshafts and keeps them synchronized. The timing belt also turns the water pump. The timing belt and the pulleys are toothed so that there is no slippage be- tween them. There are two idler pulleys. An automatic ten- sioner pulley maintains the timing belt’s correct tension. The timing belt is made of a tough reinforced rubber similar to that used on the serpentine accessory drive belt. The timing belt requires no lubrication. OIL PUMP The oil pump draws engine oil from the oil pan and feeds it under pressure to the various parts of the engine. An oil strainer is mounted before the inlet of the oil pump to re- move impurities which could clog or damage the oil pump or other engine components. When the drive gear rotates, the driven gear rotates. This causes the space between the gears to constantly open and narrow, pulling oil in from the oil pan when the space opens and pumping the oil out to the engine as it narrows. At high engine speeds, the oil pump supplies a much high- er amount of oil than is required for lubrication of the en- gine. The oil pressure regulator prevents too much oil from entering the engine lubrication passages. During normal oil supply, a coil spring and valve keep the bypass closed, directing all of the oil pumped to the engine. When the amount of oil being pumped increases, the pressure be- comes high enough to overcome the force of the spring. This opens the valve of the oil pressure regulator, allowing the excess oil to flow through the valve and drain back to the oil pan. OIL PAN The engine oil pan is mounted to the bottom of the cylinder block. The engine oil pan houses the crankcase and is made of cast metal. Engine oil is pumped from the oil pan by the oil pump. After it passes through the oil filter, it is fed through two paths to lubricate the cylinder block and the cylinder head. In one path, the oil is pumped through the oil passages in the crankshaft to the connecting rods, then to the pistons and the cylinders. It then drains back to the oil pan. In the sec- ond path, the oil is pumped through the oil passages to the camshaft. The oil passes through the internal passage- ways in the camshafts to lubricate the valve assemblies before draining back to the oil pan. EXHAUST MANIFOLD A single four–port, rear–takedown manifold is used with this engine. The manifold is designed to direct escaping exhaust gases out of the combustion chambers with a minimum of back pressure. The oxygen sensor is mounted to the exhaust manifold. INTAKE MANIFOLD The intake manifold has four independent long ports and uses inertial supercharging to improve engine torque at low and moderate speeds. The plenum is attached to the intake manifold. CAMSHAFTS This engine is a dual overhead camshaft (DOHC) type, which means there are two camshafts. One camshaft op- erates the intake valves, and the other camshaft operates the exhaust valves. The camshafts sit in journals on the top of the engine in the cylinder head and are held in place by camshaft caps. The camshaft journals of the cylinder head are drilled to create oil passages. Engine oil travels to the camshafts under pressure where it lubricates each camshaft journal. The oil returns to the oil pan through drain holes in the cylinder head. The camshaft lobes are machined into the solid camshaft to open and close the in- take and the exhaust valves precisely the correct amount at the correct time. The camshaft lobes are oiled by splash action from pressurized oil escaping from the camshaft journals.