


We often get asked, “what’s the best way to capture a 360° HDRI”? There’s no secret sauce ( well perhaps just a little ), so we’ve detailed the basics of the process, and best practices that will help you capture the best assets that will allow you to make the perfect Dome.
Let’s start by asking why do we need a detailed 360° HDRI?
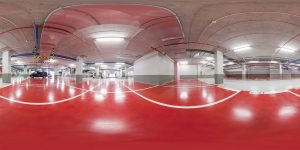
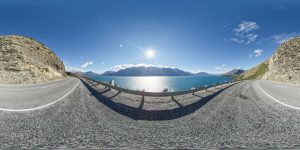
Shooting a 360° HDRI dome is a great way to add realistic lighting to your 3D scenes, as well as provide a number of VR and immersive experiences in a headset. By capturing an entire environment, you can create a detailed and accurate representation of the lighting and reflections in a space. In this blog post, we’ll cover the process of shooting a 360° HDRI dome, including the importance of the nodal point and lighting.
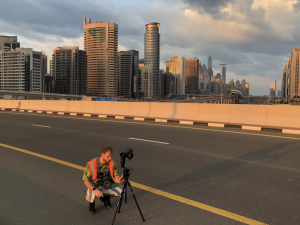
First, let’s go over the equipment needed to shoot a 360° HDRI dome. The most important piece of equipment you will need is a camera, and preferably a fisheye lens. While any camera that allows you to shoot in manual mode and capture RAW images will work, a camera with a high dynamic range (HDR) function and a wide-angle lens is ideal. You will also need a tripod to keep your camera steady while you are capturing your images. In addition, you will need HDRI capture software or an app to merge the images and create the final HDRI dome – we use PTGUI as we find it provides the best stitching by far but can be a little daunting at first.
Once you have your equipment ready, it’s time to set up your camera. Position your camera on the tripod and place it at the centre of the location where you want to capture the HDRI dome. Make sure your camera is level and pointing straight up. This is important because you want to capture the entire environment, and pointing your camera straight up will ensure that you are capturing the entire sky.
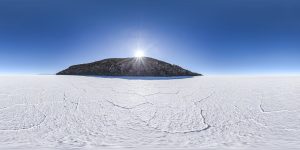
Next, use your HDRI capture software or app to start the capture process. This will typically involve capturing multiple images at different exposures. This can be anywhere from a bracket of 7 to 9 exposures for each position, and ideally no more than 2.3 EV between each bracketed exposure. These images will be used to create the final HDRI dome, which will contain all the lighting information of the environment. As you capture your images, rotate your camera around its axis, making sure to capture images at regular intervals (e.g. every 30 degrees, but this depends on camera and lens size). This will ensure that you are capturing the entire environment and not missing any important details.
It’s also important to note that when capturing your images, you should pay attention to the nodal point of your camera lens. The nodal point is the point in the exact point that the lens will rotate around – this is important that the nodal point is the central pivot and not the camera body. If the nodal point is not in the right place, you may end up with parallax errors in your images, which will make it difficult to merge them into a single HDRI dome. To avoid this, make sure that your camera’s nodal point is aligned with the centre of the rotation of your tripod head.
Proper lighting is also crucial when capturing your images. Ideally, you should shoot for the same light that you would choose for your normal photography, and if you are shooting a dome to light and use the reflections for a render, it should be captured at the same time as you shoot your backplate photography.
When you have finished capturing your images, use your HDRI capture software or app to merge them and create the final HDRI dome. This process will take the multiple images you captured and combine them into a single image that contains all the lighting information of the environment. Once your HDRI dome is created, you can use it in your 3D software to light your scenes and give them a more realistic look. In addition to the equipment and steps outlined above, it’s also important to use a colour card, such as an X-Rite colour checker passport or a grey card, when shooting a 360° HDRI dome. These colour cards provide a standardised reference for colour and exposure that can be used to ensure accurate colour balance and white balance in your images.
Using a colour card is particularly important when shooting in challenging lighting conditions, such as bright sunlight or mixed lighting. By including the colour card in your shots, you can ensure that the colour’s in your images are accurate and consistent, even if the lighting conditions are not. This will make it easier to merge your images into a single HDRI dome, and will also make it easier to colour-grade your final images in post-production.
When using a colour card, make sure to take a photo of it in the same lighting conditions as your other shots, and use the image of the colour card to set the colour balance and white balance in your HDRI capture software or app. This will ensure that the colours in your final HDRI dome are accurate and consistent across all images.
In summary, using a colour card like an X-Rite colour checker passport or a grey card is an essential step when shooting a 360° HDRI dome. It provides a standardised reference for colour and exposure that can be used to ensure accurate colour balance and white balance in your images, making the process of merging the images into a single HDRI dome much easier and producing accurate colour results in the final image. This is a very quick beginner’s overview of the process of capturing a 360° HDRI dome. It’s by no means a right or a wrong way, as we all have different processes, equipment, and software preferences, but we hope it will help you discover the world of 360° imagery and CGI rendering.
Written by Carl Lyttle- CEO at Domeble
[maxbutton id=”1″ ]